Craft Room Layout: Worktable, Storage, and Workflow
Design a craft room around project size, worktable clearance, tool access, lighting, material storage, cleanup, and a safe start-to-finish workflow.
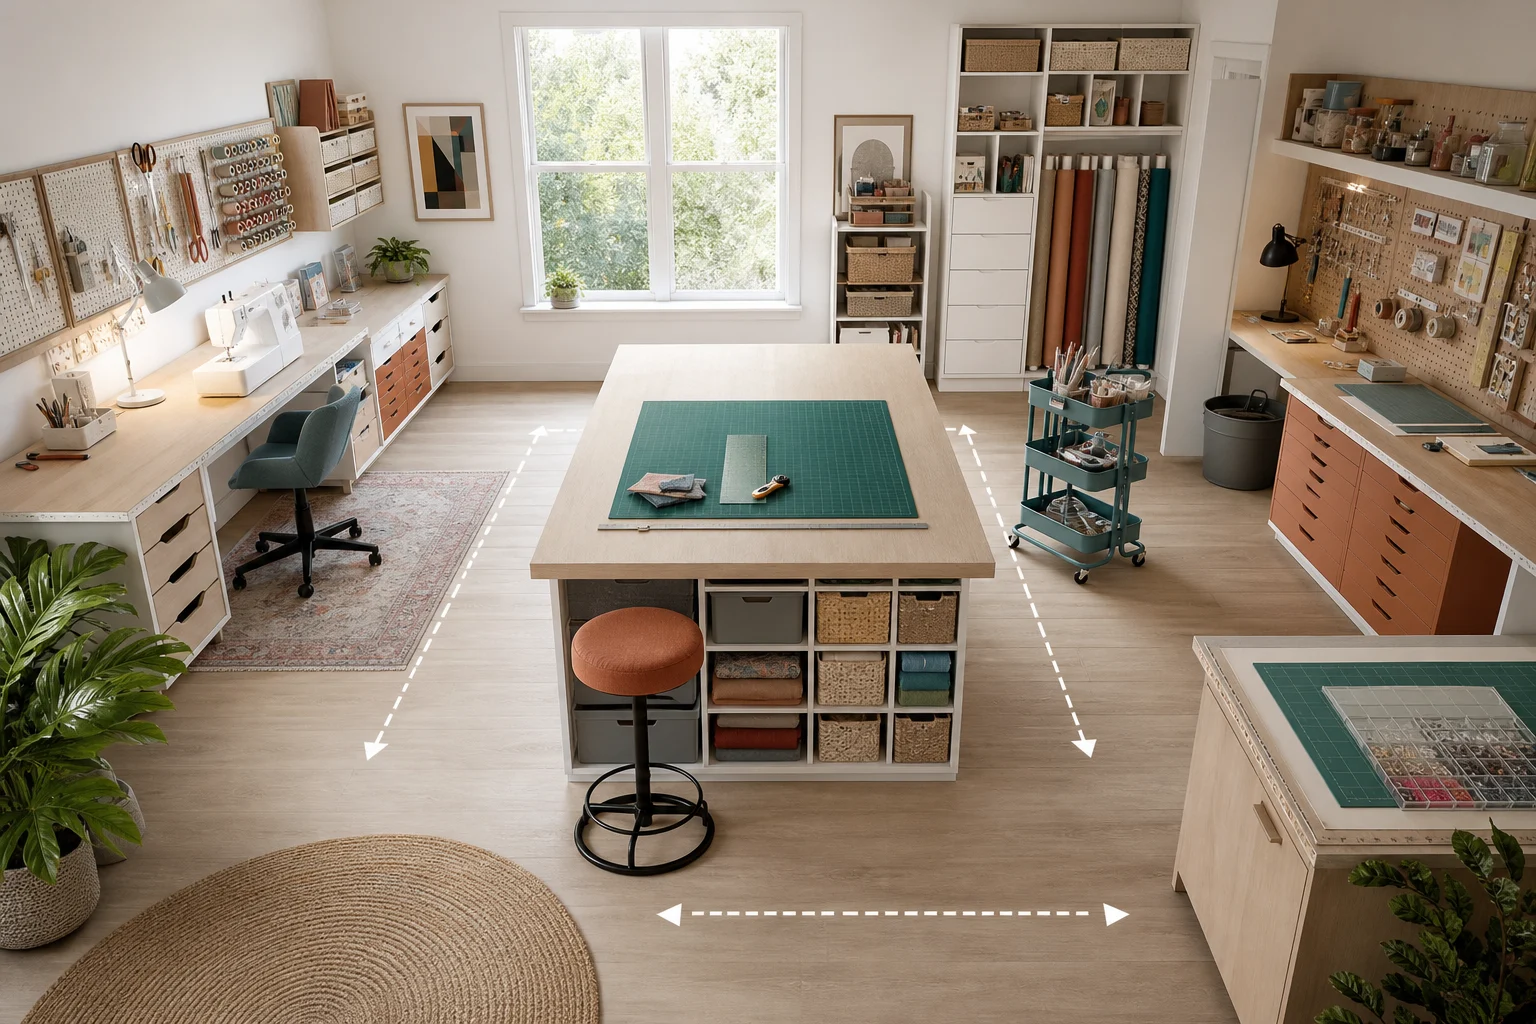
A useful craft room is organized around a project moving from storage to preparation, assembly, drying, and cleanup. Filling every wall with bins may increase capacity while forcing materials to cross the room repeatedly. Start with the largest regular project and the tools used most often, then build storage around an uninterrupted workflow.
Inventory Activities Before Furniture
List the crafts the room must support: sewing, paper cutting, model building, painting, jewelry, repair, gift wrapping, or mixed media. Record the largest material dimensions and whether work is seated, standing, wet, dusty, hot, or noisy. A cutting table sized for folded fabric differs from a desk for miniature painting.
Separate frequent supplies from archives. The daily zone should be reachable without a stool or moving another machine. Seasonal stock can use high or deep storage. Dispose of dried products and duplicate scraps before calculating cabinet volume.
Size the Main Work Surface
Choose table height from the primary task and users. Standing cutting often benefits from a higher surface than seated drawing. An adjustable chair or split-height workbench can serve more activities than one compromise height.
Set length and depth from the real project. A worktable that cannot support a full cutting mat or sheet creates inaccurate cuts and falling materials. Rounded corners reduce injuries in a tight room. If a table sits centrally, allow circulation on all required sides rather than centering it for appearance.
Protect Pull-Back and Pass-Behind Space
A seated workstation needs chair pull-back plus clearance for another person to pass. A central table needs room for opening drawers, rolling carts, and carrying a board without striking shelves. As a planning reference, roughly 36 inches (91 cm) around active standing sides is a useful starting point, with more where chairs or cabinets open.
Test the room with a project in progress, not with an empty tabletop. Add waste bins, power cords, drying racks, and material overhang. Keep the exit route free even when the largest project is clamped in place.
Create Point-of-Use Storage
Store tools where they are used. Scissors and rulers belong near cutting; thread and machine accessories near sewing; brushes and water near painting. Shallow drawers and pegboards reveal small tools better than deep boxes. Use closed storage for visually noisy backup stock and dust-sensitive materials.
Labeling can help in the real room, but organize by action rather than color alone. A rolling cart is effective when it has a parking bay that does not occupy circulation. Heavy equipment should sit at a safe lifting height on stable furniture.
Separate Clean, Messy, and Drying Zones
Paper, fabric, electronics, and finished work need protection from paint water, glue, clay dust, and sanding debris. Place messy work near a suitable sink or washable surface, with ventilation appropriate to the products used. Never assume a household fan makes solvents or fine dust safe; follow product safety data and professional guidance.
Reserve undisturbed drying or curing space. A vertical rack can use wall height, but shelves need enough gap for the thickest piece. Keep wet work away from sun, pets, children, and the main pass-through route.
Layer Lighting and Control Glare
Combine even ambient light with task lights at cutting, machines, and detailed assembly. Position light to avoid casting the working hand's shadow. High color rendering helps match fabric, paint, and thread. Diffuse window glare and protect light-sensitive materials from prolonged direct sun.
Check the task surface at night, not only in daylight. Flexible lamps should not reduce headroom or drag cords across cutting areas.
Plan Power, Data, and Heat
Map sewing machines, irons, cutting machines, printers, chargers, glue guns, task lights, and computers. Use properly installed outlets and circuits rather than permanent extension-cord chains. Keep cords away from blades, water, chair casters, and hot tools.
Give heat-producing equipment a noncombustible resting place and enough ventilation. Store batteries and chemicals according to manufacturer instructions. A clearly reachable shutoff routine is part of the layout.
Design Cleanup Into the Room
Place scrap sorting, trash, recycling, and a brush or vacuum near the messy zone. A sink needs a splash-resistant surround and storage that cannot be damaged by leaks. Do not wash harmful products into household drains; follow local disposal rules.
Choose a floor that tolerates chair movement and is easy to find dropped pins on. Highly patterned rugs can hide blades and snag rolling furniture. Use mats only where their edges will not become trip hazards.
Model a Complete Project
Lay out table, chairs, open drawers, wall storage, cart parking, drying racks, bins, machines, and material lengths in the Aedifex room planner. Walk through retrieval, cutting, assembly, finishing, drying, and cleanup using the 3D demo perspective.
Use the interior planner to compare durable surfaces and light-reflective finishes without sacrificing accurate color work.
Craft Room Checklist
- Define regular crafts, largest projects, and safety needs.
- Match table height and size to the primary work.
- Include chair pull-back, cabinet openings, carts, and material overhang.
- Store frequent tools at their point of use.
- Separate clean, messy, dusty, and drying work.
- Provide layered lighting with glare and shadow control.
- Plan safe power, ventilation, heat, and chemical storage.
- Keep cleanup tools and the exit route available mid-project.
After the workflow survives a full-size test, register to save the layout and document where mobile equipment parks between sessions.