Knife Blocks Under Cabinets: Straight or Angled Slots?
Choose a straight-slot or angled knife block by checking the longest knife's full withdrawal path and the counter space in front.
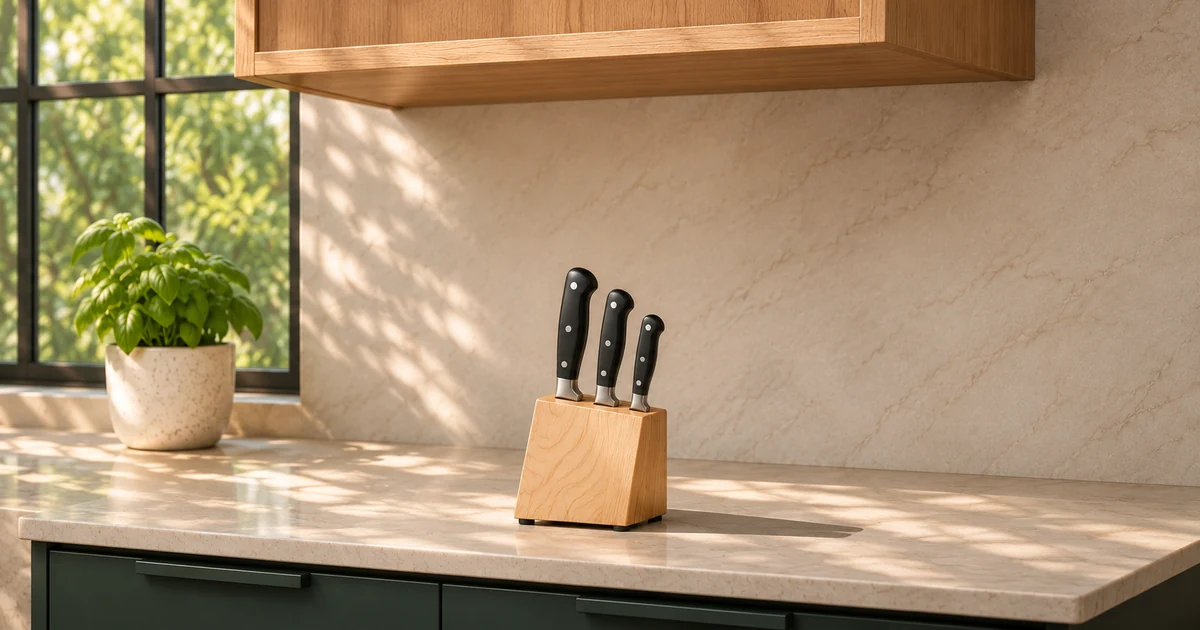
Knife block withdrawal paths
Both examples place 220 mm seated handles below a 500 mm cabinet underside. The red A path rises 300 mm and overlaps the cabinet by 20 mm. The green B path rises 200 mm and moves forward 180 mm, leaving 80 mm overhead.
Compare the paths in the 3D scene before comparing the blocks' silhouettes. Turn to the side to see how the straight path in A reaches the same cabinet from underneath. Then look down on B to see the additional 180 mm of forward movement. Put a tape mark on your counter for that front reach and check what normally sits there. Use the two observations separately when asking the seller about an angled slot. One is the highest handle position along extraction and the other is how far the hand and knife must move forward before the knife is clear.
Which blocks are worth keeping on your shortlist?
Keep a straight-slot knife block on the list when your longest knife can clear the lowest overhead obstruction in the way the maker specifies. An angled block deserves a look when overhead room is tight and the counter in front can stay clear during prep. Compare both at the same proposed position, with the same knife. The nicest-looking product photo tells you very little about either check if it shows the block empty on an open counter.
| Candidate | Keep it when | Set it aside when |
|---|---|---|
| Straight slots | The full upward movement fits, and the front counter is valuable prep space. | The hand or knife overlaps a light, valance, cabinet, or door along the permitted path. |
| Angled slots | The slot direction is documented, and its overhead and forward paths both stay open. | The route overlaps a sink rim, appliance, or occupied work area whenever you would fetch the knife. |
| A different counter position | You can keep the block stable and use it without crossing another task area. | The base would straddle a seam or edge, or the spot would be within children's reach. |
| Any listing with missing measurements | The seller can identify the exact model, slot, and missing dimension. | The only evidence is a body height, a slot count, or a photo taken without a scale. |
Read dimensions in the order they affect your purchase. First check the exact slot for your knife, including any published limits on blade length, width, and thickness. Then find the height with the knife seated and the movement required to clear the slot. Body width and depth tell you where the base can stand. The top of a stored handle, the space a hand occupies, and the furthest point reached during withdrawal each answer a different question.
A listing can be accurate and still be incomplete for a shelf-bound installation. A height might refer to the empty block, to a set with its supplied knives installed, or to the box as shipped. Treat each of those as a different dimension. Write down the measurement reference as well as the number. If you only record a height and a product name, two equally plausible interpretations can send you toward different purchases.
This guide is for planning kitchen storage and comparing products. Keep real knives safely stored throughout the layout exercise and use a blunt cardboard template or documented dimensions. Follow the actual product instructions for intended fit, placement, and use. A layout mock-up shows where things overlap. Assess grip, friction, block stability, and operation from the actual product and the maker’s instructions.
Build the shopping list around the knives you actually store
List the kitchen knives the block needs to hold on an ordinary cooking day. Separate required slots from conveniences such as a spare slot. For each required knife, write down its overall outline or documented dimensions and which slot the seller says it fits. Overall length helps represent where a handle and tip could be at the same time. Blade length answers a different question about insertion and the slot's supported range. Keep both definitions next to the figures so you can compare answers from different sellers.
Start with the longest knife you will regularly store. Use that same knife for the straight and angled comparisons. If a seller only provides a diagram of a supplied knife, check whether your own knife has comparable dimensions and whether the manufacturer lists it as compatible. A handle with a different shape can sit higher or occupy more hand room despite a similar blade length. If the longest knife's slot is at the back and a shorter knife's handle sits higher or closer to the cabinet edge, mark both for review. Competing blocks can assign the same knife to holes at different heights and depths.
A slot count is a capacity figure. Look separately at the number of slots that can hold the knives you want, and where those slots sit. Give the cook's knife its own entry if it needs the one slot suited to a wide blade. For a mixed block, read the layout slot by slot. A slot that opens vertically and one on a sloped face can have different withdrawal paths on the same product. A long tool in a neighboring slot can also change the space available for a hand even when both items fit their individual openings.
| Item on the list | Record before comparing two blocks |
|---|---|
| Daily knife with the longest outline | Exact knife and the assigned slot in each candidate. |
| Broad blade and bulky handle | Published compatibility, seating height, and adjacent space. |
| Other knives stored at the same time | Whether their handles occupy the area around the tested slot. |
| Counter location | Lowest obstruction, stable base area, and normal work area in front. |
| Evidence | Model identifier, source, and any missing measurement. |
Take a moment to describe what happens near the block before dinner. A cutting board, ingredient bowl, or draining rack may appear in that corner as soon as work starts. A cabinet door that stays closed in product photos may be open while somebody takes out dishes. That ordinary sequence is part of the storage brief. It gives the angled candidate an honest test and helps explain why an apparently emptier location can be more useful even when it is farther from the cooking area.
Group your requirements into product fit and location fit before comparing finishes or prices. Shortlist the models with a compatible slot for the longest knife before you spend time on cabinet measurements. If the knives fit but the route cuts across a task you do every day, staying on budget still leaves you rearranging the worktop. A small shortlist with the essential measurements answered makes a meaningful price comparison possible.
Ask for dimensions a seller can actually identify
Send a question that names the exact product and the knife or slot. Use the model or variation from the listing. A reply about a different finish may be relevant when both versions share a specification, so verify that the diagram identifies the construction you plan to buy. Similarly, a product family might include a compact block and a larger one whose pictures look much alike. The useful thing to confirm is which measured item the reply refers to.
A short message can cover the important points.
Could you confirm which slot on this model accepts the knife dimensions I have listed? Please send the dimensions of the base and the height from the bottom of the block to the top of the handle with that knife fully seated. Is there a side drawing showing the intended withdrawal direction and the distance the knife has to move before it clears the slot? Please say which dimensions refer to a supplied knife.
Ask for the reference points on any number. For the stored height, the worktop is the bottom reference, or it will be when the block is installed as instructed. Ask whether the dimension includes the feet if the model sits on feet. For an angled block, ask whether a drawing shows the additional rise and the forward travel from a stated point, or gives only the length along the slot direction. If the seller provides a diagram with start and end positions, make sure the end shows the knife fully clear of the product as specified. A line that stops while the tip is still inside the block describes a shorter movement.
A seller may be able to confirm the intended slot and seated position but have no movement drawing. Save that partial evidence and write down the remaining question. Where the intended direction is documented and you have enough geometry for a cardboard slot mock-up, record the mock-up as your estimate. If the tip position or withdrawal direction is missing entirely, set the candidate aside while you seek clarification. A vague assurance that the model fits under most cabinets contains no reference to your cabinet or your knife.
Use the same wording for comparable product replies. If one shop gives body depth from the back of the base and another gives draw distance from the opening, enter both with their original labels. You can translate them to the same counter reference later. Record units with the numbers, especially if one drawing is in inches and another uses millimetres. Keep the seller's original numbers and note any conversion separately. The precision you write down should reflect the precision of the drawing or your tape measure.
Make the question about your circumstances narrow enough to answer. If you are using knives bought separately, give the maker's dimensions and request compatibility for the slot alongside the height question. If the listing gives a single assembled height for a populated set, ask which handle reaches its top and where it sits. You might find that the height is useful for one slot and that a second slot still needs its own sketch. The goal is enough geometry to compare two products under the same cabinet, with uncertainty attached to the right row.
Map the usable counter before choosing an orientation
Draw a simple side view of the wall, counter, cabinet, and block position. A rough sketch with measured labels is enough. Establish a common reference from the worktop for height and from a clearly identified base corner or wall line for front distances. If you mark a point from the wall, account for the countertop backsplash or any gap behind the block. When you later move the block forward, keep the original counter drawing and label the new base position independently. This makes it easier to see the front area you lose.
Measure from the top of the counter where the base would sit to the underside of the cabinet. Then look for objects that hang below that plane. Include an under-cabinet light, a valance, trim, an outlet fitting, or another object if the hand or template would pass beneath it. Measure where the object begins and ends as well as how low it hangs. A fitting that sits beside the withdrawal path can be drawn in plan view. One directly over the required slot may set the controlling height even though the cabinet above the rest of the counter is higher.
Take the same measurements at the position for a second candidate. Wall units can step in height, and a long unit may have a light at one end. An angled face can also place the slot opening further toward the front even when both bases align at their rear edges. Where the opening moves horizontally, a single minimum overhead height is a useful first screen if it covers the entire corridor. To refine that screen, map the profile of the cabinet and obstacles along the actual route. Confirm the whole path even if the highest point is already beyond the front edge of the cabinet.
Take a second look with nearby doors in their normal operating states. A cabinet door can change the working boundary while someone takes out a plate. The handle of an adjacent appliance or cabinet may intrude from one side. A large bowl or cutting board can hide a low obstruction in the front space. If you regularly use this station together with another person, mark where each person tends to stand and move. Keep the route away from shared traffic, and consider a different stable storage position when it crosses into a second person's work.
Measure the usable base area as its own rectangle or outline. Keep the entire base on a stable, level surface compatible with the manufacturer's placement instructions. Work from the actual supporting surface at the proposed location. A back trim may push it forward. A seam, edge, or sink cutout can reduce the continuous surface available to the feet. An offset from the back of the counter changes both the block footprint and the point from which the slot route begins.
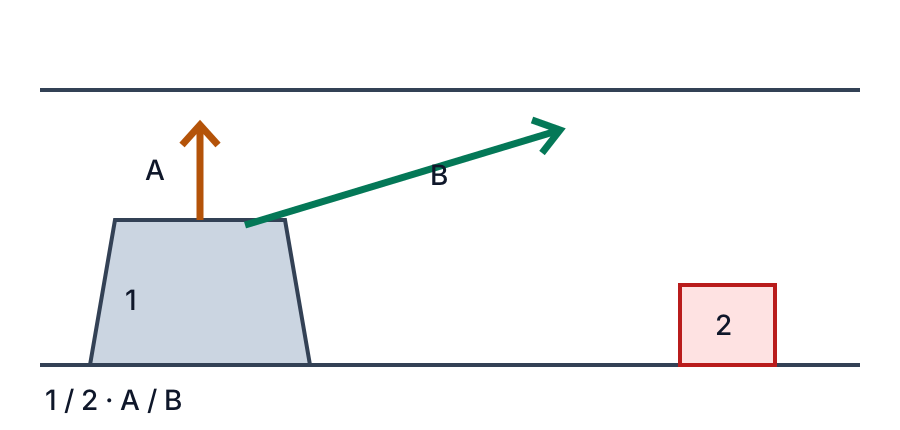
The schematic holds the block at the same position (1) and illustrates direction without a measurement scale. Route A uses space above the block. Route B travels toward the front obstruction (2). A sink rim or an appliance can occupy that space even when the top of the cabinet clears the handle. If you move the block forward to get beyond a light or trim, plot a fresh path and the remaining prep area on your drawing. Moving the block also changes its distance to the front edge and the appliances on either side.
Keep two records, one for overhead and one for the front
Give each product and position its own line. Two candidates can share a cabinet measurement while using different seated heights or rise values. If the vertical clearance was measured at the front edge at one location and behind a valance at another, label the locations so each figure stays with its own route. The record also needs the knife and slot because the same body can give different answers depending on where the knife is stored.
| Field | What to enter |
|---|---|
| Overhead boundary | Counter to lowest obstruction on the actual route. |
| Stored height | Counter to top of the handle when fully seated in the selected block and slot. |
| Additional vertical rise | Extra height needed by the assumed movement, using the same reference. |
| Trial allowance | A separately chosen amount to keep the comparison away from exact contact, with the reason. |
| Forward path | Extent and position of the moving hand and template, measured separately. |
| Occupied counter | Full block base and the objects usually in the front workspace. |
Use the same unit for the whole table. The overhead calculation subtracts the stored height and additional rise from the applicable boundary. Its raw remainder describes the gap in the simplified model. Subtract the chosen trial allowance to see whether the candidate retains any balance under your assumptions. Where the hand or a different portion of the knife rises higher than the handle reference, show that envelope in the added rise or check it separately against the drawing. Add a hand outline at the relevant points to see how much space it needs.
For the forward check, identify the initial position of the measured point. Then draw the swept area of the full cardboard outline and the hand location. It matters whether a distance starts at the slot opening, the handle, the tip, or the back of the base. A movement from one starting point may place the forwardmost part of the object much farther into the worktop. It also matters where the obstruction is vertically. The side of a tall appliance may intersect the route while an equally deep flat board lies below it, though the board can still take away your standing or prep space. Look at both the side view and the view from above.
Use a consistent recording method for the two candidates. An overhead result of zero means the chosen amounts consume the entire boundary. If the zero is after the allowance, the allowance is fully accounted for and there is no further balance. Treat the result as a cue to verify the assumptions with the side drawing. If it is zero before the allowance, the model gives exact contact for that reference before extra room is considered. Distinguishing those cases keeps a borderline result from looking better than a measured gap.
A blank cell is useful. It tells you whether to remeasure the kitchen, ask a seller, or run a safer dry layout with a dull template. A zero has a different meaning and can change the calculation. Keep uncertain measurements in pencil or add the source and an explanation. You can fill one line per candidate and keep all three types of evidence together using the plain-text record.
Download the knife block comparison worksheet
Work through the 500 mm example before entering your own numbers
The following is a hypothetical comparison. Both candidates sit beneath a 500 mm boundary and their stored handles reach 220 mm above the worktop. That leaves 280 mm between the stored-handle reference and the overhead boundary. Path A rises another 300 mm. Path B rises another 200 mm and also travels 180 mm forward. These numbers belong to the illustrated paths. Use the model and slot dimensions for your own shortlist.
| Route and rise | Raw remainder | After 30 mm allowance |
|---|---|---|
| A, straight, 300 mm | 500 − 220 − 300 = −20 mm | −50 mm |
| B, angled, 200 mm | 500 − 220 − 200 = 80 mm | 50 mm |
Route A exceeds the boundary by 20 mm before any allowance. Reserving the separate 30 mm leaves a balance of −50 mm. Route B has 80 mm of raw overhead room and 50 mm after the same allowance. For this one comparison, the allowance keeps the trial away from exact contact and can represent some uncertainty in preliminary measurements. Pick and record the amount that makes sense for your planning conditions. Use the manufacturer's instructions for placement and product requirements.
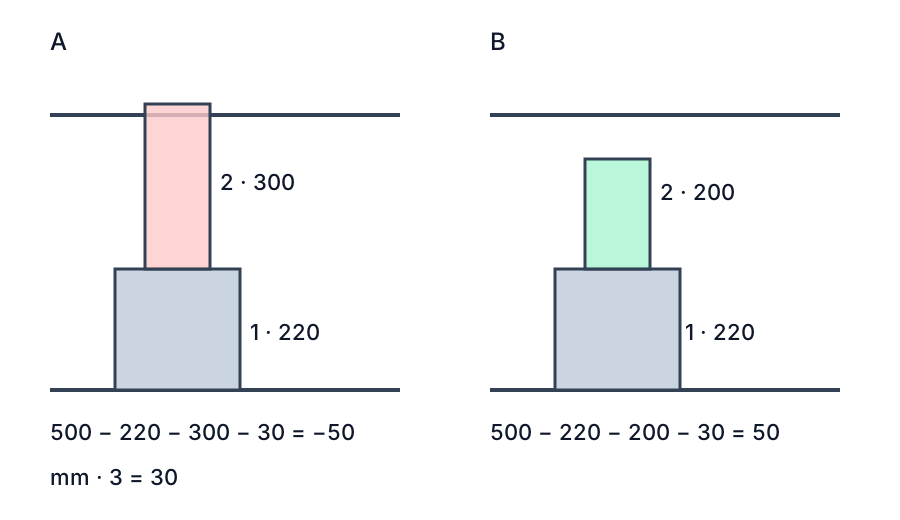
Use the withdrawal height calculator to compare the overhead entries or type in your own documented dimensions. The two presets illustrate the assumed vertical movements. For a different block, measure or estimate its stored height independently and enter the rise for that product. Carry the 180 mm forward assumption to the separate front check. Use the separate front record for the route and the product diagram for the correct slot.
Imagine there are only 150 mm to a tall obstruction across the same forward line, measured from the same reference used for the path. If the height ranges overlap, the route reaches 30 mm into the obstruction even though the overhead balance is positive. Now suppose a different position gives 210 mm to the nearest obstacle along that same line. The modeled forward interval then has 30 mm left before extra room for the hand and details of the full outline are considered. Both are hypothetical one-dimensional checks. The diagram and template help decide whether you are comparing positions in the same corridor.
If a cabinet light lowers the overhead boundary at the crucial point by 40 mm, the same angled example has 40 mm of raw vertical room and 10 mm after the chosen allowance. This is why you measure to the light when it is in the path. The best result for one row in a table can change when the block moves or when a different slot sits directly under the lowest fitting. Update only the inputs that actually changed and record the new position next to the result.
Compare the occupied space with a blunt template
Set up the mock-up after the real knives are safely stored. Use a rounded piece of stiff cardboard to represent the complete outline, with a visible line for the handle and the tip area. Take dimensions from a reliable drawing or other existing record. Form a simple block footprint with a cardboard box or cutout and mark the exact location and orientation of the slot. For an angled model, position the cutout or reference line to match the direction shown in the product information. A photo can help identify the face with openings. Look for a dimensioned drawing to establish the distance or angle.
Keep the worktop layout representative. Begin with the cooking board, sink accessories, or other appliances in their usual places. Mark the cabinet underside and any local trim on the sketch at the correct heights. If the cardboard mock-up represents an open-ended guide, follow only the direction documented for the product, from the seated outline to the point where the outline is fully clear. Observe where the blunt tip and the representative hand space pass from the side and above. Use the shape to compare occupied space and keep the exercise at the level of kitchen planning.
Look at the intermediate positions. In a side view, the start and end outlines might clear a shallow obstacle while the middle of the travel crosses it. A trim strip near the front of a cabinet is one example. In plan, a diagonal body orientation can make a neighboring object intrude into the path even if the direction arrow appears to miss it. If a box or fitting moves into range when an adjacent door opens, place the obstacle in that ordinary position for the dry layout. Keep the template comparison repeatable by marking the chosen base location before you move anything.
| Trial | Keep this condition constant | Compare this result |
|---|---|---|
| Straight and angled in one spot | Same knife, fixed obstacles, and usually occupied worktop. | Where the first conflict or smallest gap occurs. |
| One block in two spots | Same knife, slot, and product direction. | Which location leaves a clear route and stable, usable counter area. |
| A full block versus a single represented knife | Same base and target slot. | Whether neighboring handles occupy the space around the selected one. |
| Counter with a cabinet door open | Same normal kitchen setup and slot. | Whether another routine action interrupts access. |
Take one photo of the mock-up or make a sketch with dimensions for later comparison, with the actual knives still put away. Write what the mock-up established, such as whether the outline and an appliance intersect in normal positions. Also write what depends on product evidence, such as seating depth or the required endpoint. A template is a geometric planning aid. Grip characteristics, withdrawal friction, and how a loaded block behaves depend on the real item and the manufacturer's directions.
Read the common listing traps before comparing prices
Height may mean the item, the set, or the package. An advertised height becomes useful when you know its reference and configuration. Suppose one seller gives a body height of 190 mm and another reports 220 mm with a knife installed. To see which one occupies less space in use, ask for both seated values with the same knife dimensions and a comparable slot. Also check whether a top panel or a neighboring handle reaches above the one shown in the listing.
Blade length is only one dimension of fit. Two knife outlines with the same blade length can have different widths near the handle or different thicknesses at the point that enters a slot. The seller's compatible range or slot drawing comes first. A knife that sits differently from the model shown may change both the stored height and the distance needed to clear the slot. Record different seating as unknown until the maker or seller confirms it for that model.
A side photo can hide direction. The angle of the opening face and the angle of the slot axis can differ. Confirm the indicated withdrawal line, including whether it heads forward or to the side in your proposed orientation. Turning a block changes the orientation of the base and the route relative to the wall, sink, and neighboring appliances. A product designed for a specific placement must be considered in that placement. Use a different model or a suitable position when its directed path is unavailable.
A bound on movement needs a reference. A seller might quote the length along the slot, a vertical projection, or a distance from a tip reference. All are plausible answers to a short request for clearance. The overhead calculation needs an extra vertical rise, and the front check needs a forward extent from a specified point. If the drawing gives only overall movement length, ask for its projections or for an adequate side drawing. Enter the dimension matching the requested direction once you have its reference.
A small footprint can come with a long draw in front. Base depth tells you how much continuous counter supports the block. A forward-sloped route may extend much farther than that footprint. Evaluate the permanent footprint and the temporarily occupied path independently. In a wide prep run the trade-off may be easy to accommodate. In a shallow corner of a busy kitchen, a block that looks compact when stored can still interfere with regular work.
Returns and dimensional evidence. Return terms may affect whether you accept uncertainty around a finish or exact footprint. Keep looking for a drawing or a confirmed measurement when the route matters to the purchase. If a specification remains unclear, keep its uncertainty in the shortlist even if the price is attractive. Explicit evidence that the exact model supports the knife and the intended direction is worth more than an unqualified claim that a particular kitchen accessory is space-saving.
Choose for the counter you use most days
A long back run with clear height and a busy board area
The cabinet underside is fairly uniform and there is overhead room along the entire marked path. The front half of the worktop fills with a cutting board, a mixing bowl, and ingredients. A straight model is a sensible first candidate because its needed overhead space can already be checked and access need not depend on clearing the area in front. Confirm the tallest required handle, the permitted extraction direction for each relevant slot, and the reach from the normal standing position. Compare base depths and remember the space taken by the backs of large handles.
When choosing between otherwise suitable products, look at how much counter stays useful once the base is in place. A smaller block that fits the knives you own can free a continuous portion of the back run for the bowl or other tools. The regular layout is the right reference, even if the entire worktop can be cleared for a product photo. Where a movable appliance sometimes occupies one side, keep that appliance in the drawing and confirm you can use the storage spot on those days too.
Low cabinets along a dedicated storage end
There is under-cabinet lighting, but the counter near the end of the run mostly holds either the knife block or open space. Compare an angled candidate if the manufacturer documents its direction and the corresponding slots. A more forward path can avoid a narrow overhead zone, provided the hand and tip stay within the available corridor and away from the counter edge or shared traffic. Measure where the lowest part of the light lies, because a small projection can govern part of the path regardless of the wider opening elsewhere.
If you try moving the block a little forward in the drawing, measure the front route from its new position. The available distance until the next obstruction will usually change when you shift its reference point. Keep the entire base supported and check the space required alongside it. This comparison can favor a model that needs more static depth but has its slot opening positioned advantageously. It can also favor a suitable location just beyond the cabinet. The template makes the positional trade visible before you order.
A short worktop between the sink and an appliance
Here the permanent base may fit in a small patch while both available withdrawal corridors are constrained. A draining rack may occupy the front route and a cabinet fitting may obstruct the upward route. A dish, a towel, or a bowl set down temporarily can raise the effective obstacle much higher than the rim alone. Test this section in its normal occupied state and record whether access depends on moving those things every time. If it does, look elsewhere in the kitchen even when the block technically fits on the counter.
An extension of the same counter or another dedicated worktop location may preserve both usable prep space and reliable access. Check level support, normal adult reach and safety around children before treating that second spot as viable. If every counter position puts the block in shared traffic or leaves insufficient space, a purpose-designed storage product elsewhere may be a better shopping category. Check its own instructions and measure the relevant door, drawer, or other boundaries independently.
A shared prep zone next to frequently used cabinet doors
Cabinet height may look generous while the kitchen is empty. During dinner prep, however, someone opens an upper cabinet or uses an appliance past the block. Ask where the door and each person are likely to be during a normal task. An angled path that moves toward a second person's area and a straight path that intersects a door both change the practical decision. Move the candidate's outline to a place where access can be independent of those movements, then repeat the main tests for the new position.
In a small household kitchen, a few minutes of replaying the normal order of tasks with cardboard and an empty counter sketch can expose boundaries you would miss in a static measurement. Start with storage, then position the common equipment and identify which doors are open. Retain the position that consistently keeps the route clear while the rest of the worktop remains in service. Your shopping decision has a clearer basis once you can name the slot for the longest required knife and the part of the counter its route will use.
Give a borderline fit a second measurement
A narrow overhead balance can be the result of several uncertain readings. Suppose you measured to the cabinet with a tape held near the backsplash, while the relevant slot sits forward beneath the lip of the light. Measure at the slot and along the line leading away from it. Record which reading actually controls the route. Do the same when the worktop slopes slightly or a mat raises the block relative to the surface used as the zero point. Use the mounting or placement instructions to establish the intended support before carrying a measurement forward.
For a comparison at the front, look for the widest point of the obstacle at the height at which the moving outline could pass. An appliance handle may project farther than its base. A rack may have an open lower frame and a loaded upper tier. In a plan sketch these each look like a single rectangle, so add a side note about which part occupies which height. This is also useful when a route runs near the edge of an obstruction. A change of orientation can move the hand sideways even when the front distance looks generous on paper.
Consider making two entries for the same model when a measurement only comes as a plausible range. In one, use the more restrictive documented geometry. In the other, use the more favorable geometry, giving the range and source. If both entries lead to the same decision, the remaining ambiguity may have little bearing on your shortlist. If a small change reverses the outcome, verify that input before deciding. Recheck the seated height and vertical rise as a pair when the seller's range comes from different knife shapes or slots. Mixing a favorable seated height from one slot with a favorable rise from another would make up a combination that may not exist.
If a route clears with a few millimetres in the sketch, state where that gap was measured. The highest point, the place with the closest obstacle, and the point with least hand room can be at different stages of the movement. A useful note identifies the limiting stage and the nearest object, so you can revisit that location if the countertop changes. You can also retain a second, fully measured position for the same product if an appliance or rack may move there later. Each position requires its own vertical and forward entries.
A small modeled gap is a poor reason to infer that a real product allows an alternative direction, or to assume that a minor obstacle can be ignored. Keep the geometry, product restrictions, and daily worktop conditions in the record. If two stable locations are available, the location that stays clear across their ordinary changes is usually the easier one to explain and keep using.
Make the purchase from a record you can review later
Give each surviving option a brief entry with the model, included knives if applicable, exact slot, proposed position, vertical balance, and evidence for the front route. Add the everyday worktop consequences in a sentence. A comparison between two viable blocks may turn on whether one takes a small strip of otherwise unused back counter, while the other needs a corridor through a prep area. This is the moment to weigh finishes, useful capacity, cleaning instructions, and price for the candidates that have adequate dimensional evidence.
If two candidates still look equal, identify the assumption with the greatest effect on the recommendation and recheck it. A seat-height difference may matter more than a small difference in the footprint when a cabinet valance sits close above the slot. A deep appliance side panel may matter more than a modest increase in overhead room when the angled path has no alternative direction. An unresolved specification should stay visible until you have a drawing, a clear answer for the exact model, or enough documented geometry for a meaningful mock-up.
Your finished entry can be short. One useful record might say that a straight model stays on the list at the left-hand position with the long knife in the specified slot, because the upward clearance is documented and the board area remains in regular use. For an angled option, the note can describe the dedicated open area in front and the cabinet light you included in the overhead measurement. Store the seller's diagram and your notes together so a different product variation or a layout change prompts the relevant checks again.
Before you place the order, read the slot requirements back against your knives, picture the countertop as it is used, and make sure the proposed position leaves the whole base stable and out of children's reach. If a low fitting, sink accessory, or door makes either route unavailable, change the position or cross the model off. The result of the comparison should be a specific model and slot in a specific place, backed by dimensions you can trace to the kitchen and the product.
TRY THE EXAMPLE
Compare the vertical withdrawal envelope
Enter the counter-to-obstruction height, stored block and handle height, additional vertical rise and a separate trial allowance in millimetres. The extra rise must come from the chosen product and movement.
Allowed range: 1–2000 · Step: 1
Allowed range: 1–1000 · Step: 1
Allowed range: 0–1000 · Step: 1
Allowed range: 0–500 · Step: 1
A negative remainder means the selected allocations overlap. Change the inputs or the proposal.
- Remainder before allowance
- -20 mm
- Balance after allowance
- -50 mm
500 − 220 − 300 − 30 = -50 mm
Check the chosen product’s permitted slot direction, full forward path, hand and tip, and the block’s stability separately. The vertical result does not certify knife handling or installation.
Teaching assumptions, not a surveyed home or a construction check. Results describe this simplified geometry or budget only. Changes stay on this page and reset on reload.