Hair Dryer Drawer Storage: Fit, Cord and Access
Compare two hair dryer orientations in a bathroom drawer, then check the cord, drawer opening and safe cooling before choosing a storage position.
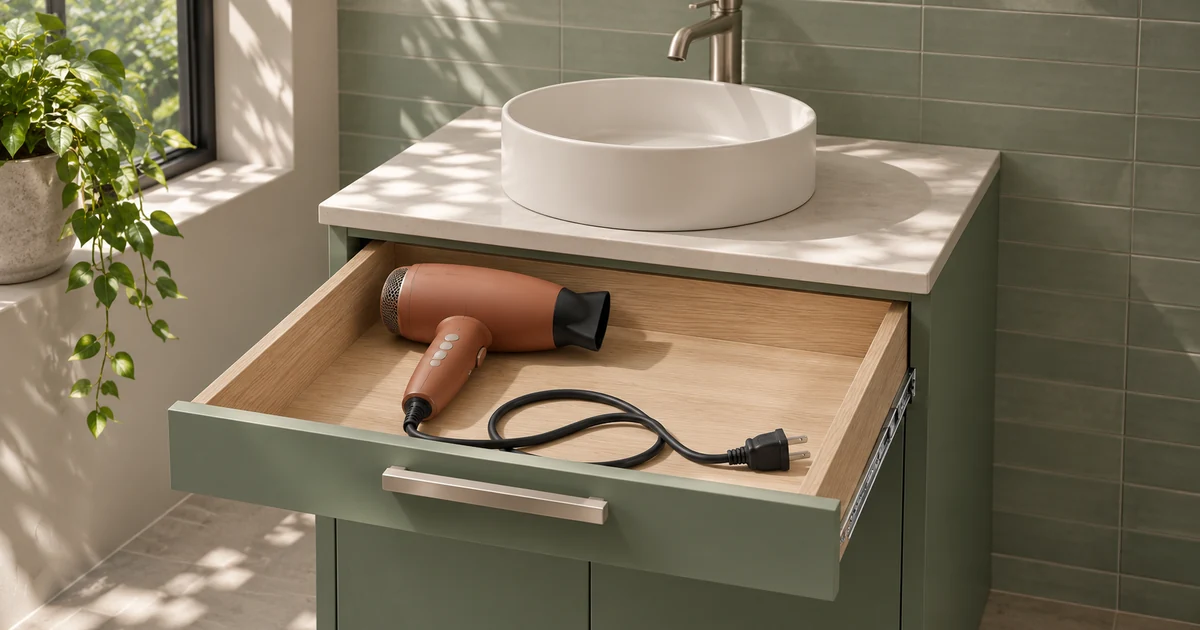
Two hair dryer orientations in a drawer
With the same 25 mm left and 35 mm rear offsets in the 500 × 350 mm drawer, A leaves 245 mm right and 105 mm front. Rotating the envelope in B leaves 265 mm right and 85 mm front, before cord and handling space. The model adds a fixed vanity lip and two illustrative plug positions.
A morning drawer has to work in both directions. Tonight, after the dryer is unplugged and cooled as its maker directs, you need somewhere dry to lay the appliance and its cord. Tomorrow you need to lift it out without dragging the plug or knocking the drawer front. If you can only do one of those things, the layout is unfinished. Follow a pair of routines through the vanity before dividing up the drawer.
The following measurements are hypothetical teaching inputs in millimetres. They do not represent a tested appliance, a required clearance or electrical approval. Unplug and allow the device to cool as directed by its manufacturer before handling or storing it. A normal closed drawer is storage, not an operating enclosure for a powered or hot appliance.
Before putting it away, follow the evening routine
The checks in this section use the actual dryer only once it is unplugged and cooled as its manufacturer directs. Use a light paper outline for early comparisons and keep the test area dry. Decide where the appliance can rest according to its instructions in the time between use and storage. A suitable resting point, the direction of the cord and the route to the drawer all matter, especially if a second person needs the basin during that interval. Do the physical storage trial with the appliance at a safe temperature.
When the time comes to store it, notice the direction it is held. Picking it up by the grip might present the nozzle first to the drawer. Turning it so the nozzle points sideways may be perfectly possible once the container is open, but require you to change hands beside the sink. Sketch the start, the entrance and the resting position before worrying about organizer colours. If you use a nozzle most mornings, decide whether it stays on for storage according to the appliance instructions. That decision determines the object to measure.
If two people share the appliance, record where the person putting it away stands and how the next person finds it. A cabinet user generally starts while holding the dryer, so they need to operate the handle of the drawer or set the appliance safely down first. Someone taking it out needs enough space to carry both the body and cord. A taller user may easily see the compartments in a low drawer; another user may need a convenient grip without sight of the back. Compare the resulting sequences before picking an orientation.
Use the floor plan to choose an initial resting footprint
A rectangular approximation helps rule out a placement before buying an organizer. Suppose the usable drawer floor is 500 mm wide × 350 mm deep, after excluding internal fittings. A dryer's outer bounding rectangle is 230 × 210 mm in orientation A. Its left edge is 25 mm from the drawer's left boundary and its back edge 35 mm from the back boundary. The remaining space on the right is 500 − 25 − 230 = 245 mm; at the front it is 350 − 35 − 210 = 105 mm.
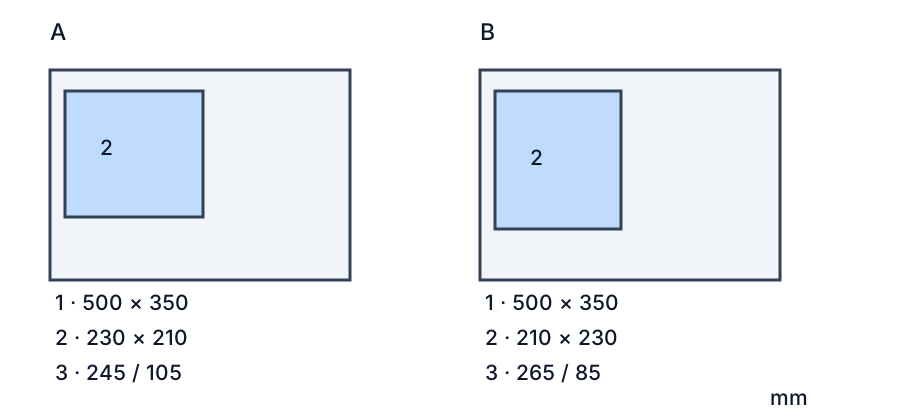
Open the full-size drawer comparison
In the figure 1 is the usable drawer floor, 2 the simplified dryer rectangle and 3 the right/front remainder. Keeping the same offsets, turning the rectangle gives 210 × 230 mm in B: right remainder 500 − 25 − 210 = 265 mm, front remainder 350 − 35 − 230 = 85 mm. B gains 20 mm at the side but loses 20 mm at the front. Neither remainder includes the cable, plug, organizer walls or hand movement. If those sizes are unknown, record them as unknown; do not allocate the entire remainder to a divider.
Use the drawer comparison to change the floor dimensions, object envelope and its left/back offsets. Negative values in the result mean the chosen rectangle crosses a boundary; zero means contact with no tolerance. A positive number only fits the stated rectangle in this simplified plan. It does not establish that the drawer closes, the cord fits or the appliance can be lifted through the opening.
Count the available width and depth where the appliance will sit. Exclude uneven hardware that actually occupies that plane. Measure from the nearest continuous left boundary to the right boundary at several depths, and from the back to the front at more than one place. A vanity drawer around a pipe may have a large advertised width but only a narrow continuous rectangle next to a recess. Draw that piece of usable floor, then draw any other zones independently. Combining two disconnected floor patches into one width can create a footprint that has no real place to sit.
Mark which items must stay next to the dryer and which can move to another compartment. A filter tool may fit in a small tray, while an attachment needs its own outline. A folded towel drawn at its nominal size can occupy a taller shape if somebody presses it in loosely. Record a usual storage condition for everything you keep below the closing edge. If an object can roll against the dryer handle, consider whether the manufacturer permits an organizer that keeps it behind a suitable barrier. A sketch with an empty remainder has no reason to predict what a loaded household drawer looks like.
Put the empty rectangles to work
Read the example from the left and back boundaries first. The 25 mm and 35 mm offsets have been assigned, so they are already outside the 245 mm side and 105 mm front balances in A. Mark this on the plan with arrows. Sliding the body to one side gives that side less space and the other side more, but leaves the drawer width unchanged. If you move the body during comparison, change the offset in the interaction as well. Make the decision on the plan that represents where you would actually put it, including which way the cord leaves its body.
Suppose a dry plug and the leads in their approved storage shape take a strip 90 mm deep when viewed from above. This is a hypothetical measured region from a sample outline, with no effect on the example dimensions. If you propose a 5 mm divider across the front, the two together would require 95 mm of the available depth. A's 105 mm front remainder could leave 10 mm in that simple plan. B's 85 mm front remainder would be 10 mm short. Neither result predicts whether the cord sits low enough to close or whether the partition blocks the entry grip.
For a second arrangement, consider a separate side compartment 250 mm wide in the same hypothetical plan. With the original 25 mm left offset and 5 mm for a divider, A has 240 mm on the right after the divider. B has 260 mm. The 250 mm compartment would exceed A's side balance by 10 mm and leave 10 mm in B. It is useful to write these requirements as competing orientations. A could favour a front pocket while B favours a side pocket, and a pocket that works on paper may still be ruled out by the cable's exit point.
It is also possible to reverse the formula to size the usable drawer. If you need the 35 mm back offset, the 230 mm depth of orientation B and a protected 95 mm strip in front, the necessary rectangle there would be 360 mm deep. A drawer with 350 mm of usable depth misses that outline by 10 mm. Moving the appliance 10 mm toward the back would reach zero in the simplified calculation. That is only a useful candidate if the back of the drawer and cable outlet of the appliance still allow the new placement. Where the footprint just touches a boundary, try the actual stationary condition without pressing the cord or forcing the body into contact.
A new liner or organizer changes the model at more than one edge. For example, if an organizer's inside front and back walls take a combined 10 mm and its outside shape follows the measured 350 mm floor depth, the internal depth would be 340 mm. Reusing the original offsets within that tray would give A 95 mm in front and B 75 mm in front. If the organizer has a lip, this change could also reduce the hand's access above the organizer floor. Measure again from its inside surface and record the new boundary instead of subtracting an unexplained number from the previous plan.
Keep a short inventory of what each number represents. A side strip 245 mm wide may run along part of the body only. A front strip may connect across the entire width if it lies in front of the nozzle and handle. If you allocate a plug pocket and a divider that are both irregular, draw their actual outlines instead of reusing every number as the usable size of a full rectangular compartment. Items can compete for the same corner. When a dimension is unknown, keep it empty in the interaction until you can take it from the appliance, plug or cabinet drawing.
Try a drawing of a drawer with a missing corner
Suppose a vanity has an obstacle rising from the back right of the drawer floor. Represent it separately from the rectangular example: the outer drawer is still 500 mm wide and 350 mm deep, but a 160 mm wide obstruction occupies the rightmost portion of the rear 140 mm. The uninterrupted side of the back is therefore 340 mm wide. As the 25 mm left offset and 35 mm back offset put A entirely in that left region, the dryer footprint itself could remain in that position. The 245 mm previously indicated at the right is not a full-depth strip; part of it intersects the excluded back corner.
Draw the boundary along the front of the obstacle as well. In this example that leaves a continuous 210 mm of depth in front of the obstruction. A front pocket measured entirely within that depth might remain possible even if the back of a proposed side compartment crosses the enclosure. A cutout might also accept part of the lower plug outline under a raised section but block the user's grip from above. Measure each feature at the right vertical level before using its apparent floor area. These calculations describe an invented drawer, and a real pipe cover often has a different shape at different heights.
Give door hinges, runners and rounded corners the same treatment when relevant. A runner may be wholly beneath the drawer interior and have no effect on the usable floor. An internal fitting may project only near the top, which means it affects closure or lifting instead of the parked rectangle. Photograph or sketch the section and note its height so a future model of the drawer can put the cutout at the correct level. If the outline needs more than a rectangle, use the interaction to check one valid subrectangle and keep the detailed drawing beside it.
Observe where the cord starts
Draw the cord from its actual entry into the appliance. It may exit from the end of the handle, point sideways from a swivel or have a moulded support that should not be held in a forced position. Know the manufacturer's storage guidance and draw the cord first in a relaxed position. A loop drawn around an appliance outline can be geometrically possible but leave its first bend buried under the handle. Place a paper marker for the lead's exit and note which orientation sends it directly toward the intended separate pocket.
The plug is its own object. Include the body, any protective base at the lead, and the height and direction it occupies when resting. Plugs vary between markets and models, and a replacement appliance can have a different connection even if the body is the same width. If the lead remains attached, leave room to move the plug with the dryer without dragging it over adjacent objects. Recheck how it will sit when another person puts it away with the cable entering from a slightly different side.
Separate the plug from the leading edge of a drawer runner and the underside of the vanity frame. An internal panel can keep it away during storage but make the cable cross a high lip that meets the fixed cabinet at closing. A low profile plug compartment near the front might make it easier to pick up, provided it holds the natural cable shape and cannot interfere with the opening. A dry compartment inside the drawer can still be unsuitable if water sits above it or is likely to enter the opening during ordinary basin use. Assess the actual storage environment and follow the manufacturer and local electrical requirements.
A relaxed cord can have more than one stable shape. During a couple of ordinary put-away trials, note whether its loop stays in the space you assigned or tends to rise up when you release it. An elastic cord or shaped strain relief may take more space after several seconds than it did while held down. If any piece rises beyond the intended height marker, revise the compartment or move to a container with adequate room. Store and handle the appliance according to the manufacturer's instructions. Avoid a layout that requires closing the drawer against a cable to hold the cable in position.
Some drawer inserts favour tidy compartments but hide cables from sight. If you cannot see the part nearest the back while reaching in, try an outline of a lower tray or a change in orientation. Watch where the plug comes to rest before the drawer closes, rather than deciding on the plug pocket by its static photograph alone. Mark the lowest drawer edge, the exit and the plug on the same side sketch. If the product instructions call for a specific storage position, use that as an input while comparing the remaining arrangements.
As the drawer closes, watch the top edge
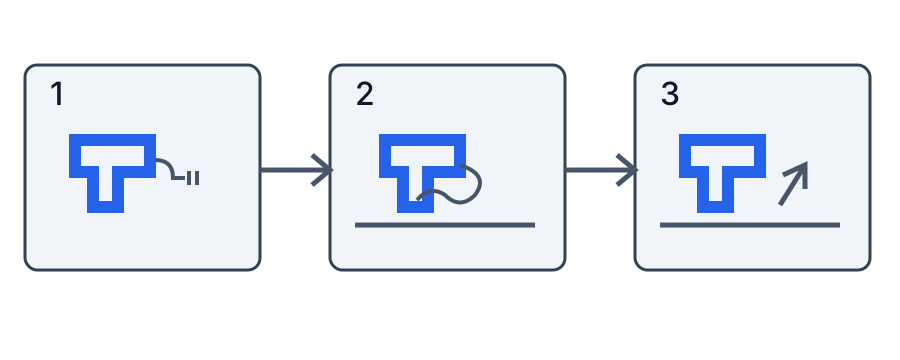
Open the full-size handling sequence
The numbers represent 1: unplug and cool according to the manual; 2: place the appliance and its cord in the open drawer; 3: lift it out. The arrows show order, not a verified path. Watch the rim, drawer opening and lowest obstacle above it as the handle rises. A drawer's internal floor can be wider than its entrance; an open drawer can also meet a door or a person standing at the basin. If the dryer must be twisted to clear the opening, check the full motion with the actual unplugged, cool appliance and stop if it catches.
Keep the cable's natural route separate from the dryer's rectangular envelope. Follow the product's storage instructions: do not tightly wind a cord around a hot body, pinch it in slides or close the drawer on a plug. A loose loop still needs a dedicated measured area. A partition that makes the plan tidy can make it harder to lift the handle or remove a nozzle, so compare a removable divider and an undivided drawer.
Take measurements with the drawer in its working positions
Measure the lowest opening at the front and the available height at the back when the drawer is closed. A fixed panel under the countertop, a sink bowl or a pipe cover may cut into one part of the envelope. Some drawer sides are taller than the fixed opening through which the contents pass. If the cabinet maker supplies a section, distinguish the drawer's internal height from the clearance above it. The practical storage height is the equipment's highest point at the position where it first travels beneath any fixed structure. Compare the placement of the main body, the plug, and anything that sits upright on the floor.
Make a cardboard marker for the highest part of the stored object before trying a full closing cycle. Keep all hands away from closing edges and use the marker gently only to see the relationship; stop when it touches. Do the same for the plug and naturally resting lead. A cable laid flat in a demonstration is likely to rise again if its natural curve is held only by hand. Use the product instructions and orient the cable so the arrangement works as stored without pressing it down. If the furnishings cannot accommodate this position, compare another position or container rather than forcing the drawer.
A drawer opened halfway and a drawer with its full designed travel can expose different lengths of floor. Capture the normal travel you can use from your standing space, then locate the backmost point of the appliance from the front of that opening. If a bathroom door or a nearby wall prevents full extension in ordinary use, record the actual accessible opening when somebody is going to retrieve the appliance. Do not alter stops or slides to make a test succeed. Consider a different drawer where the existing hardware provides its normal range.
If the drawer front is high, the grip might be accessible only behind it. Draw the first few centimetres of the lift in elevation and mark the hand above the handle. A horizontal turn may require raising one end of a long dryer while keeping the other end inside the drawer. That end can hit the upper rail even when the whole length fits flat on the floor. If you feel resistance during the cold, unplugged test, stop and locate what touched. Tilt and rotation are real options only if they are comfortable to repeat and keep the cable away from closing points.
Distinguish the hand opening from the resting height
Here is another hypothetical check used outside the plan calculator. Assume the lowest fixed edge that the assembly passes under sits 120 mm above the drawer floor. A body with a measured parked height of 100 mm gives a nominal vertical separation of 20 mm at that edge. If the plug and relaxed lead sit 128 mm high, they would exceed the opening by 8 mm if they passed through the same location. Putting the plug at a different depth can change where it first meets the edge, but the exact closure path still has to allow its full height.
Once the drawer is open, the hand needs to fit around the grip in addition to the parked body. If a hypothetical lift requires raising the 100 mm high assembly by another 45 mm beneath that same 120 mm edge, the path would reach 145 mm and cross it by 25 mm. Pulling the drawer farther within its normal range might move the handle clear of that edge before lifting. A better layout could place the handle in the exposed portion immediately. Make separate observations for raising the body, lifting its plug, and guiding the nozzle forward. Those components might be clear at different moments.
There is an important distinction between a permanently available margin and one that depends on a pose. A drawer that closes only when somebody holds a loop flat requires a second action near the closing edge. An orientation that allows removal only if the user twists the handle behind a fixed lip may be difficult to reproduce. If an arrangement needs one particular hand position, review whether everyone who uses the appliance can take it out comfortably. Mark the ordinary sequence and the direction it depends on. Try the less demanding alternative while the intended users are present.
Record the four boundaries on separate lines
- Write the largest continuous floor footprint available at the drying appliance's resting location. Show left and rear offsets and note any obstacle intruding into that piece of floor.
- Measure the actual access opening, with the drawer opened to the normal working position. Add the depth of floor hidden under the countertop and the approach available from the usual standing place.
- Map overhead height along the closure travel. Include the height of the body, connector and cable loop at each point where they pass beneath a lip, shelf, structure or pipe enclosure.
- Draw the hand and entire appliance at the tightest point in the removal action. Record whether the attached or separately stored nozzle and plug travel with it and whether they need another hand.
Tomorrow morning, leave the room as you usually find it
Try the extraction with the surrounding vanity in its usual condition. Put towels, a mirror door, baskets and the adjacent room door in the position they commonly have in the morning. Leave the floor dry and keep the test area clear. Have the intended user open the drawer, find the grip and remove the unplugged cooled dryer and plug. The cabinet should not have to be stripped of harmless everyday objects for the outlet to work. If the drawer is usually approached from the right, compare the ease of finding the grip from that side rather than standing square in a convenient but unusual position.
If the plug is reachable separately, try lifting it before guiding out the main body. Check that doing so does not pull it from behind a divider or lead it across a closing edge. If the user normally removes the appliance with one hand and controls the cable with the other, draw that action including where the user's elbows go. A door partly open into the room can make it impossible to take a step sideways while holding both. A stable, approved storage location that lets the user approach from their natural side may be worth more than a few extra centimetres of free drawer floor.
Where the user must turn the dryer on the way out, draw the part that acts as a pivot. If they naturally lift the handle toward themselves first, the nozzle might move backward before rising. Mark that rearward room on the side view. If they lift the nozzle end first, the takeout requires access to that end and might lift the attached cable nearer a brace. A simple model with an empty rectangle ignores both of those effects. Measure them with a safe mock-up or the cool product and keep the path feasible for both insertion and extraction.
Open some drawers carefully while another person uses the basin. Watch the position of the drawer front relative to where legs and feet go, and the space the other person needs to leave. Do not assume that every family member can comfortably step backward while holding the appliance. If the opening intrudes into the main door route, use both positions of that door on the plan. Changing the storage drawer can free the busiest basin area even if another space is a little farther from where the dryer is used. A path that keeps people and appliance clear of water is part of the comparison.
Work through the jams in order
If the feet or runner stop the drawer before the grip is exposed, look at moving the appliance forward or picking a drawer with better actual access. Compare which other items could move farther back. Shortening the body by removing a nozzle is an alternative only if that is an ordinary step the manufacturer permits and you have somewhere for the nozzle. If the issue is a fixed trim edge above the opening, an orientation giving a straighter lift can be more useful than the one with the biggest storage remainder.
If the drawer opens freely and the grip is easy but the cable drags, go back to the drawing of the entry point and loose length. The most effective correction could be changing which way the handle faces. A separate permitted compartment closer to that exit can keep the plug away from moving sides. Changing the whole drawer growth may not matter if a divider creates the only pinching point. Try the candidate with a liner or divider actually in place and look for the tall bend that appears when the wire crosses it.
If the body and cable are accessible but the closed drawer rubs at one point, locate the height and depth of that contact from the fixed frame. A different low organizer may restore the lost space, or a shorter object on the same side might avoid the lowest area. The fix should still leave enough vertical room for the hand during extraction. Remove a proposed divider from the test rather than changing the actual cabinet structure. Hardware must work within the furniture maker's instructions.
If the room becomes congested while the drawer is open, consider changing when and where the appliance is retrieved, or selecting dry storage that does not open into the same narrow passage. Decide whether the inconvenience occurs on every weekday morning or only when a rarely used compartment is open. The physical penalty for a daily crossing may be similar on two plans, yet the household experiences it differently because one action happens repeatedly. Make that use pattern explicit before picking the final storage.
Choose a compartment the household can keep using
A broad undivided drawer is a practical baseline. The body can sit where the natural cable route is easiest, and cleaning or measuring a new attachment requires little rearrangement. See whether small objects remain far enough from the cable and whether loose appliances shift in normal operation. A removable compartment can help hold particular accessories and remains available as the collection changes. Compare the extra walls, lips and handle heights it introduces with the full takeout path.
An organizer placed around the handle can define where the dryer rests but restrict the choice of hand position. If a rough divider just touches the outside of the cardboard outline, try leaving it out of the test or using another rectangle before committing to that style. Narrow clearances around the grip can make it necessary to pull at the cord or the nozzle. The resting layout should leave a stable grasp. When there are multiple removable attachments, an adjacent box can keep them away from that grasp without demanding a separate pocket around every edge of the dryer.
If the vanity is not a suitable dry storage location, consider a different dry cabinet, shelf or container suitable under the manufacturer's instructions. Draw the carrying route from the safe place where the dryer has cooled. An extra step can be acceptable when access is predictable and the cord stays separate from sliding parts. The new location should allow the necessary space and safe storage conditions. A shelf closer to the point of use can be less practical if the body projects out toward a doorway. Make a separate shape and access record for each alternative.
Stop a modification at the first decision that depends on unknown cabinet strength, plumbing or electrical work. A vanity housing may include a pipe or installed equipment immediately behind a visible panel. Recheck relevant guidance before attaching dividers or mounts. A closed drawer is only a location for the cooled and unpowered appliance. No pocket or liner makes it suitable for operation, and a new power arrangement needs independent qualified local advice.
Plan for the next ordinary cleaning or replacement
Vanity storage inevitably needs access for cleaning. Check how a selected liner or tray lifts out without pressing against the pipe cover. Make sure the compartment for the plug can be emptied before removing something beside it. Follow the furniture and appliance care instructions and return only dry components to their places. When a leak or spill is discovered, address the moisture and reassess the storage location before returning electrical equipment. A mixed-use drawer with damp hand towels sharing the space requires a different household plan from a drawer dedicated to dry items.
A replacement usually starts with familiar expectations about where the grip and nozzle will sit. Keep body width and depth on the record with the attachment state, and reserve a separate line for the plug and cable exit. A shorter new dryer could have a bulkier plug or a longer strain relief that changes its storage needs. Check the exact layout profile rather than assuming the new object fits the old plan. If the household changes where attachments are dried or cleaned according to its instructions, include the return path for those separate pieces. This maintenance record allows a partition to be moved or removed without discarding earlier useful measurements.
For a cupboard used by visitors, simplify the return path. A clearly located safe support for the cooled appliance and one visible dry space for the lead can be easier to use than an elaborate arrangement of nested holders. The arrangement should be evident from the usual angle with the drawer open. A temporary method used by careful test participants can fail when a guest has never seen the storage layout. Share the brief instructions and test that putting away remains possible without rearranging unrelated items first.
Leave a note by the measuring record
When the household has tested a suitable location, write one short put-away instruction that follows the appliance manual and matches the actual routine. It can name where the approved resting point is, which direction the handle faces when the dryer is ready to store, and where the loose plug sits. Record the limiting measurement alongside that route. If a new nozzle is fitted or the cable behaves differently, the next person can see whether to measure the front strip, the upper rail or the cable pocket first.
Include a failure case in the drawer record. “A fits on the floor but the plug rides over the divider into the closing line” is an explanation that can be verified when somebody changes an organizer. “B fits” is too little information for a future replacement. Leave unknown dimensions visibly blank and give the same staged test to any shortlisted alternative. A repeatable routine is the deliverable; it covers preparation, putting away, closure and retrieval, even if the resulting sketch looks less symmetrical than a display photo.
What to keep from the trial
- Measure the usable floor between runners and internal projections, then the narrower opening and the height below the lowest overhead obstruction. Record these as different dimensions.
- Record the cooled, unplugged dryer's widest envelope, including a fitted attachment if it stays on. Check both orientations; include the cable and plug as separately measured items.
- With the drawer open in its normal position, rehearse placing and removing the appliance without forcing it. Check the adjacent vanity door and the user's standing position.
- Keep the storage location dry and follow the manufacturer's instructions and applicable local electrical requirements. Do not add a power strip to a damp drawer or plan to operate the dryer inside it; electrical alterations require qualified local advice.
- Recheck after adding a liner or divider: its thickness reduces usable space. If either orientation fails, a different drawer or a suitable separate storage container may be better than compressing the cable.
A drawer record should leave the next user able to answer three questions before changing an organizer. Which edge determined the orientation? Where does the plug rest before closing? What movement released the handle at the opening? For the layout beyond the vanity, see the bathroom storage layout guide.
TRY THE EXAMPLE
Compare two dryer orientations
Enter the usable drawer floor, the dry appliance envelope and the left and back offsets in millimetres. This plan excludes cord, plug, fittings and hand movement.
Allowed range: 1–2000 · Step: 1
Allowed range: 1–1500 · Step: 1
Allowed range: 1–1000 · Step: 1
Allowed range: 1–1000 · Step: 1
Allowed range: 0–1000 · Step: 1
Allowed range: 0–1000 · Step: 1
Positive remainder under these assumptions. Check the actual use and product requirements before choosing a layout.
- Left remainder
- 25 mm
- Right remainder
- 245 mm
- Back remainder
- 35 mm
- Front remainder
- 105 mm
Reference boundary — Usable drawer width: 500 mm × 350 mm
Blue dashed line: comparison boundary. Red dimension: shortage.
500 × 350 mm
Use the unplugged, cooled appliance as directed by its manual; check the opening, cord route and complete extraction separately. A plan fit is not electrical or installation approval.
Teaching assumptions, not a surveyed home or a construction check. Results describe this simplified geometry or budget only. Changes stay on this page and reset on reload.