Bedside Phone Charging: Keep the Drawer Area Clear
Compare two bedside phone positions, protect a chosen front access area and check whether the charging cable can avoid a drawer's closing edge.
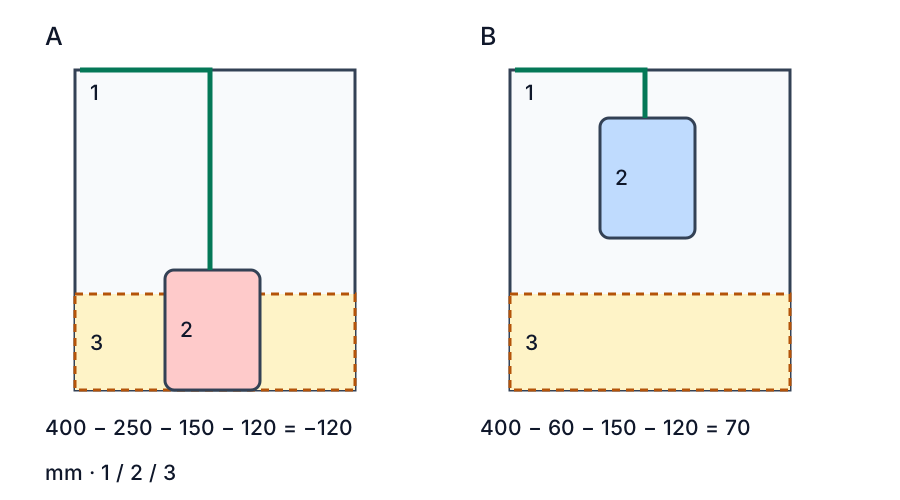
Phone and connector versus the front retrieval area
On this 400 mm deep table, the 150 mm phone-and-connector envelope begins 250 mm from the rear in A and 60 mm from the rear in B. The 120 mm front retrieval strip has a 120 mm overlap in A and 70 mm to spare in B. Follow the lead at the moving drawer lip in A and along the outer cabinet side in B.
A phone charging at the front of a bedside table may leave the drawer usable on paper while the cable crosses the place where a hand reaches for glasses or medicine. Moving the phone toward the back can free that area, but may make it harder to reach from bed or put its connector close to a wall. Compare the parking position, cable path and drawer movement before buying a clip or a longer cable.
The numbers below describe a teaching plan in millimetres, not a measured bedroom or a recommended electrical clearance. The front strip is a chosen area for this example, not a code requirement or a prediction of a person's reach. Follow the phone, charger, cable and furniture instructions; arithmetic does not establish electrical or fire safety.
Compare two phone positions on the same table
Assume a table 400 mm deep, measured from its back edge to its front. Reserve the front 120 mm as a trial access strip for frequently used items. The phone and its connected plug together occupy a 150 mm envelope along that depth; include a real connector's projection when measuring.
Open the full-size position comparison
In A, the envelope begins 250 mm from the back and ends at the front edge: 400 − 250 − 150 = 0 mm remains beyond it. After reserving the chosen front strip, 400 − 250 − 150 − 120 = −120 mm. This indicates the phone envelope occupies the trial strip in the simplified plan. In B, the phone begins 60 mm from the back; its far edge is at 210 mm, leaving 190 mm to the front and 70 mm after the same strip. In the figure 1 is the table, 2 the phone-and-connector envelope and 3 the chosen strip. The cable line is schematic, not a verified route.
Try the position comparison with the actual table depth, back offset, phone-and-connector envelope and your own trial strip. Empty measurements stay unknown. A positive result describes the selected one-dimensional separation only; it does not demonstrate comfortable reach, connector bend, a free drawer or suitable charging conditions. Moving the phone back also changes reach from bed, so test both positions with the people who use them.
Keep cable and drawer movements separate
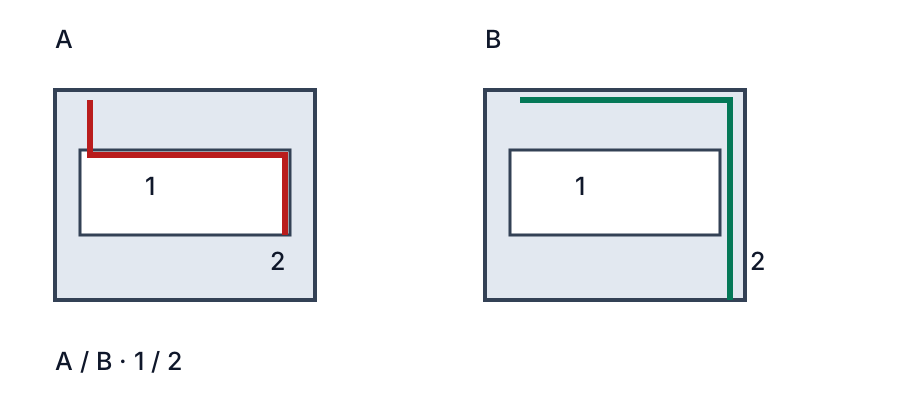
Open the full-size drawer-route sketch
The side views are not to scale. Number 1 is the drawer, 2 the cable. In A the cable crosses a closing edge where it could be pinched; B shows a route outside the drawn drawer path. B is an idea to check, not an approved installation. A clip may help retain a route only when it is suitable for the cable and surface, does not crush the cable, and leaves the movement required by the relevant instructions.
With equipment disconnected according to its instructions, trace the actual cord and slowly open and close an empty drawer while keeping fingers clear. Check the complete motion, not just the drawer's closed position. If the cable catches, relocate the route or phone; do not shut the drawer on it. Check the plug, charger and any connection independently, and avoid placing the phone, charger or cable where bedding or moving furniture can trap them contrary to the manufacturer's instructions.
Before the room goes dark, give the usual objects their places
Try a brief walk-through in daylight with the objects that actually stay by the bed. Put the usual glasses, water glass, book or alarm where you would normally leave them. Keep a clear margin around electronic equipment as its instructions require. Set the phone and its connector on the table in the normal orientation. Then make a sketch of the first object you pick up when entering the room and the first one you reach for when you are in bed. On some tables those are the same object. On others the phone comes last at night and the glasses come first in the morning. Those are two different priorities for the small piece of surface nearest the bed.
Do a dry run with the charging equipment disconnected as its instructions allow. You can use a line marked on paper to represent the route while you look at it from above and from the side. You want to know whether moving the phone would solve the conflict on the tabletop, or whether the conflict is below the tabletop where the cord falls. If the hand can only reach the glasses by brushing across a loose cord, a neater cable at the wall will not free that part of the route. If the glasses are easy to take but the drawer front closes onto the line, you can investigate the line without giving up a comfortable phone position.
Give each proposed arrangement a short name you can remember. “Phone at the back with the cord down the open side” is specific enough. “Tidy” is not. The first describes a parking position and the start of a route. It also makes the next test obvious. If the side is only open with the bed pushed a certain way, that condition belongs beside the name. Record the position of the bed, table, drawer and nearby outlet as found. Moving one piece of furniture during the test can conceal the case you need to solve.
Use the part of the front edge your hand needs
The example uses a continuous 120 mm strip to make the calculation legible. In a room, you may want only a small patch beside the end of the bed. Mark the actual landing patch with a piece of paper. Show which edge the hand approaches and which way the object leaves the surface. For glasses, the arms may be folded at rest but the hand may approach from the side to pick them up. For a book, half of the cover may need to be supported while you slide it. Put those actions on the plan before deciding whether to reserve the full width.
A partial strip lets you try both the along-depth and across-width relationships. If the phone model overlaps the chosen front depth, but it is on the other end of a wide table, the projected overlap might never affect the hand. Draw the width and position of both rectangles to find out. A phone on the right and a glasses patch on the left can still conflict if the cord crosses the gap between them. For that arrangement, treat the phone, connector, loose cord and approach to the glasses as separate shapes. One advantage of a small layout is being able to check each with the real object instead of guessing a common margin.
Decide whether the front area is reserved all night or only after some items move. A water glass may be set down before the phone is plugged in. A drawer might stay closed until morning except for bedding or a spare item. These routines can make an apparent overlap harmless at one time and troublesome at another. If you rely on a time separation, rehearse it in the order in which it actually happens. Two people may use the same piece of furniture in a different sequence. Where their routines cross, give a frequently reached item a permanent position instead of relying on them both to move it out of the way.
Sit down and measure the plug while it is represented in the sketch
Measure the relevant outside dimensions of the phone in the case you use. Including the connector in the visible outline can change even the straightforward front-to-back result. A flexible line on a diagram is not the same thing as the rigid part projecting from a socket. Use the actual connector profile in the plan, and let the cable continue according to its manufacturer's handling requirements. Do not assume a different plug can bend closer to the wall because it looks small. The case opening and connector shape need to be compatible before you consider the layout.
To reproduce the published comparison, use the rear table edge as zero and the front as 400 mm. A 150 mm envelope at a 250 mm rear offset ends at 400 mm. The front strip begins at 280 mm, so the envelope and the full 120 mm strip overlap along this depth projection. Start the same envelope at 60 mm and it ends at 210 mm. Between 210 and the 280 mm strip boundary is a 70 mm interval. That is what appears in the interactive model and on the two tabletop models. It is a planning result along one axis. You still need to observe the hand and the other objects in plan, and check the path of the flexible part of the cable.
A useful intermediate paper test is to move the start to 120 mm. The far edge becomes 270 mm and the remaining interval to the chosen strip is 10 mm. This is an additional teaching position, not a recommended target. If 10 mm is the only interval left and the real connector is wider or extends farther than the outline, it is worth checking the measured shape again. A case that adds depth at the connector can remove that narrow difference without changing the position of the phone. If a person reaches much more comfortably to 120 mm than to 60 mm, try this position rather than jumping straight from the front to the back.
Put the table against the wall the way it will actually stand
A skirting board or protruding plug can hold a bedside table away from the wall. This means the tabletop's rear edge and the wall line have different positions. On the tabletop plan, continue measuring from the table edge. On the cable route sketch, draw the wall separately. A cable leaving the rear edge might have room for a gentle direction change in the gap, or an object in that gap might take up the space. The tabletop difference does not describe it. Record any bulky adapter and the actual spot where the line would pass, without modifying the outlet or fixed furniture wiring.
With the table angle fixed, look from the side and behind if it is safe and practicable to do so. A back panel may stop below the top. A drawer body can extend nearly as far as the rear panel in its closed position. The usable route around that furniture is the path that remains open through the motion, subject to the equipment instructions. Simply spotting an opening at the back when the drawer is extended does not show that a cable passes through it safely when the drawer closes. If you cannot observe an inside gap and are unsure what changes with motion, choose an observable external route or have the appropriate person examine the setup.
Measure from the equipment to the wall connection independently of the apparent length left over. A route around the side may run farther than the straight diagonal you first draw. Draw the points where the direction changes and where the flexible part must remain comfortably free. Treat the measured path as a way to compare two placements, not a standard amount of slack or a specification for an electrical installation. If the existing equipment cannot be placed as instructed along an unobstructed route, a different surface or a compatible accessory used as specified is more useful than trying to force the current cord around tight furniture.
At bedtime, check what the hand can do without shifting the table
Put the phone at the front position with the setup disconnected for the rehearsal. Sit or lie the way you normally would when retrieving it. Reach using your normal turning motion. Mark the outer edge of the patch your hand naturally visits. Put the glasses down as usual and try the same sequence in reverse. You may notice a path that is easy with an empty hand but awkward when it has to hold the glasses carefully. Record the task in words. There is no universal line on the table that separates reachable from unreachable.
Now try the rear position. It may leave more space at the front while putting the phone farther from your resting position. It can also change the angle at which you see a screen or identify the edge of the device with your hand. If you only plug the phone in while standing and do not retrieve it from bed, those disadvantages may matter little. If the phone serves as an alarm you turn off while lying down, it matters more. Avoid a trial that requires reaching across a live cord, pulling the cord toward you, or moving other bedside equipment out of the way solely for the test.
The actual comparison is between two usable motions. If you cannot reach the rear position comfortably, try placing the phone nearer the bed-facing corner while keeping the front access patch at the opposite end, if the width allows. A small sideways change may keep the distance reachable at the side and separate the hand from the phone at the front. Recheck the connector and route in this orientation. When the phone turns, its depth in the new direction may change and the connector can point into a window, lamp base or drawer gap. The original 150 mm applies to the illustrated orientation only.
Keep a known place for the cable end when the phone leaves
The phone is not attached throughout the day. When it is picked up, the free connector often lands somewhere different. An end that slides behind the table may be annoying but harmless if it stays accessible and clear of the furniture. An end that falls over a drawer edge can enter the motion path the next time the drawer is used. Compare the full and empty states from two directions. With the equipment disconnected for the test as its instructions allow, set down the end where it would naturally fall. Watch that spot during the first slow drawer movement.
If you use a holder or clip, let the location follow the route you already verified. Check compatibility with the cable and surface. Keep enough freedom according to the equipment instructions so the holder does not pull on the connector when the phone is picked up. An adhesive hook high on the side can look inconspicuous and still force the cord to cross the edge where a sleeve or a passing person can catch it. A lower side route can leave the upper hand space freer but may interfere when cleaning or moving the table. Check the ordinary actions around it rather than judging from a front photograph.
For a shared table, avoid treating the other person's cable as one fixed object. They may unplug it, use a different connector, or move a lamp. Compare any overlap with their everyday actions. A good place for two temporary cable ends might be adjacent but requires room at the moment both phones are connected, not just when only one is present. Use measured footprints and an actual safe equipment setup. If you cannot arrange the furniture within the manufacturers' conditions, split the chargers between appropriate positions instead of crowding the same path.
During a drawer check, look for the edge that moves toward the line
A still picture can miss the closing edge. Trace the line with the equipment disconnected and observe the full drawer travel slowly. Stop if the line catches or could be trapped.
Draw the side of the table with the drawer fully closed and fully open. Mark what actually moves, including the drawer's front edge or attached handle and anything kept near its opening. In a real cabinet, the front can project farther than the side panels. When the cable hangs in front of the table, there may be a position where the front sweeps towards it. The side-view sketch in this article distinguishes that moving edge from a route that goes around it. Look at the full move. A line that clears the fully open drawer can still be in the way during closing.
With the equipment disconnected according to the instructions, use the real route or represent it with a simple line on the side of the cabinet. Start with an empty drawer so that contents do not obscure the edge. Move the drawer gently, keep fingers clear and stop ahead of any pinch point. If the cord crosses a moving gap, choose a different path. Do not repeatedly press the drawer against the cord to see how much pressure it can take. A route outside the front is worth evaluating only if it remains out of the path throughout the movement and can be used in accordance with the equipment instructions.
The open path from the phone has two pieces worth sketching. The first goes from the connector to the edge where the cable leaves the top. The second goes from that edge towards the charger or outlet. A cord may leave the top beside the bed, then be pulled into the drawer gap lower down because it follows the shortest path to the outlet. Mark where the path changes direction. At that point does it remain clear when the line is loose, as well as when someone has just plugged in a phone? Side clearance at one height does not answer a question about the entire length.
When the top looks solved but the side does not
Consider an illustrative table with a drawer front extending past the side panel. The top route in the rear phone position no longer crosses the glasses patch, but the flexible line drapes back towards the front when the phone is detached. Setting it down behind the cabinet instead may clear the front while placing it in a gap occupied by the bed frame. Try to locate an external side path that stays outside the full sweep and can be inspected. With the real setup, keep the instructions for safe routing in view. If none of the candidate paths works, compare locating the phone on another suitable surface.
Another case is a fixed position above a drawer used for clothes. The line avoids the drawer when the drawer is empty but a piece of clothing occasionally projects out while it is being sorted. Identifying that action does not prove a problem with the electronics. It shows why the furniture and cable were sharing the space. Rehearse the likely movement around the drawer before installing a route holder. You might retain a convenient front phone position and send the cable another way, or decide that the phone needs its own place farther from the place you use for sorting.
Some tables have open shelves instead of drawers. That removes one closing action, but books, baskets and storage boxes can be moved on the open shelf. Observe the nearest moving basket and the anchor points you can use without damaging the product. A projecting container may bring a loose line inside the perimeter even without a drawer. An open shelf also gives you visibility and a chance to check the route from the side. Use that visibility to distinguish the wires from things you remove. Test one alternative that keeps the shelf usable rather than merely finding a hidden route.
Include the changes that happen in an ordinary week
A table can shift when the floor is cleaned. A bed can move when bedding is changed. A cord that looks untouched in the evening may have a different path after either motion. Record the approximate way people move the items, without making the cable bear any load. If furniture must be repositioned for an ordinary task, follow equipment instructions for disconnecting it first. Make the routine convenient by putting the device and the disconnected end somewhere that will be easy to find afterward. Returning the phone and table to the original reference lines makes comparison possible without assuming the corner stays fixed.
Bedding changes the amount of room at the bed edge. A narrow blanket neatly folded during a photo test may extend over the table area in use. Observe the real route when the bed has the covering you normally use. Follow the product manufacturer's charging location and ventilation guidance and avoid placing equipment where bed linen can cover or trap it contrary to those instructions. The point of this part of the check is to identify the moving fabric and the space it reaches. Where that space conflicts with the phone or cord, plan a different location rather than treating a tidier-looking arrangement as approval.
If existing equipment shows damage or has been caught, follow its manufacturer's guidance for inspection and replacement. An organizer is for managing the location of suitable equipment in good condition. It cannot fix an electrical problem. Likewise, an arithmetic cable length does not certify connector compatibility or a bend radius. Check the actual specifications if considering a different cable or accessory, and leave fixed electrical work to appropriately qualified people. These boundaries leave plenty to evaluate with the furniture and daylight walk-through.
In the morning, try the route in reverse
Put the most frequently retrieved item on the table before the morning rehearsal. Some people reach for glasses first, others for the phone, and others get out of bed to use an alarm. The right arrangement keeps those first movements practical without asking the person to lift a lamp, cross a cord or free a drawer with the other hand. Try the reverse sequence with the actual phone and usual case where permitted. Return the charger end to the chosen place when the phone leaves. This is when a stable side route often shows its value. You can see whether the connector remains accessible and where the line ends up when left loose.
If you get out of bed on the opposite side in the morning, run a second rehearsal from that side. A furniture layout designed around one approach may leave an open walkway while asking the user to reach across the table. Distances in the diagram cannot decide which of those inconveniences matters more. A location for less frequent items can be farther away. A charging location you only visit standing may also be farther back. Put the items in order according to how often the arrangement must support an easy return as well as an easy reach.
Look again at the two article diagrams from your own measurements. In the plan, show the rear reference, phone start, farthest hard connector point and the nearest edge of the chosen retrieval patch. In the side sketch, show the top edge, drawer front at both limits and the observable external cord path. If the actual phone remains parallel to the table depth and the chosen strip spans the table, the example arithmetic can be adapted directly. A partly reserved patch or an angled phone requires a plan that includes width and overlap. Move a paper outline to identify a promising candidate before using the real device.
Write down one thing that would reopen the decision
A useful final note is small enough to keep with a photo. Write the tested phone and case, the orientation of the connector, the tested position of the table and the open route around the drawer. Put the actual daily first move alongside them. For example, “Phone on the rear left, connector down the open side, glasses stay on the front right, cable end stays at the side when unplugged.” That note describes a layout another person can try. It also contains several conditions that can change. A different case, taller lamp base, moved table, new drawer insert or new bedding can affect one question without invalidating everything.
Keep the two tests that earned a pass. One is a reach and surface test made with the real bedside objects. The other is a furniture-motion test with disconnected equipment as its instructions allow. If only one passes, record the remaining issue and choose a reversible trial. Moving the glasses patch a little, changing the orientation of a compatible connector, or using another suitable surface can be trialled before installing any holder. Mark the route you actually observed so somebody does not reinstall a clip at an old location after moving the bed.
The result should be easier to use during the next evening and next morning, when the table is no longer arranged for a picture. Notice the small inconveniences that repeat. If the cable reaches the side every night but you keep fishing its free end out of a drawer, the end position is the next adjustment. If you keep moving the phone forward to reach it, the rear placement was not a good match for the routine. A layout note that names what happens makes it straightforward to change one detail and compare again. You do not need to start over by purchasing another organizer.
Compare a workable evening with a shared morning
If the room takes two different routes before and after sleep, put those routes on a single sketch with separate labels. Imagine a narrow aisle beside the bed. In the evening the person stands at the foot of the table, sets the phone down and walks away. In the morning a second person sits on the bed and opens the top drawer while the first goes through the aisle. Mark the two starting positions before drawing a line towards the outlet. A cable that leaves the same side as both people may pass through the only place where the first person pauses. The alternative can be a position where the phone is reached from the bed side while the line leaves from the side that faces a fixed wall, provided the real wall side stays clear. This example is about space used in sequence. It says nothing about how an outlet or an electrical supply should be installed.
Try a small set of checks in that situation. Photograph the closed drawer and the table from the route where the first person walks. Have the ordinary drawer user demonstrate the start and end of their normal movement using disconnected equipment. If both people can't be present at the same time, mark each route separately on the drawing and compare later under the same furniture positions. When a line crosses both routes, determine whether the overlap happens in the loose state, the connected state or both. That observation directs the next test. If the loose end is the only item that falls in the way, a known landing spot might be enough. If the rigid plug itself points into the drawer path, first test a different phone location.
Read two rough sketches before purchasing a longer cord
Give the replacement idea two sketches with the same rear table reference. In the first, move the phone but leave the equipment where the instructions allow it to stay. Measure the route along the top, around the observed furniture edge and to the equipment. Use a tape or a piece of string as a measuring tool with the devices disconnected. Record each segment, including the two or three places where the direction changes. Draw the drawer sweeps across those same lines. In the second sketch, leave the phone where it is and change the external route around the cabinet. Compare which arrangement avoids contact in both the connected and loose states, without assuming that adding length makes a poor route better.
The length comparison becomes particularly useful when there is a table at an angle and a wall joining two corners. A drawn diagonal can understate the real run around a piece of furniture. Conversely, a path that follows every wall edge can be longer than necessary if the phone can sit closer to an appropriate open side. Sketch both layouts without feeding a cord anywhere you cannot inspect. If the only apparent short route uses the space immediately behind a moving part, mark it as excluded and measure the available external route. Decide what needs to change before purchasing or fixing anything. Whether a given replacement cable or accessory is compatible is a separate question for the equipment specifications. Even a measured route with extra length is only one part of that decision.
Decide whether the easier change is about storage, reach or routing
Store one of the occasional bedside items away from the crowded table for a few ordinary routines if it is convenient to do so. Observe whether the front patch stays open without changing the charger. That test is useful when the phone has to remain close to the user, but a book or case can live elsewhere. It does not establish a cord route. Try the corresponding routing test with the original tabletop load still in place. If the drawer clears and the retrieval problem remains, the two issues are independent enough to fix separately. If a new side route also removes the main obstacle for the hand, verify that nothing else was shifted during the test and that the result can be repeated.
It is easy to spend money on the problem marked first in a drawing. The best sequence might cost nothing. Changing which item goes on the bed-facing part of the table can make the phone easier to reach and leave the front drawer clear. In a completely different arrangement, a table with the drawer on another side may reduce the overlap but put the controls of a bedside lamp farther from the person who uses it. Put each change next to the observation it is intended to fix, then note any new inconvenience. Before committing to a furniture change, check the motion after putting the normal items back. A result that only works when the table is empty will need a different routine as well as a new position.
For one last comparison, record a pair of snapshots with time and state in the captions. One is the phone parked while the top is in ordinary evening use. One is the empty charging position and the drawer partway through an ordinary morning opening. Keep the positions of the other things visible so the conditions can be reproduced. If the connected state alone is documented, you cannot tell where the free end was during the furniture motion. If the table is photographed after clearing everything, you cannot tell which part was reserved for a hand. A concrete note linking the source of inconvenience to one of these views is a practical record of what the layout solved.
Choose and verify the route
- Measure the clear tabletop from back to front and define an access strip based on what the user actually needs to pick up. Record its width across the table if the chosen area is not a full-width strip.
- Measure the phone with its attached connector and mark two parking positions. The example assumes the strip spans the whole width and the envelope runs straight back to front; a rotated phone or localized access area needs its own plan.
- Test sight and reach from the usual lying or seated position without stretching a live cord. Compare whether the rear position still permits the user to pick up and return the phone comfortably.
- Trace the disconnected cable past the drawer, wall, outlet and bed movement. Check the actual device and cable instructions for connectors and charging arrangements. Do not conceal damaged cords, improvise fixed wiring or force a tight bend.
- Recheck after moving the bed or table, changing a case or connector, or fitting a clip. The bedside table height guide covers the larger furniture decision; the dock cable guide addresses a different moving workstation.
TRY THE EXAMPLE
Compare phone position and front access
Measure table depth and the phone with its connector. Choose a front access strip spanning the table width, then compare the phone envelope in the depth direction.
Allowed range: 1–2000 · Step: 1
Allowed range: 0–2000 · Step: 1
Allowed range: 1–1000 · Step: 1
Allowed range: 0–1000 · Step: 1
A negative remainder means the selected allocations overlap. Change the inputs or the proposal.
- Space from envelope to front edge
- 0 mm
- Balance after chosen access strip
- -120 mm
400 − 250 − 150 − 120 = -120 mm
Check actual reach, cable and connector, the full drawer movement and product instructions separately. A positive separation does not approve electrical safety.
Teaching assumptions, not a surveyed home or a construction check. Results describe this simplified geometry or budget only. Changes stay on this page and reset on reload.