Shoe Bench and Boot Tray: Compare Two Entryway Layouts
Compare wet-boot storage under or beside a shoe bench using a worked height check, floor plan and practical tests for sitting, drainage and door movement.
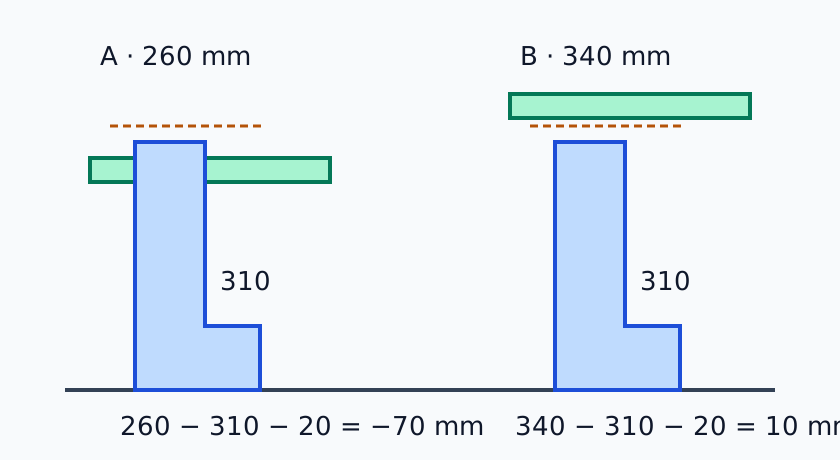
Wet boots beneath two bench heights
A 310 mm boot exceeds the 260 mm underside in A by 50 mm. It leaves 30 mm beneath the 340 mm underside in B, before a separate 20 mm trial allowance.
Someone opens the front door with a bag in one hand and an umbrella in the other. A second person is already sitting on the bench, taking off boots. The bare floor between the door and bench looks like spare space on the plan. In use it is where the first person stops, the seated person plants a foot, and the wet boots have to land. This is the moment to design for.
A tray under the bench can leave more of the wall free. You have to be able to put the tallest wet pair there and remove the tray when it needs attention. A tray beside the bench keeps the boots and accumulated water in sight. It needs a piece of wall and floor the entry can genuinely spare. Follow one rainy arrival, then one cleanup, through both arrangements. Try the routine with dry boots and an empty tray first. The plan and height examples below are hypothetical comparisons you can replace with readings from your own entry.
At the threshold, give the door its whole sweep
Stand outside with the bag you routinely carry. Open the door to the position you use to enter, close it behind you and look at where your feet and bag ended up. Use the open position required for the doorway as another point of comparison. Mark the edge swept by the door and projecting handles through the movement. A tray can look well clear of the door at one angle and sit under its lower edge as it swings shut. A small floor mat or tray lip can be the first thing the moving door meets. Treat the installed door, threshold and stopping arrangement as reference conditions rather than moving them during a furniture trial.
If the entry has a screen or storm door, vestibule door or nearby closet, add those to the sketch. Watch where you pause to move a bag from one hand to the other. A person entering behind you needs somewhere to stand, especially if they are shutting a door out of the weather. An area that appears generous when only one leaf is drawn can feel tight once you open the closet to hang a coat. Draw that leaf in its open position and partway through its swing. The same applies to a shallow drawer or shoe cabinet that opens in the narrow section beside the bench.
Mark the feet of an actual or proposed bench and the front of its seat. Where it will sit against a wall, check the baseboard, door casing and nearby hooks, projecting outlets or other fixed items that affect where the bench can stand. If the feet are inset, the seat can project past them and still affect a door or elbow. Measure usable wall length between finished obstructions at the relevant heights, then check the floor area right in front of it. A radiator, a corner return or a course of trim can occupy a piece of wall marked blank on a room plan. Keep dimensional starting points clear so another person could reproduce the sketch.
Use a removable marking method appropriate for the floor and a stable bench approved for sitting. Put the tray down empty. Make a simple outline for the alternative position so you can change candidates without moving the whole room around each time. As long as you are testing dry, light items, you can observe the doorway and wet-to-dry transition without creating a wet slip hazard. Keep normal and required access open during the setup and have any applicable exit or accessibility requirements checked independently. The two diagrams later in the guide simplify the room on purpose. Your own floor outline is where the omitted door and nearby openings belong.
Decide where the first dry surface begins
At the door, identify where a wet sole is expected to touch the ground, where you sit, and where the first dry shoe or sock goes after a boot comes off. These can be different patches of the same floor. Give wet footwear a direct route to its receiving point. If there is no free hand when you enter, show where a bag can go briefly without reaching across a wet tray. This may be a shelf or a stable furniture surface elsewhere in the entry. Check product and furniture instructions for what each surface can support. If you hang the bag or coat first, open that part of the entry and walk its route from the door with the tray in place.
Talk through the order with the people who come home together. One person may take their boots off as soon as they cross the threshold. Another may sit down with both boots pointing forward and place them side by side only after both are off. A child may put a pair down in the first visible spot rather than carry it under a seat. Make the tray assignment match a place they can actually use under supervision where appropriate. A position close to the entrance helps keep drips together only if those returning can reach it after setting down what they carry.
At the seat, measure the underside from the tray bottom
Try the tallest pair you expect to keep wet at the door. Measure in the orientation in which it will stand, from the surface inside the tray on which the sole actually rests to the highest point of the boot. Include a projecting pull loop, a folded top if regularly stored that way, a footbed grate in the tray, and anything else that changes the shoe's height in the installed arrangement. If using a separate grate, identify whether the measurement starts on the grate or at the tray bottom and carry the offset through the calculation once. Put both boots in the tray. Their heels and toe shapes may determine how they sit, and the pair may need to stand offset rather than directly next to each other.
A tape measurement to the bottom of the seat board is a useful start. Then check the framing across the front, a bar below the seat, any hardware below the underside and the legs at either opening. A low rail may be just where the top of the boot has to pass, even if the boot would stand comfortably after clearing it. Measure to the lowest relevant obstruction along the approach you intend to use. Take a second reading behind the rail if the boots will stand farther back. Have the benchmaker or product instructions identify which components are structural. Keep the frame in place during the trial.
The boot often travels in an arc as you reach from the seat. With the actual clean, dry pair, test the place where you hold it. Lift it past the lip of the tray and the opening of the bench, settle it, then grip it again to retrieve it. A handle or flexible top can change shape under your hand. Record the way the boot is meant to stand and watch whether it tips over when set down or whether a second pair knocks it. Plan for the boots people use in the wet season, when bulk and sole depth may differ from the flat shoes that often appear in a shop display.
Open the full-size side sections
In the hypothetical section, the top of the boots is 310 mm above the tray bottom, and the bench underside in version A sits 260 mm above that same reference. There is a static difference of 260 − 310 = −50 mm. If you choose another 20 mm as a trial allowance, the balance is 260 − 310 − 20 = −70 mm. This version misses the upright static fit before making any provision for handling. The dashed line represents the assumed allowance in this comparison. It gives you a consistent input for comparing two heights. The chosen number is neither a construction dimension nor an access standard.
Version B brings the underside to 340 mm above the same tray bottom. The static gap is 340 − 310 = 30 mm, and 340 − 310 − 20 = 10 mm remains after the assumed handling allowance. The positive result says the invented boot and allowance both fit inside that simplified section. Take the outline to a dry rehearsal to see where the gripping hand is and how the sole crosses the lip. The section has no door, knees, supporting rails or turning path. Where the finished bench has a projection the input needs to account for it.
A higher underside and a higher seat often come together but are separate dimensions. You may be considering a different bench design with a thinner frame, an open center or a shallower apron instead of raising the seat. Review the actual construction and intended use with the manufacturer or carpenter. Do not cut out or remove a rail to improve a sketch measurement. If changing the entire bench, test a stable seat at the height you would buy and include the effect of a cushion if it is part of regular use. Ask the person who has the most difficulty with the current seat to try it, with appropriate support if needed. Can they plant both feet, lean forward comfortably to reach their shoes and get up with dry footing?
Make the seated position part of the plan
The seat is a strip on the elevation, while the person stretches out into the floor in front of it. Have a user sit down with the empty tray nearby. Observe the space a foot needs as it comes out of a boot, the direction the other leg points, and the place a hand naturally lowers the boot. Take a moment to watch the movement from the side. If you have to sweep a boot up behind the supporting leg to get it under the bench, the tray may work as storage but fail as a direct landing point. Try the same move while placing the boot down on the side option. Compare whether the person can see the rim and lower the boot into it without changing which surfaces they step on.
Set a dry shoe down outside the wet position. A person who needs to reach past the tray for their dry footwear may place a sock on the tray while turning. Try putting the dry pair where you can take it after removing the wet one and then stand up on the appropriate floor. Account for moving shoes from the drying area to ordinary storage once they are ready. A deliberately reserved empty corner of the tray may matter more to the routine than packing every available square with footwear. For two users arriving at once, try sharing the bench and then taking turns. What changes is the sequence and available floor, even if the furniture dimensions stay the same.
Move the same tray across the floor
Open the full-size plan comparison
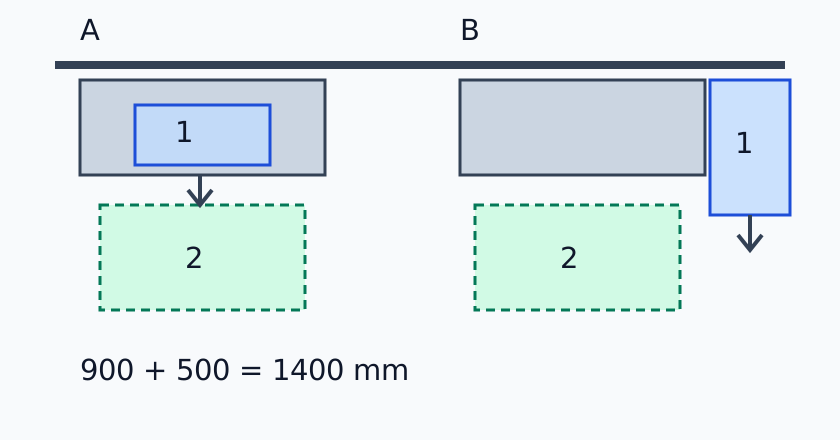
The plan shows the trade-off without drawing the doorway. In A, reference 1 marks the tray under the bench and 2 the schematic floor area a seated person uses. When you slide the tray forward, it occupies some of that same floor. In B the tray stands alongside the bench. The seated area stays in front and the tray uses ground along the wall. The arrows are test directions. Both diagrams simplify the room and are not to scale. In your sketch mark the outline that actually moves, including tray handles, and where the user has to stand to draw the tray forward or pick it up.
Treat the height section and plan as two different comparisons. The section asks whether two undersides can accommodate the same upright boot and trial allowance. The plan asks where the same tray sits in relation to the bench and what floor it needs in use. A beside-the-bench layout may avoid the underside altogether. That changes which section governs the boots. The letter B in one drawing therefore does not require you to raise the seat when you put the tray beside it.
For an illustrative length check, suppose a bench takes 900 mm along the wall and the side tray uses 500 mm along the same wall. They require 900 + 500 = 1400 mm before any separation gap, casing or other projection. If the clear usable length there is 1300 mm, the option is short of 100 mm. This is a comparison of occupied lengths along the wall, with no claim about the door or how far the pieces extend across the room. Start from the actual finished baseboard and trim constraints, make the units consistent, and measure the tray including its rim and handles. If the side-by-side arrangement takes more than the clear wall length, circle the dimension on the plan and find which part can realistically change.
Compare three ways to use less of the wall
One option is to turn the side tray so its other dimension lies along the wall. Draw its new outline on the floor and place both boots onto it. The tray may now extend farther into the room, and a tall boot might end up behind a low wall hook or near something that swings. Open the door and let it travel slowly through the relevant positions. Stop the mock-up if the occupant would step on the rim when closing the door. Rotate the shoes too if they naturally fit that way. Check how a pair is lifted out and how easy it is to see water in the far corner.
Another option is to shorten the bench using a model designed for the new size. Sit on the same proposed seat type, with the height and depth it will actually have. Decide who needs to sit and whether they share the bench. Check whether a single-person seat is enough if two people enter together. If the person who sits requires arm support to rise, choose a product and location that suit that use and keep the supporting parts in the plan. A seat change may free wall length and change how boots are handled, so repeat the seated trial instead of carrying over observations from the original bench.
A third option is to assign just the wet-weather pairs to the tray and move already dry shoes to other storage. Try a smaller tray by placing the largest actual pair inside and leaving enough room for the way a second pair will land when the household needs it. Check the internal base dimensions. A lip with tapered sides can make the advertised exterior footprint much larger than the flat area available for soles. Pushing part of a sole up on the rim can tip the boot or let water fall outside. Confirm the side option still handles cleanup under the expected number of pairs. In multiple wet arrivals, a tray cleared as boots dry is a different routine from one expected to hold all footwear indefinitely.
A hybrid is possible when both under-bench and side areas are genuinely usable. Low wet shoes can go beneath while the tallest pair stays beside the seat. Draw both actual tray footprints, any gap between them, and the standing area needed to reach each. The same space cannot serve as both a doorway patch and an overflow tray. Consider whether users can remember the division and whether cleaning two surfaces is realistic. In a very narrow entry, another suitable drip location might be more practical than fitting both versions of the tray into the doorway.
Rehearse a rainy arrival in both positions
Under the bench
Enter with the load you ordinarily carry and put the bag and umbrella in their planned positions. Sit, remove the first clean, dry boot, and put it onto the empty tray without holding it longer than you would in daily use. Try the second boot with the first already there. Check the top and outside edges as well as where your toes and knees move. See whether you can place the first boot without first sliding the entire tray out. If you need to draw it forward, observe where the tray stands until you are ready to push it back. That is the moment most likely to take up a dry standing spot or another person's approach.
Repeat the motion standing if some users remove shoes that way. Check where they can see the tray rim and how far under the seat they have to reach. A tray tucked deep underneath may be effectively hidden from a newcomer. Placing it closer to the edge can make it easier to see and also leave less overlap protection for drips, or bring the lip close to the seated user's heel. Use the position that allows stable support underneath and leaves the front floor useful. Add a fixed visual reference to the drawing so the tray can be returned to the same place after cleaning.
If the necessary pair fits only when it lies sideways, try the dry motion first and observe where the shaft and sole would drip in that position. Check whether the boot's maker gives drying or care instructions relevant to that orientation. A product used to hold tall boots upright may require a different tray or a different assigned position. Keep the use test distinct from the arithmetic. A very flexible shaft may fold clear of the seat, yet become awkward to take out with a gloved hand or tip when another shoe is placed next to it. Record that as a result of the actual trial rather than counting on the boot's flexibility when buying a bench.
Beside the bench
Use the same boots, tray and seated user where possible. Move the empty tray to the side outline. Go through arrival and sit down at the same bench. Reach toward the tray holding the first boot. If it sits beyond a bench arm or behind the user, they might have to stand to set the boot down and then sit again for the second. Turning the approach, moving the bag landing or swapping sides can change that. Repeat from the way you normally enter. The direct vertical opening over the tray helps tall boots only if the sideways reach and rotation are still practical.
Now bring in the second person, or represent their ordinary standing spot with an outline on the floor. Let them open the nearby coat cupboard or enter after the seated user has put one boot down. Compare whether they can stand clear of the tray and leave themselves somewhere dry to step. A side tray that sits in a natural shortcut across the room can be more exposed to trips than the same tray close against the wall. Watch the corner nearest the doorway and the moment you swing the door closed behind you. Any wet floor created by the real use deserves a practical housekeeping response and suitable floor protection.
Picture the arrangement one hour later. A second pair may have arrived, the umbrella may have finished dripping and a household member may be wearing shoes out the same door. In the side position, water level and the tray outline can be more visible, but it may look crowded if the tray also collects umbrellas or unrelated items. Decide whether those are separate tasks and designate what actually belongs in the tray. Try taking one pair out while the second remains behind. Record whether toes, shafts or other objects need to be shuffled first.
Keep the comparison fair
Start the two rehearsals with the same load and the same allowed door positions. Try them in the order you arrive, sit, remove the pair, stand and leave the boot area. Then try a more demanding variation. For example one person arrives while another is already seated, or the most frequently used cupboard is open. Use a dry bag or simulated load and keep the walking surface clear during the trial. Mark when an arrangement works only if a door is held back or a bag is always moved promptly. That might be possible in daily use, but it is a condition to record before purchasing or fixing furniture.
Write a short decision for each outcome. “Under the bench with short footwear works when the tray stays fully in place; the tallest boots have no upright position” is more useful than “A passes.” “Beside the bench holds both tall boots; the front door strikes the corner when it swings to its ordinary stop” gives the exact point of failure. Both statements in this paragraph are examples. In your own record, mark the floor position, footwear and direction of movement so the result can be reproduced with the door and other furniture in place. If you change which boots will live in the tray, repeat the relevant trial under the new assignment.
Walk the same route from the opposite direction
Leaving the house reverses the order. You take dry footwear off near the seat, find the pair you plan to wear outside and then open the door, sometimes with a bag already slung over one shoulder. Make a placement for the footwear you leave behind. If you can take off your dry shoes only while standing on the tray's far side, the route may force another step back across the wet boundary. In a home with a step between floor levels, show which level contains each action. Keep the step visible and the landing that belongs to it clear. A tray that fits along the wall below a step may still be far from the hand that has to retrieve the boots.
When a household has different ages or reach needs, invite each regular user who can safely participate. One person may need room for both feet and support near the seat. Another can lift the boot by a loop and place it below without leaning far. A layout chosen by the person with the longest reach may make the tray invisible or hard to use for someone else. Observe what actually needs to change: seat choice, the side of the tray, a place for the bag, or the sequence with another person. For any applicable accessible route or required clearance, confirm the local requirements independently of the household's trial.
Resolve a collision by changing one variable
Imagine a plan that leaves the entire seated area clear when the tray sits beside the bench. During the exit trial a door handle passes over the tray, while the lower panel strikes the rim as the tray turns outward. Keep the approved door position the same and square the tray to the wall. If this makes the right boot hard to lift, record that new restriction. Next try the under-bench location with the shorter wet shoes and assign the tallest pair elsewhere. Checking one change at a time gives you a choice between two working routines or identifies where the design still needs work. This is an illustrative comparison. The governing door position, allowed floor area and furniture vary by entry.
Another possibility is that the door works at both trial positions, yet a person leaving the house tends to put a foot in the side tray when sitting down. Watch where they first look when they enter, especially if there are coats or bags hanging at eye level. Try shifting which end of the bench users sit on, then move the tray closer to the wall if it still fits on stable ground. Test whether the shift actually leaves a usable place to stand up and turn. The tray's four edges, the seated person and the open door all retain their own outlines; a layout can easily trade a door conflict for a different pinch point.
The next morning, take the tray out and put it back
A useful storage layout survives its cleaning routine. With the boots dry and tray empty, remove the pairs in the order you would after the rain. Notice whether a hand can reach the last one or whether a bag, bench leg or low shelf gets in the way. Find where you put the shoes while emptying the tray. For an under-bench option, slide out the empty tray and stop at the point where you must change grip to pick it up. See whether the front rail or the outer lips contact. As you lift, check the clearance through the swing of the door and past the far end of the bench. If the tray is too big to carry comfortably, consider which size and location let you maintain it without dragging it across the floor.
Plan where dirty water goes. Most of the design can be tested without water. For a wet check, use only a small amount where the floor, tray and surroundings permit it, keep people from stepping into the test patch, and dry the area promptly. Watch whether water would stay within the tray during normal use and what happens at the boot's heel when you lift it. Look underneath for moisture, especially if a mat or liner covers the floor and would hide water. Follow the flooring and tray care instructions. Move or clean a tray with water by a suitable method instead of dragging a full tray over a surface that can be damaged by moisture.
Under a bench, you may need a clear sightline or a regular occasion to lift the tray and inspect the floor beneath. A side tray is easier to see, though a user can still overlook moisture beneath it. Check what support, cleaning and drying are possible. Airflow depends on the actual furnishings, shoes and room; consult any relevant care instructions and observe where damp items can dry. The furniture needs stability and suitability for the intended seating and loads. Keep comparisons of slip, floor finish, mounting and rated use tied to the selected products and appropriate professional input where needed.
Mark which floor patch you need clear for cleaning. An under-bench tray may share the seated zone for a short time, provided the household can clean it while the seat is free and the door route remains usable. If the only way to remove water would be to carry the tray through a busy threshold, consider whether a lighter tray, a deliberate off-hours cleanup or another location is better. In a busy household a cleaning action that is hard to perform may keep a wet tray in place longer than expected. Place the refillable or washable items in the position where their daily use can be maintained by the people who actually do it.
A washed tray has to go back. Dry it and check whether its edges catch as you slide it into the final position. Note the orientation where it passed the bench legs and whether it can be placed there without moving the bench. If cabinet doors, decorative molding or floor protection are planned but not installed, repeat after they are in position. For a commercial entry, rental or shared hallway, check the rules and applicable access requirements of that location before placing furniture or trays. This comparison is meant to help you understand your own arrangement.
Put the fit and the daily routine on one sheet
The height comparison lets you enter the tray-bottom to underside height, any overhead projection that is still outside that measurement, the height of the boot and your chosen trial allowance. If you measured directly to the lowest relevant part of the bench, enter zero for the extra projection. The simpler section uses zero as well. Record the static gap and the balance after your trial allowance separately. Reset brings you back to the demonstration. A large trial allowance chosen for one grip is not a new rule to impose on every boot, and a positive result needs the rest of the seated, doorway and cleaning checks.
Use the printable record to put readings and observations next to each other. Write where the height reading was taken, whether it already includes a rail, how the boots were oriented and where the tray sits in plan. Use a second copy for the side option if it has different conditions. If the tray is beside the bench, record the wall length or other boundary that actually governs it. Leave missing sizes blank and write what item or finished surface is still needed to obtain them. Compare both candidates after the same check so the least convenient step remains visible.
A practical record could be phrased as follows. “Tallest dry pair stands in the side tray and can be put down without crossing the dry shoe landing. Door closes with the tray squared to the wall. Verify the finished casing after replacement. The alternative under-bench spot accepts short shoes; the test boots meet the front rail before they are in position.” These are sample observations. Replace them with the state you actually saw. Rather than copying the worksheet's height number onto an order, share the measurement reference and what happens in the room when the tray moves.
Decide how the furniture and supplies for the remaining entry tasks will fit around this sequence. Wet footwear may get the most attention on a rainy day, while keys, bags, coats and dry shoes will still need their places. If moving one of those tasks makes the tray layout workable, draw the new location on the same plan and rehearse the handoff from door to seat once more. Entryway layout guide
Take a photo or draw the successful arrangement from the viewpoint of someone arriving. Include the position where the door stops and the point from which you measured the available wall. For a tray that moves out to clean, show where it lands temporarily and write down the order used to clear it. If you are comparing furniture in a store, take the full footprint and underside profile back to that sketch. Exterior bench depth can conceal a rail or a leg arrangement that rules out the tray even when the product's dimensions seem to fit your wall.
If you are ordering a bench after the trial, share the required shape below the seat, the intended seat height you checked, and the floor outline available for the tray and door. Request the maker's underside and support dimensions for the model as supplied. For a bench you already own, retain the seat that works for your users and make the tray assignment fit its accessible opening. Repeat the dry test in the finished room, especially if a new floor mat or altered trim changes where the tray sits.
Choose the position you can use with wet boots on, a bag in hand and someone else at the door. The successful arrangement lets you set the boots down, stand on the floor you intend to keep dry, and remove the tray when it needs cleaning. If the best place for the tall boots leaves the underside useful only for dry shoes, give the two places those distinct jobs. Mark that choice on the floor plan so the person coming home in the rain can follow it.
TRY THE EXAMPLE
Compare boot height below a bench
Use millimetres measured from the tray bottom. The 20 mm allowance is a chosen trial, not a standard. Change it and compare the static gap and remaining balance.
Allowed range: 1–1000 · Step: 1
Allowed range: 0–300 · Step: 1
Allowed range: 1–800 · Step: 1
Allowed range: 0–300 · Step: 1
A negative remainder means the selected allocations overlap. Change the inputs or the proposal.
- Static gap above boot
- -50 mm
- Balance after trial allowance
- -70 mm
Reference boundary — Tray bottom to bench underside: 260 mm
Blue dashed line: comparison boundary. Red dimension: shortage.
Balance after trial allowance: −70 mm · Short by 70 mm
260 − 0 − 310 − 20 = -70 mm
Measure at the actual tray bottom and lowest bench projection. Try gripping and removing dry boots and an empty tray; arithmetic does not establish a usable or safe layout.
Teaching assumptions, not a surveyed home or a construction check. Results describe this simplified geometry or budget only. Changes stay on this page and reset on reload.