Where to Hang a Long Shoehorn in an Entryway
Compare hook height, door movement and seated reach before mounting a long shoehorn beside an entryway bench, using a practical check sequence.
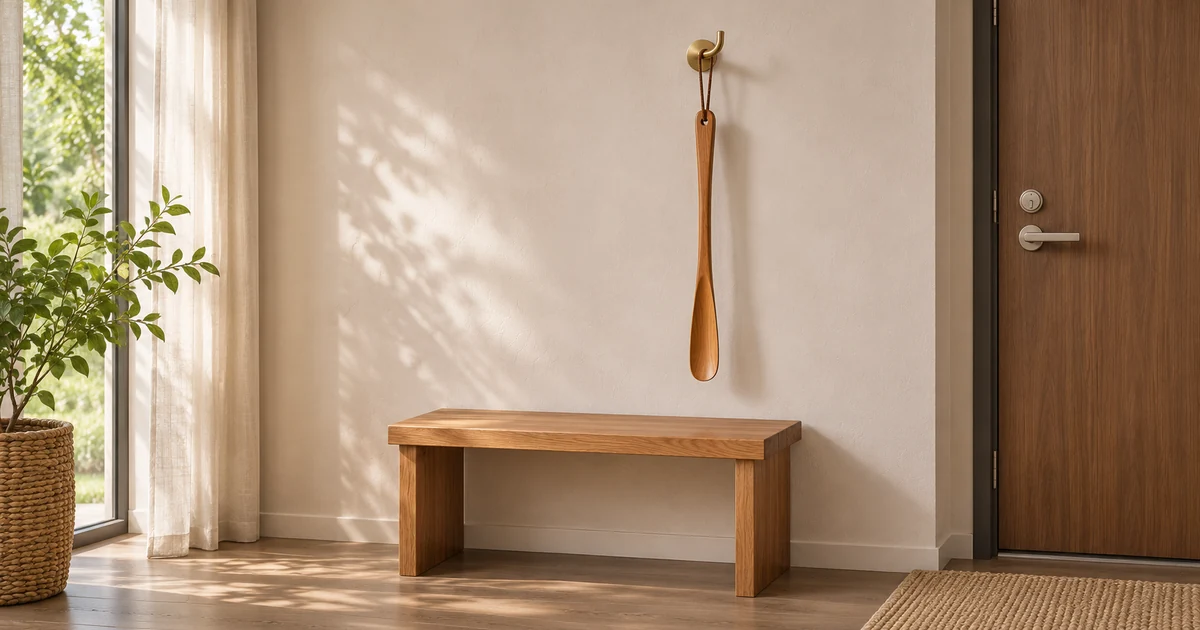
Long shoehorn and bench heights
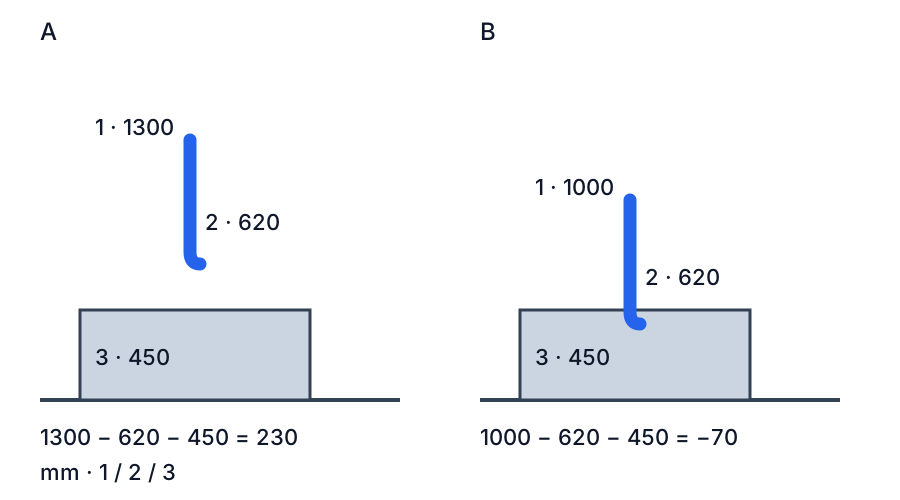
With the same 620 mm hanging length, a 1,300 mm hook at A leaves the shoehorn 230 mm above the bench. A 1,000 mm hook at B puts its end 70 mm below the seat in the projected section.
Sit down on the entryway bench before choosing where the shoehorn should go. Put a shoe at your feet and see where you would naturally reach for the handle. Then try the reverse action with the door in the position it normally occupies at that moment. The wall behind the door may look empty when everyone has left, but the very task you are planning for takes place with people, shoes and a moving door in that space.
The dimensions below are an invented comparison in millimetres. For a real entrance, the person who uses the shoehorn, the bench and the door each supply evidence that the diagram cannot give.
Try the departure first, with no hardware on the wall
Put the bench, shoes and ordinary accessories where they tend to be just before someone leaves. With a helper outside the door's movement, use a lightweight blunt outline of the intended shoehorn and removable marks for possible wall positions. Sit in the spot and direction normally used for putting on shoes. Some people sit facing the doorway, while others turn sideways to have more room for one leg. Allow space for ordinary foot placement and for anyone who needs a stable seat or assistance. Preserve that arrangement while comparing places for the tool.
Ask for a sequence in the user's own words. “I sit near the end, leave the door open, take the handle in my right hand, put the shoe on, and hang the handle back before I stand.” That account tells you where to place the marks and in which door state to look. If the usual habit is to stand first and take the shoehorn from the wall, let the trial reflect that. The fitting should support the person's task. It should not require someone to change how they sit or step merely because one mark gives a tidier elevation.
Rehearse the return while still holding the soft sample. Sometimes the handle is easy to grasp because it hangs naturally, but getting the loop onto a higher hook takes a longer reach. The wrist may turn toward the wall, the far end may sweep across a seat cushion, or the user may have nowhere stable to put the sample while approaching the door. From the side, note the highest point during return, the farthest sideward movement and whether the user can feel the support without leaning. Do not use a heavy, sharp or breakable object for an early placement trial.
Observe passive and active conditions separately. The shoehorn can hang motionless beside the bench with plenty of room, then clip a coat hook as it is taken down. A bench that stands well away from the closed door can be beside the door handle halfway through opening. Mark where the user is before handling the shoehorn, where the end travels during the action and where it ends up, regardless of whether anyone would choose that exact position from a photograph.
Try the smallest set of new marks that answers the question. One can sit beside the normal seating end, one on the wall beyond the bench, and one on the wall that looks free when the door is closed. Put a short paper label at each location and give it a height from a common floor reference. While the marks are in place, ask the regular users to show their usual move. Choose marks they can comfortably reject as well as test. A neutral mock-up makes it easier to discover that a frequently used spot is inconvenient without creating a patch or an exposed fitting.
Set the bench with the user's feet in mind
Record bench top height where the person sits, including any cushion normally in place. Then draw the outside end of the bench at its real projective depth from the wall. A stool under the bench or a low footwear tray can extend farther than the seat. Include parked boots or slippers that stay by the wall during use. For the hanging tool, the lowest relevant nearby surface may be a shoe, the edge of the tray or the top of an arm rather than the central bench top in the example.
The person often needs one hand free to balance or hold a shoe. Ask what they normally do rather than assuming they can use both hands to reach and detach the shoehorn. A high hook to one side might clear all the furniture but be difficult when the user is seated with one hand occupied. A lower hook in the same spot can improve hand access while putting the far end near the shoe tray. Move the position in plan if lower height is important and the existing bench blocks the hanging outline. Record the hand arrangement without prescribing an individual posture.
Keep any separate needs for accessibility and support visible. A comfortable reach can be observed directly, but the example's heights are not accessibility measurements. If the entrance, seat or door needs to meet particular access requirements, use the relevant local rules and suitable professional advice for that project. Preserve required routes in both door states. A hook that only works because a user steadies themselves on the door is not a completed location choice. Use the intended person's normal support and check that the use is repeatable.
Put the lowest point on the elevation
Suppose the hook's contact point is 1300 mm above the floor. The loop and shoehorn together hang 620 mm below it, so the lowest point is 1300 − 620 = 680 mm above the floor. A bench top at 450 mm is 230 mm below that point in the same projected elevation.
Open the full-size hook-height comparison
In the figure 1 is hook height, 2 is the complete hanging length and 3 is bench height. At a 1000 mm hook height, the bottom is 380 mm, or 70 mm below the bench top. If the shoehorn and bench actually share the same horizontal space, their envelopes may conflict; if the hook is on a clear adjacent wall, they may not. The diagram projects both onto one plane and does not decide that spatial relationship. A lower hook may improve reach but can put the shoehorn into the seat or a nearby shoe tray.
Measure the actual loop and any hook projection, including the way the shoehorn hangs rather than just its labelled product length. At both candidate heights, check whether the user can remove it without bending uncomfortably or knocking other objects. The entryway bench and boot-tray guide addresses the space below the bench; it does not validate this wall position.
Start the measurement at the bearing point
On an actual hook, distinguish the screw or tape base, the high end of the tip and the location at which the loop rests. The latter is the start line for the length subtraction. If the user lifts above the tip to remove the loop, the difference between the tip and the bearing point is part of the motion. The supporting wall may have a layer of trim or panel, and its offset affects how far the hook and tool project. Record both the support height and the projection toward the room.
Measure the complete length in its hanging position. Lay the shoehorn and loop out for inspection, then locate the lowest point when the loop is held at the sort of support permitted for that product. The loop might flatten, twist or settle farther down a curved hook. A curved end may project toward the bench or wall. A marketed-length shoehorn can hang farther than its nominal body length once a loop or strap is added. Keep the bearing height, full hanging length and lowest point in three separate fields rather than measuring from an arbitrary top edge.
The bench height is another reference. If it is on a rug and the wall mark comes from a bare floor, compare where the two vertical measurements begin. For a floor that is not level across the entrance, establish a common line for comparison and write where it was taken. To assess the outline at the proposed wall site, check the places where both physical things could meet, rather than subtracting heights taken from unrelated footprints.
Compute a useful threshold for the original teaching case. A 620 mm hanging length and a 450 mm bench put the contact line at 620 + 450 = 1070 mm for the lowest point to align with the bench top. At exactly 1070 mm there is no vertical separation in that projection. If you want a chosen extra 40 mm in this example, the line would be 1110 mm. These values identify heights worth comparing on paper. When the wall and bench actually overlap in plan, the only meaningful target depends on the real outline and the user's comfortable take-and-return motion.
If the contact is already fixed, reverse the same calculation for the object. At 1000 mm with a 450 mm bench, the longest complete hanging length that reaches the bench line is 550 mm. With a hypothetical extra 40 mm, that length becomes 510 mm. The 620 mm example hangs farther. If the length is what makes the fixture useful, first consider a wall portion beyond the bench end, where the two do not share a footprint. Alternatively select a different appropriate support or shorter product and retest comfort. Altering a loop or storage orientation depends on the maker's instructions and the product's intended use.
A replacement part can matter even without moving the casing. Suppose a replacement loop increases the complete hanging length from 620 mm to 660 mm in the hypothetical model. At the 1300 mm contact, the bottom moves from 680 mm to 640 mm. The difference above a 450 mm bench changes from 230 mm to 190 mm. At the 1000 mm contact it would be 340 mm, or 110 mm below the bench top on the projected elevation. A new loop's behaviour as it takes the load still needs checking. The comparison tells you which boundary changes while all other assumptions remain fixed.
Add the outline behind and in front of the elevation
Draw a small plan through the hanging position, including the nearest edge of the bench and where it sits relative to the wall. The distance from the wall to the hook tip and the bend of the shoehorn determine how far the object can project. A low fixture that is beyond the side of the bench can have a negative vertical comparison without touching it. But if the curved end extends back into the bench footprint, a vertical match still matters. Hold the outline at its actual orientation and mark how it projects before marking either condition as clear.
An empty bench can tell you about furniture and miss the seated person. Show a shoulder and the reach beside the seat at the height where the handle and shoehorn move. A long tool can sweep through the leg area when turned from vertical hanging to use beside a shoe. Compare the inward and outward rotation that the person would normally make without approaching the door movement. A projection on a wall beside the seat may crowd the space used for changing shoes. An accessible alternative preserves both the resting outline and the handling sweep.
The tray has its own place in the drawing. If the shoehorn's end hangs near the floor, show the sides of the tray and the largest shoes it normally holds, not just an empty tray. When a season changes the likely contents or a different mat shifts the bench, revisit that part of the drawing. A high candidate above a bare tray should not be treated as forever clear without saying what must remain there. Show the everyday objects that establish the geometry of the entryway.
Walk the door and the person past the marker
Open the full-size three-step check
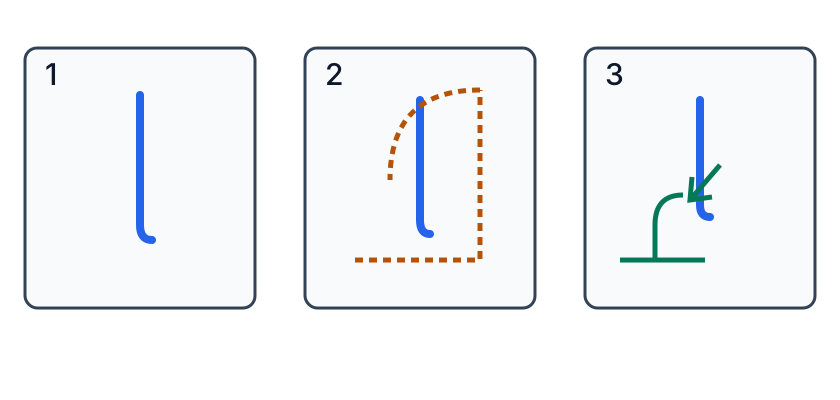
Step 1 marks the proposed hook and full hanging outline. Step 2 follows the door through its ordinary movement, including its handle and any stop. Step 3 checks taking and returning a blunt sample from the user's normal seated or standing position. These steps answer different questions: passing one does not establish the other two. Do not stand in the door's path or force it against the marker.
Use the position check to select each step and record evidence you have actually collected. An unchecked step is unknown; a checked step is your own record, not the system certifying the hook, reach or door. The record resets when the page reloads. If the candidate behind the door fails the door movement, compare a side wall or an approved freestanding holder; a side location can require a longer reach and deserves its own test.
Behind the door, start at the hinge and follow the handle
A wall hidden behind the open door often has an uninterrupted patch, which makes it an obvious place to put a small hook. First compare the hinge axis, door thickness and handle against the point where the hook and shoehorn would project. Explore the normal range from closed to open, watching the intermediate positions as well as the end position. The leaf may clear the wall while the handle moves closer to the tool at its own height. An existing stop can define ordinary travel, but it should not be changed or expected to provide a different purpose just to gain the fitting.
A hanging tool occupies additional space as the loop moves or the curved end rotates. Mark its parked projection and the outline of it lifting toward the tip. Even if the door does not touch it at rest, normal use can bring a portion out farther just as someone is opening the door. Consider the task used to put it away at the start of the trial. If someone must close the door to reach it every time, record that restriction. In a busy entrance the fit may be very different from the quiet state used to install the hook.
For a neighbouring door, trace its movement too if it can share the same area. A closet door can cross the wall beside a bench a few minutes after the entry door has been closed. Its handle and the person reaching inside can disturb the shoehorn even if the outer door stays well clear. A sliding door can also occupy the hand's access path at the edge of its opening. Draw the conditions as real household sequences so the number of independently moving objects stays clear.
Keep ordinary access and any required exit route free in the mock-up and the final choice. Test with paper marks from a safe stance and stop before driving the door into any object. Make sure people have room to walk through in the positions they use, without assuming somebody will intercept the door or remove the shoehorn first. If the door condition cannot be reconciled with resting position and handling, take the candidate off the shortlist and compare a side wall or approved freestanding support.
Beside the bench, try reaching and returning with each relevant hand
Give the task to the person who is going to use the tool. Start in the usual position: a seat at the near end, a separate stool, or an ordinary standing position. A wall that is reachable by moving to the far end of a bench may be inconvenient if the far end is needed for bags or does not have room for feet. Keep that setup in the trial. Observe whether the person can take the handle, clear the hook and rotate the usable end toward the shoe without moving the door or leaning through someone else's space.
Check the return from the actual end of the task. After the shoe has been fitted, both feet and knees can be in a different position. If the user stands before returning the tool, trace that move. If they normally stay seated to finish the other shoe, see whether setting the tool down or finding a holder makes the sequence simpler. A very tight loop can require a second hand to open up the contact area. An appropriate fixture with an obvious resting point may make a higher location less awkward to use than a smaller fitting at the exact same height.
Pay attention to the end of the shoehorn that is farther from the hand. When the handle comes to the user, that far end can rise, travel along the wall or sweep behind the bench. The long curve useful for putting on shoes is also a longer lever during removal. On the outline, mark the limit where the far end would cross a tray, bag or coat. If that space is usually occupied, compare another direction of approach or a nearby support where the whole tool can leave along a simpler line.
If there are several users, confirm each one's acceptable position and note the ordinary approach. Do not average the heights and assume a compromise has been tested. A standing adult and someone who needs to remain seated may use one fixture by approaching from opposite sides, or prefer different storage. If one person cannot operate the loop with the usual hand, a suitable holder can be more useful than trying to maintain a wall hook at a height that suits only the other. Keep the decision with the household's observed routine and the product's handling conditions.
Write down three separate findings for each candidate
- Resting outline. Mark the proposed bearing point, total hanging length and actual bottom line. Identify the nearby bench, footwear and door projection at the same location.
- Door movement. Follow the usual opening and closing sequence, including intermediate angles and the user's path. Check the physical projection of the fitting and the tool, while leaving passage available.
- Take and return. Try the movement with the intended user, their seat and the right range of hand positions. Check the other end of the tool and how the loop settles when the person releases it.
The three items in the check below are evidence notes for the position you are considering. If you mark a step for the bench side, keep a separate worksheet line for the wall behind the door. An unset step still needs a check. The browser controls can remind you of the sequence, but your recorded observations need to say what the door did and how the hand moved. They belong to that exact candidate. Starting over in the browser should not erase the measurements you need to compare on the next visit.
Choose among the places you can actually use
A wall beside the seated user's working hand
Start this candidate at the side of the bench where the intended user has room to put one foot down and move a hand. Position the marker so that it can be approached from the user's usual seat. If the whole outline hangs outside the bench footprint, it may be possible to set the bearing point lower while keeping the tool away from shoes or a tray. Ask the person to put on both shoes using a light sample. Stay clear of the door and record which hand begins and returns the tool. A useful position works at both moments.
There is a small cost to reaching sideways. The extra reach can be insignificant in one entrance and unpleasant if an arm of the bench, coat sleeve or stored bag stands between person and the wall. Place each everyday object where it usually lives before repeating the trial. If the bench is normally pushed right up to a wall, the person's shoulder might be able to turn only on the other side. A different edge of the bench can change the action without a change in the shoehorn's vertical reference.
A fixture just beyond a bench deserves two separate floor measurements. One concerns the available passage past the bench. The other concerns the space used by the person retrieving or returning the tool. Draw a floor outline for each. An unused strip between the bench and the wall may be ample for the hanging end while offering very little space for a hand to approach from the front. A low hook may also put the tip near footwear under that hand. Check those details with the actual loop and tool shape.
A wall beyond the open door
This candidate can look discreet on a photo of an empty entrance. Test it during the busiest time of departure. Mark the angle of the open door when somebody stands inside to put on shoes, and again when another person enters from outside. A suitable wall point has room for the whole shoehorn as well as for the door hardware at each encountered height. If it is on the far side of the door, look at whether the actual user can reach it without touching the door or moving into its path.
A rear wall can be acceptable if the item's full projection clears the leaf, handle and user in the observed door range, and the fixture's support is suitable. Keep that outcome conditional on the actual handle and door. A thicker replacement handle, a longer loop, or a new mat that holds the door at a different angle can change what passes the marked point. Record the observed position of the door and the fixture type alongside the height. If the door would need to remain shut whenever someone is still getting ready, compare a location that is open to the user throughout the usual sequence.
Some entrances have a hinged outdoor door and a second swinging internal door in a small vestibule. Draw both openings at their usual positions when people are using the bench. If the two door paths already compete for part of the floor, keep the tool and hand out of that area. Draw carrying a bag or a pair of shoes as well as walking empty handed. Choosing a different wall in the room is easier to reverse at the sketch stage than patching an unfavourable fixing after a door strike.
A suitable holder at the edge of the shoe area
A stable, product-compatible holder can allow a more direct motion and avoid a fixing on a surface whose construction is unknown. Place its base on a suitable level surface and mark where the shoehorn handle will lie. Include the part of the holder that extends beyond the tool, and the space the person needs when lifting it. Compare on the same footing as a wall position. It has a resting outline, a movement next to the door and an approach by the user. A holder in a passage can interfere even when the handle is at an easy height.
Some holders need the long tool to be raised far before it clears a pocket. Draw that upward movement under shelves or projecting coats. A shallow stable support or an appropriate fixture near the seat can change the path, as the maker permits. A floor support may also be hard to find and use if placed behind stored boots. Store the ordinary boots first and run the rehearsal. A holder whose only available footprint shares the normal door route is not eligible even if it needs no drilling.
If a shoehorn can rest on a suitable shelf, include how it is retained, how the handle presents itself and where it travels during pickup. A horizontal orientation can give a favourable reach in a narrow side zone. It can also extend toward a walking path or take up the surface used for keys. Compare that surface at busy times and keep small stored objects away from any action that could sweep them off. Confirm the storage method and suitability with the product information before expecting it to stay in place.
Two alternative benches in the same invented elevation
Consider the same 620 mm hanging length and a 1000 mm contact point. The bottom line remains 380 mm. If a different bench at that location is 420 mm high rather than 450 mm, the signed result is now 380 − 420 = −40 mm instead of minus 70 mm. The mismatch is smaller in elevation, but an overlap still deserves a plan check. A bench top of 380 mm would align the lines exactly, while a nearby footwear tray could still rise into the projected outline. Moving the hook along the wall beyond the bench end can change the overlapping footprint without changing any of those heights.
Return to the 1300 mm candidate and retain the original 450 mm bench. A sample with a longer loop may keep the lowest end above the top in elevation, as in the 660 mm example, while making the reach to return more demanding. Mark the motion the hand makes to clear the lip and the height at which it actually carries the loop. A comfortable reach at the hanging handle position is not a test of placing the loop over the fitting at that active position. The comparison should tell you whether a small location adjustment or a different support addresses the particular movement that failed.
Follow the arrival as well as the departure
The person coming home can have a bag in one hand and the door on the other side. The bench may hold a parcel left there a few minutes earlier. Observe where the bag and parcel actually get set down before somebody sits. A fitting immediately above the bag position may be usable on a clear bench yet disappear behind a strap during the next arrival. Give bags their usual home and repeat the reach. If that space belongs to parcels or coats every day, move the tool marker beyond it and try the new return direction.
Check the stretch from the end of the seat to the floor with two types of footwear that the household normally uses. A taller boot can alter the way the user turns or moves the long shoehorn. A slipper commonly left below the hook can occupy the lowest part of its hanging position. Those are separate changes: one to the active side sweep, one to the parked outline. Record which one is important at each candidate. If clothing takes up the area during one season, use that ordinary condition when deciding whether the reach and tool can both pass.
Ease of finding a handle matters when people enter in low light. Observe what the user can see from the ordinary seated or standing position under normal room lighting. Try an obvious support point clear of other hanging objects, or use an appropriate place on an existing support in view. Keep this observation tied to the physical reach trial. A visible choice still needs the same door and passage checks. If two candidates perform equally well, it can be reasonable to choose the one that stays easy to find and return while other people are passing behind the seat.
Handover before making a hole
Give the installer or whoever is responsible for the fixture a specific bearing height drawn from a known floor point. Show where the fixture projects after installation, including any spacer or trim. Identify the intended product, surface and attachment method from the maker's instructions. If the wall surface is uncertain or near concealed services, keep the decision pending for appropriate verification. A permitted alternative stand or a different surface may meet the user's placement needs while avoiding intrusive work. A temporary tape marker communicates position but carries no authority about the wall structure or weight it can support.
Treat a rental wall, furniture side and finished panel as separate surfaces. Approval for one does not imply approval for the others. An adhesive fixture, clamp and fastened fixture each have their own documented compatibility and use. Check what part of the fitting might contact a moving door even when the shoehorn is away from the hook. Tell the next person whether the measurement includes the point supporting the loop or the top of the mounting plate. Transfer that dimension from the drawing carefully so a correct proposal is not fitted at an unintended height.
When the chosen installation is ready and appropriate, repeat the simple departure in the original order. Use the actual permitted product and verify ordinary door travel, safe passage, the comfortable reach and the moment of release. Stop before any contact and update the drawing with the place that caused the concern. If a fixture moves when used as instructed, revisit its suitability and installation with the relevant guidance. Recheck a seasonally loaded tray or changed seat separately, because the attached hook may be unchanged while the room around it is different.
A handover can end with a note someone could reconstruct. “At the right end of the bench, the loop bears at the marked floor height. The tool hangs outside the bench edge and is returned with the right hand before standing. The open door reaches its normal stop without entering that hand movement.” Fill in whatever the actual trial established and leave anything untested open. A weak candidate can be recorded just as clearly: the handle of the door hits the projected hook area, or the step to return the loop is beyond a comfortable seated reach. The name of the problem is more valuable than a preferred generic mounting height.
- Draw the door frame, normal swing, bench, shoe tray and proposed hook on a simple plan. Include the door handle and the hanging object's forward projection; a floor plan alone may miss the hook height.
- Mark both candidate hook heights with removable tape. Measure from the same floor to the contact point, then subtract the complete hanging length. Check nearby surfaces in three dimensions, not only the elevation.
- With the user seated in the normal position, have them try reaching the temporary marker and returning a blunt sample. Do not treat a generic height or this diagram as proof of accessibility. If several people use the entry, try each person's actual movement.
- Confirm the surface and fixing with the hook's instructions. Avoid concealed services, rented surfaces without permission, and any location that obstructs an exit. Choose a holder if a suitable wall fixing is unavailable.
- After correct installation, repeat the door, take-and-return and bench checks. If the loop, footwear tray or seat changes, recheck rather than assuming the original position still works.
TRY THE EXAMPLE
Record the three hook-position checks
Choose each step and record evidence you personally collected. Unchecked means unknown; checking does not certify reach, door operation or the fixing.
Mark the proposed hook contact and the lowest point of the hanging loop and shoehorn. Note the hook projection and any bench or tray in the same space; an unmeasured length remains unknown.
Measure the real hanging loop and hook, test normal door movement and reach with the user, and verify the wall and fixing separately.
Teaching assumptions, not a surveyed home or a construction check. Results describe this simplified geometry or budget only. Changes stay on this page and reset on reload.