Kitchen Scale Storage and Counter Space for a Bowl
Compare a kitchen scale's drawer footprint with its weighing space on a counter, including the bowl, display and an actual removal route.
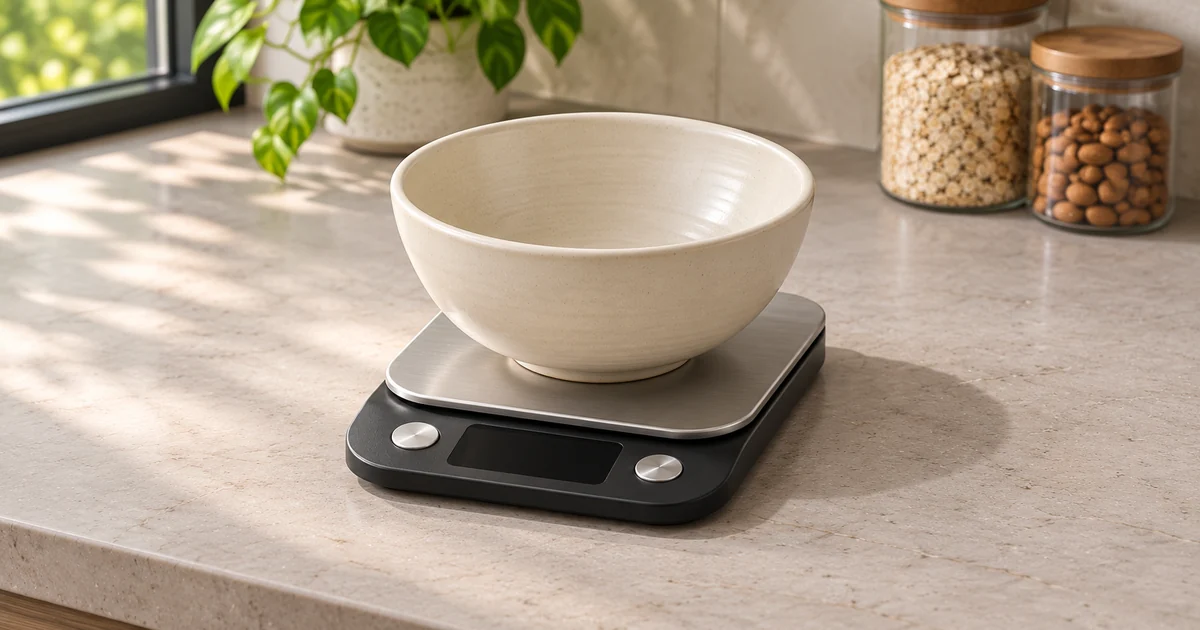
Kitchen scale in its drawer and on the counter
A shows the 180 × 240 mm scale inside 400 × 300 mm of clear drawer space. B adds a centered 240 mm bowl on a 360 × 300 mm worktop, leaving 120 mm total across the width and 60 mm across the depth.
A kitchen scale may fit a drawer yet still be inconvenient when a mixing bowl covers its display or the usable counter is occupied by another appliance. Decide where to store it and where to weigh before buying an organizer. A drawer near the worktop reduces carrying, while a clear section of counter must accommodate the bowl and the actions around it. If the scale's full dimensions or the bowl's outside diameter are unknown, measure them rather than treating the unknown as zero.
The dimensions below are a teaching example in millimetres, not a tested product or a standard worktop clearance. A footprint calculation cannot verify a scale's capacity, accuracy, stability or water resistance; use the actual manufacturer's instructions.
The drawer: measure the usable floor and opening separately
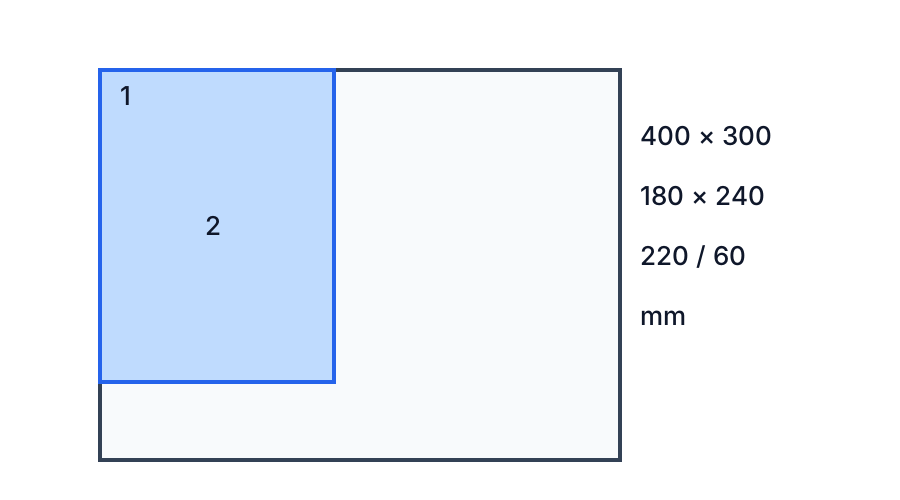
Assume the clear drawer floor is 400 × 300 mm and the scale's outside envelope is 180 × 240 mm. Placing the scale at a corner leaves 400 − 180 = 220 mm total unused width and 300 − 240 = 60 mm unused depth. Those are the total differences in this simplified plan; placing the scale elsewhere divides them between edges.
Open the full-size drawer diagram
Number 1 is the usable floor, 2 the scale envelope. Look at the narrow remaining strip before adding a divider: the 60 mm depth difference does not automatically fit a hand, a liner or a charging cable. Measure the opening, overhead lip and any drawer runners separately. A scale may fit the floor but require a tilt to pass the opening; simulate removal gently with the unplugged scale as instructed, without forcing it against the drawer.
The counter: include the bowl without adding overlapping areas
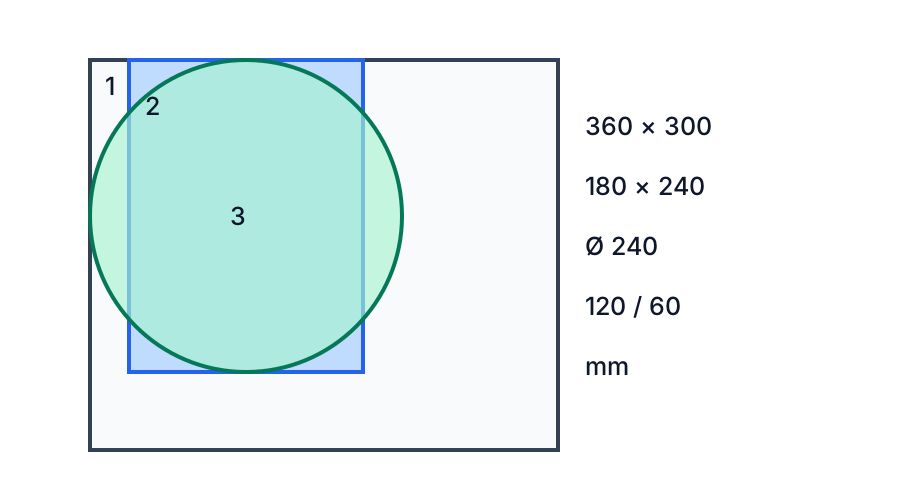
Assume a clear counter rectangle 360 × 300 mm. Place a 240 mm outside-diameter bowl centrally over the same 180 × 240 mm scale. The combined bounding footprint is 240 × 240 mm, because the bowl and scale overlap in plan; it is not 180 + 240 mm wide. The total differences from the clear rectangle are 120 mm in width and 60 mm in depth before choosing offsets.
Open the full-size weighing diagram
Here 1 is the clear counter, 2 the scale and 3 the centred bowl. Check the display and controls as well as the perimeter: a bowl can cover the display even when its outline fits. The example says nothing about whether a bowl overhang is stable or allowed. The chosen scale's manual governs supported loads and placement.
In the storage and weighing comparison, switch states and enter the drawer, counter, scale and bowl dimensions. The graphic centres the bowl on the scale for this simplified calculation. A 320 mm bowl changes the assumed weighing footprint to 320 × 320 mm: the same counter has 40 mm width left but is 20 mm too shallow. A positive difference is not a usable hand clearance; test actual offsets, visibility and motions separately. Blank inputs remain unknown.
A storage test and a weighing test earn separate passes
Set a ruler, your usual empty bowl and a strip of painter's tape on the worktop. Take the scale out of its current home and put the bowl on it where you would normally prepare food. This is the shortest route to identifying the problem. If one hand has to hold a drawer open while the other hand drags the scale past a scoop, the difficult step starts in storage. If the drawer works but you lean over the bowl to see a number, the difficult step starts at the worktop. Moving the scale to another drawer will do little for a number that disappears under the bowl.
The distinction helps when comparing two proposed locations. Give one row to the stored object and one to the active station. The first row asks whether the scale can enter, lie in its intended position, and be removed gently. The second asks whether the equipment and ingredients can occupy the counter through one complete weighing sequence. Keep a third note for what remains unknown. An incomplete row is more useful than a tick made before the bowl is on the platform. Add one specific observation such as “the rear drawer edge leaves no place for fingers” so you can compare remedies next time without repeating the entire survey.
| Check | Observe it in this condition | Record the first point that fails |
|---|---|---|
| Entry | Drawer fully open and neighbouring fronts in their normal positions | The height or width that stops the scale or your grip |
| Storage | Scale resting with the cover or attachments that stay with it | The fitting, liner or shared utensil that occupies the same space |
| Readout | Bowl centred according to the manual and viewed from the working position | The display segment or unit symbol that disappears |
| Transfer | Bowl set down, ingredients waiting and a separate destination available | The place where the bowl or scale has to be held in the air while space is cleared |
| Return | Ordinary preparation finished and the scale cared for as instructed | The objects that need to move before the scale goes back |
The drawer can pass while the worktop fails, and a reading test can pass while the return route fails. Keep those observations intact when ranking solutions. A wider organizer ordinarily changes only the storage row. A different bowl can change the reading and footprint rows while leaving the drawer untouched. A different preparation location changes the transfer path and where the scale gets put away. Each is a legitimate response to a specific failure.
Fix the reference points before measuring
Use the inside face of the left side as zero for the storage width, and the inside rear face as zero for the storage depth. If there is a metal lip or a large hinge with a different position farther up, mark that on a separate opening sketch. On the worktop, use the edges of the area you actually cleared. The rear reference can be the front of a fixed appliance zone and the front reference can be a tape line short of the counter edge. Label them in the photograph or sketch so somebody else can reproduce the same rectangle.
Record dimensions across the position at which the appliance will actually sit. For an inset drawer insert, the opening, base and space over the base can all be different. A ruler stretched between cabinet sides can produce a wider figure than the usable floor. On a counter, a mixer body may end before its controls or handles. Turn the device to the orientation you will use before recording the boundary. One careful reference is worth more than several measurements from different points.
The figures in the previews above use idealised, square-edged areas and typical-looking geometry to explain the arithmetic. For your own kitchen, make an overhead sketch and a side sketch. Put the width and depth on the first and a clear opening height on the second. Record the place where the narrow point occurs. A width that applies only at the front tells you much less about an internal divider near the back.
At the drawer opening, account for the part you hold
Imagine a scale that is 180 millimetres wide and 240 millimetres deep and has no accessible recess. With a straight overhead lift, both hands may need to reach down to opposite edges. A wider drawer might appear to give plenty of room, but a tall divider sitting flush with the scale can leave one side inaccessible. Pulling diagonally to find an edge then rotates a corner toward the front. When laying out the drawer, reserve a reachable edge next to the front before using the remaining footprint for storage. Choose the side that corresponds to your habitual grip and check it with the other hand if the drawer is shared.
A cover changes what you take out. If the cover remains on the scale in storage, both cover and body pass through the opening together. Some wide covers overhang at a clasp. Measure the maximum outside rectangle at the clasp and its height over the scale, with the product closed or stored as its instructions specify. If you remove the cover before weighing, give it a defined place at the worktop. Otherwise the drawer tray may record a tidy case that never survives the first baking session.
Small cables and removable trays need their own storage decision. A cable loose around a thin scale can snag on a utensil when the scale passes the opening. The built-in tray may be stored separately according to its instructions. Record what's attached during removal and what is carried separately. A scale that lives in the right drawer with a charging accessory in a second drawer has two distinct retrieval steps. It is reasonable to keep an occasional accessory farther away when the scale can be used without it. The working assumption should come from your equipment and how you actually prepare food.
Read a positive difference at the correct edge
Consider the 400 × 300 mm teaching drawer. A 180 × 240 mm body at zero offsets leaves 220 mm on the right and 60 mm at the front. If you slide the scale 50 mm forward to make it easier to grip, the front gap drops to 10 mm while the rear gap grows to 50 mm. The total difference still shows 60 mm. Someone reading just that total would overlook a move that has almost eliminated the approach from the front.
Next add a divider in front of the scale that uses 18 mm of the 300 mm depth. A model with the body stored against the rear then leaves 300 − 240 − 18 = 42 mm on that axis. Translate the 42 mm into an observation rather than choosing an arbitrary “finger standard.” With the front clear, can you put your hand where the product can be held and lift it enough to clear adjacent objects? If the divider occupies the place your hand needs, a positive 42 mm says the arrangement fits in plan and leaves the access question open.
Try a different orientation on paper before cutting a divider. Turn the scale by 90 degrees, so its 240 mm axis lies across the 400 mm drawer and its 180 mm axis runs into the 300 mm depth. Totals become 160 mm across and 120 mm along. In a drawer organised for flat spoons, the extra front space might be more useful than the earlier right-hand strip. Before choosing this orientation, check whether the lift can begin with a comfortable grip and whether the cover, knobs or other projections occupy the dimensions you used. A mathematically generous orientation becomes awkward if it forces the scale to pass near a tall tray that cannot move.
Keep the usable drawer floor separate from the opening
A pull-out drawer may not expose its full depth. You might measure 300 mm available at the floor but find that the rear 45 mm remains beneath the worktop when the drawer is fully extended. If the scale is lifted entirely vertically and stays horizontal, it has at most 255 mm of exposed depth along that line. Against a 240 mm body that leaves 15 mm of planning difference before allowing for gripping. Along a different path, the body could move forward before lifting and clear the worktop. The 15 mm belongs to the straight-up test at one position, not to every possible motion.
Sketch the start, the opening and the final lift as three outlines. You need room near the front to slide the scale forward before lifting. On another cabinet the overhead handle of the drawer above can intercept a tilted corner. With an empty accessory-free drawer first, observe the path without forcing the scale or using it as a wedge. If a cardboard cutout is easier, be aware that it represents the footprint only. Thick cardboard or a rigid mock-up with the scale's maximum height can represent more of the geometry. A bendable paper cutout that passes a corner proves little about a rigid case.
Look at the cabinet face from two directions. From above you will see a projection near the opening that reduces width. From the side you will see whether the overhead lip can be cleared while the scale is held level. Do the check with the drawer above closed and the adjacent cupboard in whatever position it normally needs during preparation. Test it again after you install any insert. An insert that made the model a millimetre smaller on paper may also have raised the scale toward the obstruction, which is a different failure.
Give the scale a deliberate return path
The last move of the job changes the storage decision more often than the first. A scale taken from a nearly empty drawer at the start can go back to a full drawer after mixing spoons and lids have returned to it. Observe which utensils migrate into the cleared slot. If the slots are shared, choose a simple boundary a second user will recognise. A full-width rigid organizer is one possibility. An existing shallow space could work with a single removable divider at the edge that actually needs it. Leave the scale in the intended position during the check instead of assuming users will notice a gap they cannot see.
Avoid storing weight on sensitive equipment unless the manufacturer allows it. A drawer that gains room because a stack of bowls has been counted as occupying the same floor area as the scale depends on storing one object on the other. The stacking assumption needs to be explicit. If the scale uses a protective lid or has operating controls that catch on items above it, account for the closed case at its tallest point. If a stored cable is allowed to stay in the drawer but tends to wander, give it a dedicated location outside the lift path before you define the minimum opening.
A scale used once a fortnight can live farther from the counter than one used for flour, coffee or portions several times in the same session. Compare the motions you repeat. A drawer next to the scale station pays off when the task starts with a cleared worktop and the scale has a straightforward return. It may be worse than a second cabinet if the drawer opens into the position where your feet need to stay while you weigh. Walk through both proposals with your empty bowl and a ruler rather than relying on the room plan alone.
On the counter, draw the objects in the order they arrive
The usual picture of a scale on a spotless counter skips most of the work. A bowl must arrive somewhere, ingredients must wait somewhere and a filled bowl must leave. If the only empty area is immediately in front of the scale, passing a container to your other hand can put it over the controls. The existing countertop behind the scale is not necessarily available, since it may already contain the rear half of the bowl's bounding circle. Sketch the order of arrival even when the footprint on its own fits.
Start by drawing one free rectangle after stationary equipment is in place. Add the scale with its display facing the working edge. Add the centred bowl as required by the manual and draw its widest outside edge, including any handles or lip that extend at plan level. The bowl and scale overlap, so use their union for the stationary bounding rectangle. A spare ingredient container next to the bowl occupies a separate area. It has to be drawn next to that union, or in a known staging bay elsewhere. This is where adding individual widths can make sense, provided they occupy the same band and cannot overlap.
For a handled jug, separate the body from the handle on the drawing if the actual projection is directional. A rectangular envelope is a quick screening tool. It formally reserves the corners of the rectangle even when the body is round. That can be conservative for a nearby utensil that fits in a cutaway corner without contacting the vessel. Conversely, a round diameter alone can omit a handle and underestimate the allowed turning room. Record the orientation in which the jug will be placed and lifted. If a handle must rotate around a backsplash to clear the neighbour, trace that sweep separately.
The preview's 240 mm bowl is deliberately centred. That helps compare the two article states and keeps the geometry aligned with the interactive calculator. Many scales have a platform offset rearward from the controls, so centring on the outside rectangle is not necessarily centring on the platform. Use the actual equipment's intended placement. On paper you can move the scale-with-bowl combination within the free counter rectangle until the controls and the preparation path become legible. Do not assume an off-centre load on the actual hardware is acceptable because it gives a nicer rectangle.
Check the front view before deciding on a bowl
The limiting feature may be the bowl's sloping wall rather than its bottom. A narrow foot can sit well inside the platform while the top lip rises into the line of sight to the display. A tall bowl and a short user standing close to the counter may form an angle at which the lip hides part of the display. The same setup can be readable to a taller user or to someone standing a step back, yet the latter position might make a button awkward to reach. A front elevation drawn from the stationary bowl does not tell you whose eyes and hands are in the way.
Put the empty bowl in its correct working position. View the display from where you normally stand to add ingredients. See the unit, the sign and all digits, not only the bright part of the number. Check which button is necessary for the ordinary sequence. If possible follow the normal product instructions to confirm a readout and control operation. You might be able to read the display without moving the bowl, but reaching the tare control could still require changing your grip on another vessel. Record the exact moment the setup becomes awkward and whether a change in stance is genuinely practical.
Do the same check for the other household user or for a preparation task with a different vessel. A wide, shallow receptacle can preserve sight over the rim while increasing its plan diameter. A taller, narrower bowl can improve perimeter clearance but hide the display. Looking only at outside diameter cannot compare these two consequences. When you shortlist replacement equipment, ask for a side view with the platform and display in the same photo. You want to see the relative locations and verify the manual's bowl and load instructions, rather than inferring them from a promotional photograph cropped around a number.
A removable display can change the question again. If the actual scale is designed for a separate display, lay out its cable or holder as part of the active station, along with the point where the controls will be used. A handy visible position is of limited benefit if it places the display where a bowl is carried to the sink. With a fixed display, changing the scale orientation can make the numbers face sideways. That may help in a one-person station where the cook naturally approaches from the side. It may give a poor view when the same counter is used from the opposite end around another person. Test the orientation in both positions where it matters.
Reserve a landing space for the contents you use next
Take a recipe in which you weigh flour, empty the bowl into another vessel, and then weigh sugar. Empty bowl, source bag and receiving bowl are distinct roles. If both bowls must be present at once, clearing one 360 × 300 mm patch is only part of the arrangement. Decide on a landing spot for the receiving bowl and a spot for the spoon or scoop before moving the scale. Draw measured footprints for the two bowls where they have to wait. If there is no contiguous counter area, the solution might be a short staging move rather than a bigger scale.
Suppose the stationary 240 mm combination is centred across a 360 mm clear width. That leaves 60 mm at each side. Move the combination 30 mm left and the differences become 30 and 90 mm. A 90 mm strip might accommodate a small utensil lying along the worktop, depending on its length, but a large bowl still cannot wait beside the scale in that band. You could stage it in a separate cleared rectangle, or decide that the source container can stay on a different surface until its turn. This is a decision about sequence. The calculation shows where the widths go and does not imply a required space on either side.
When the task is portioning several small items, mark where the filled portions accumulate. The first item may fit beside the empty bowl, while the final set occupies the only clear stretch between the scale and its drawer. Give them a tray that can move together if a suitable one is available and fits the preparation plan. If you use a second person to carry them away, record that dependency. A workflow that relies on help can still be fine for a shared cooking session. It can become inconvenient when operated alone with the same fittings.
Check where you rest utensils while reading and adding. A spoon laid across a bowl can project farther than the bowl's diameter. A spatula resting over the display can obstruct the same numbers even when the bowl is shallow. Record the envelope in the state that actually matters for reading and moving. Treat a tool that sits on the scale as part of the load only if the equipment instructions permit that use and you account for the weight as intended. This guide compares layout. The manual governs the weighing method, capacity and surfaces.
Three decisions the footprint alone cannot settle
One way to compare the 3D comparison and the diagrams with real objects is to record a finding, a second option and a condition that would reverse the choice. Work through a troublesome weighing job rather than trying to recreate all meals on one layout. These are teaching scenarios using the dimensions already defined. Replace any supplied number with one you measured, and mark an unknown as unknown if it matters to the next action.
Case one where the clearance is not at the paid-for edge
Assume you intend to buy a divider for the 400 × 300 mm drawer. The scale fits on the floor, with the original 220 mm width and 60 mm depth differences. You want to divide the depth so a row of measuring spoons can live in front. The width of the scale in this orientation sounds reassuring and is almost irrelevant to that proposal. Measure how deeply the spoon tray projects, including its divider thickness and a projecting handle. If the tray and divider occupy 80 mm along the depth and sit in front of the scale, the two roles alone require 240 + 80 = 320 mm. The proposal exceeds the nominal floor by 20 mm before any lift access.
Compare turning the scale to free depth. Its 180 mm dimension along the same axis and the 80 mm tray now consume 260 mm, leaving 40 mm unassigned. The 240 mm width still fits across 400 mm in the simple sketch. Identify the trade before shopping. The reserved 40 mm may be all at the front if the back is occupied, or you may choose to allocate part of it to a grip along a side. If no placement lets the scale pass the narrowest opening, move the spoons rather than purchasing the divider. Write the cabinet configuration and orientation on the shopping note so the two clearances do not get swapped when somebody compares products.
There is a third candidate if the drawer is typically used for long utensils. Consider placing the narrow spoon tray to one side of the scale instead of at the front. If both need the same depth, test the side-by-side width and the deeper of their two envelopes. Draw the tray handle because it can protrude across the boundary when the tray is removed. The side-by-side option restores a separate front approach but leaves less of the broad open space valuable to long objects. Compare the specific utensils that would move elsewhere. An organizer purchase is sensible only if those utensils already have a usable alternative.
Case two where the display and the bowl point to different purchases
Keep the 360 × 300 mm worktop. The 240 mm bowl leaves 120 mm total across the width and 60 mm along the depth. Suppose a real reading check shows you cannot see the display from the place where the ingredients go in. A 320 mm bowl from the same family might have a different profile and improve line of sight. Its stationary footprint would still exceed the worktop depth by 20 mm under this model. Visibility is an additional result. It does not remove the depth failure.
Consider a narrower bowl whose lip is positioned differently, showing the display while keeping the footprint in the clear region. Check whether it still serves the amount and kind of mixture that prompted the change, and whether it is suitable for weighing on the platform. If it makes the task slower or compromises mixing, a different worktop position might be a better trade. Measure the alternative surface from the actual adapter, kettle or prep tools that share it. A nominal 600 mm counter depth is irrelevant if an object has already occupied the rear section.
When two bowls both fit and permit reading, pick the one that keeps the receiving step simple. An empty vessel may be easy to turn and reposition, while a contained mixture is harder to carry or pour cleanly. Rehearse with empty objects before drawing a final conclusion. The shortlist can include a divide-and-transfer option and a one-bowl option, with a note for the circumstances under which each is useful. You may discover that there is no reason to buy a different scale if the actual constraint is where the filled bowl can be set down.
Case three where a wall cupboard saves space but adds a lift
A low-traffic cupboard away from the preparation area can supply a larger shelf than the nearest drawer. Test what that choice saves. If the original drawer needs a specialised organizer and two other utensils must move, the larger cupboard could avoid the purchase. It may add a reach or a turn while you carry the scale to the worktop. Put a light, empty representation of the scale on the candidate shelf and walk to the preparation location through the same doors and aisles used while cooking. Observe how you would hold the actual scale as its instructions allow.
Try the return with the worktop still occupied. Can you close the drawer before lifting the bowl away, and can you open the cupboard without setting the scale atop another item? Can a person resting at the counter stay in their place while somebody returns the scale? These are questions about the route between surfaces. They do not show up in the drawer arithmetic. A shelf that works every time when the kitchen is quiet can be awkward during a shared task. If the item is infrequently used, that extra route may be worth the drawer space saved. Write down the observed obstruction and the less frequent activities affected.
Suppose both the drawer and cupboard routes work but it is unclear which to pick. Choose the arrangement that can be tried by moving fewer items. Mark a temporary slot in the drawer and keep the cupboard space in mind for a later comparison. After ordinary use, look for one repeated clue such as people leaving the scale on the counter because returning it takes too many moves. A temporary arrangement gives you direct evidence about routines. It is also easy to restore if the new slot creates a problem for somebody who uses the drawer differently.
A short rehearsal before you install anything
Put the empty scale and bowl where you intend to use them. Leave the usual appliance and utensils in their real positions. Look for the first step that forces you to clear space, move the bowl, or handle two items at once.
Make the first run with the arrangement as you found it. That establishes a baseline people can remember. Put the chosen scale in the proposed storage location as allowed by its manual. Place one ingredient container and one receiving vessel where they will actually wait. Take the scale out, set it on the intended stable surface, place the empty bowl as directed, read the display and reach the controls. Move the bowl to its real destination. Return the scale after following the appropriate care instructions. Keep the test to one recipe or preparation task so changes can be compared fairly.
Now change one thing. Try the opposite drawer orientation while leaving the bowl and counter position alone. Move the scale station sideways without moving the bowl to a different position on the platform. Swap the receiving bowl's landing spot while keeping the source container in the same place. A one-change test tells you whether a new proposal actually fixed the observed problem. If you change drawer, bowl and counter simultaneously, you might accidentally miss that the original scale could work with a simpler division of space.
Look for independent checks where the geometry model cannot answer. If the counter surface is uneven, the projected footprint gives no information about stability or performance. If the actual load is near a limit, weighing instructions have priority. If the scale must be protected from moisture or heat, a rectangle next to a sink or hob does not verify that it is a suitable operating location. Confirm those requirements using the manufacturer's documentation. Treat the photo and measurements as a way to narrow choices within the product's approved conditions.
Keep the following notes beside the two dimension drawings. A reader taking up the task later should be able to tell what was demonstrated and what still needs measuring.
- Mark whether the bottom and the opening both passed, and record the narrow point at the height actually tested.
- Describe what you carried in one move, including the cover or accessories if they are usually attached.
- Record where you stood for the readout and whether the unit or any required control was obstructed.
- Mark the waiting area for the ingredients and the destination for the filled bowl.
- Write the one condition that would cause you to repeat the test, such as a different bowl, a new divider or a countertop appliance moving into the chosen area.
Keeping these records avoids a false shortcut. A new scale does not inherit the original scale's dimensions even when the platform looks similar. A different bowl may shift the combination's bounding footprint or change the readout line without changing anything in storage. A new organizer might make retrieval worse even when both original examples passed. Revisit the row that changed, and run the joint sequence again if the two decisions are now coupled. The storage drawing and the weighing drawing have earned separate places in the plan.
Choose the trade-off with a real work sequence
- Measure the narrowest drawer opening and usable floor after fittings; write down both. Record the scale with any protective case, attachments or cord that stays with it.
- Mark the clear counter area after accounting for fixed appliances. Check the actual bowl, the scale display and buttons, and where ingredients or a utensil will sit. Do not count the same counter space as simultaneously empty and occupied.
- With the scale on a suitable stable surface, rehearse taking it out, placing the empty bowl, reading the display and putting it away according to its instructions. A shallower bowl or an alternative display position may improve visibility but changes the choice of equipment.
- Confirm load capacity, minimum increments and permitted placement from the scale's manual. Avoid weighing a hot or wet container unless the product instructions allow it; a layout model does not establish electrical or food safety.
- If the drawer or counter fails, compare a different drawer, a smaller bowl or a different preparation location. A smaller bowl can fit but may require weighing in batches.
For the larger preparation area, compare the kitchen baking station guide. Record storage and weighing checks separately so a new bowl or divider prompts a fresh measurement.
TRY THE EXAMPLE
Compare storage and weighing footprints
Enter the drawer and counter rectangles, scale dimensions and bowl diameter. In the weighing view the bowl is centred on the scale; all inputs use whole millimetres.
Allowed range: 1–2000 · Step: 1
Allowed range: 1–1500 · Step: 1
Allowed range: 1–2000 · Step: 1
Allowed range: 1–1500 · Step: 1
Allowed range: 1–1000 · Step: 1
Allowed range: 1–1000 · Step: 1
Allowed range: 1–1000 · Step: 1
The simplified footprint fits with positive balances. Check the opening, display, stability and actual movement separately.
- Assumed footprint
- 180 × 240 mm
- Width balance
- 220 mm
- Depth balance
- 60 mm
Check the scale manual for capacity, placement and care. This footprint does not prove that the bowl is stable or the display can be read.
Teaching assumptions, not a surveyed home or a construction check. Results describe this simplified geometry or budget only. Changes stay on this page and reset on reload.