Mop Bucket Filling Space: Check the Sink and Route
Test whether a mop bucket can be positioned, filled and removed near a sink, with a worked height comparison and separate route and emptying checks.
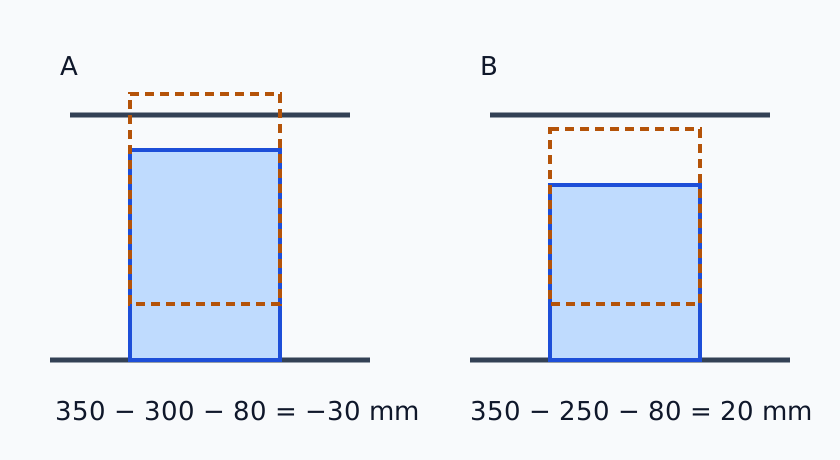
Bucket envelopes after a trial lift
The faucet is 350 mm above the basin datum. An 80 mm lift of the 300 mm bucket crosses that limit by 30 mm in A. The 250 mm bucket in B leaves 20 mm for the same straight lift.
Set the empty mop bucket on the floor where you normally start. Leave the water off. The first question is whether the bucket can reach the intended filling point, sit there in the necessary position and leave it along a manageable path. Then walk the separate trip to the place where its contents may appropriately be emptied. The two trips often use different furniture positions, grips and directions. A container can go into the basin straight down and need to move in several directions before it can come out.
Keep the bucket empty for every geometric rehearsal. A lightweight stand-in can help compare options without putting a hard rim against the fixture. Neither method determines how much liquid any person should handle. The useful marks to collect are where the container touches, where it cannot be guided comfortably, where it needs to pause and what part of the route is not yet known. Start from those observations when comparing a lower bucket, another filling method or a different station.
- Identify the normal storage orientation and what must be removed to reach the sink.
- Measure the section at the point where the bucket would have to rise before it can move sideways.
- Follow the empty bucket from the basin to a planned resting point and then toward a permitted emptying location.
- Retest with the doors, fixtures and people using the room as they ordinarily do.
Do the sequence in that order so you can stop safely when a single action fails. There is no reason to rehearse a later lift with liquid or equipment attached when the empty profile already meets a fixed obstacle.
Get from storage to the basin with the water off
Look inside the cupboard at the bucket as it is stored. Identify the part you can grasp and the direction in which that part can move. A bucket stored with the handle flat may fit under a shelf while the handle cannot be raised until the bucket has crossed the opening. A wringer or lid may be stored with it but have its own removal order. Follow the product's instructions and record any piece that is meant to be removed before filling. If a removable piece needs a place to wait, decide where it can sit without interrupting the sink or the route you are about to rehearse.
Check the cupboard opening as well as its inside width. A hinge arm, projecting hinge cup, door stop or face frame may occupy part of the space at just the moment the handle is lifted. Use the actual door position that occurs when someone carries the empty bucket out. A pullout shelf may reveal the handle easily but also occupy the strip of floor where you need to stand. Note which object moves first and which still needs to move while the bucket is in hand. A piece of tape or removable mark on the drawing can identify that standing position.
Bring the empty bucket to the basin without changing things that are normally there unless your plan includes a defined place to move them. A dish rack, dish basin or removable board can narrow the route at the top of a sink. A faucet with a separate control may require room for the user to set the empty bucket down before their hand can get to the control. Check what lies beneath and beside that point. You do not need to try filling yet. Place the bucket in the intended dry resting position and confirm where the base actually sits.
Some sink bottoms slope in more than one direction. A standing point beside the drain might have a different elevation from the broad flat portion used in your sketch. If the bucket base can sit only slightly to one side of the faucet, note that exact point. A measurement through the center of the basin cannot be used unaltered at another point where the basin rises or the faucet hangs lower. If the proposed support or shape makes it difficult to rest the empty bucket, stop there and compare a different arrangement before considering a filled container.
Leave room at the basin for the next operation
For a divided sink, keep the center divider and both faucet positions in the drawing. The container may fit the width of one opening but have to turn across the divider to leave. That can be a different route from entering vertically through the wider end. Dry-rehearse the entire turn with an outline that represents the base, upper rim and handle. If you are planning to move an existing rack elsewhere during cleaning, establish a place for it first. Taking the rack out in the mock-up without giving it a real home can make the test look easier than the work will be.
Ask what the person needs to reach with their hands while the bucket is sitting in the basin. A front control or separate spray component may be reachable at one corner and blocked by the container at the other. Put the empty shape at the supported point and check which parts are still available, following the fixture's directions. A faucet that can rotate through an approved range offers two paths to compare: the normal position for placing the container and the position for moving it away. Do not assume the faucet head or its controls will always be in a specific place if another person normally uses the sink.
If this is a proposed kitchen, trace the real bowl profile using the current fixture drawings. The room plan can show where a sink sits but usually cannot supply the inside radius, bottom slope or height to a spray head. The faucet specification may refer to its height above the worktop rather than its lowest projection over the bowl. Put the manufacturer's reference surfaces on the same section, then relate them to the bottom support. Look for handles that need a separate movement width. Until those choices are made, keep the result as conditional rather than ordering a bucket from a catalog drawing alone.
Check one vertical bottleneck
Open the full-size lift section
In this teaching section the vertical space from sink bottom to the lowest fixed faucet point is 350 mm at the bucket's position. An empty bucket stands 300 mm high, and a trial path asks it to rise vertically 80 mm before moving sideways. The comparison is 350 − 300 − 80 = −30 mm: that proposed straight lift would cross the simplified upper boundary. The dashed outline shows the lifted position. It does not represent the actual faucet profile or prove that tilting is possible.
A 250 mm high bucket under the same 350 mm boundary leaves 350 − 250 − 80 = 20 mm for that one straight lift. The smaller bucket gives up capacity; 20 mm is a calculation, not a safe handling allowance. Handle height, rim shape, sink opening, faucet projection and the real movement path must be measured separately. A bucket may clear a point and still strike the faucet while moving sideways.
Use the same datum at the same location
The section on the page has one sink-bottom line and one overhead line. In the actual sink, the bottom line is the supporting height beneath the bucket at the position being tested. The upper line should be the lowest fixed part that the rim or handle might meet in the proposed zone. That may be the faucet outlet, a projection of the faucet body or some other fixed accessory that crosses the route. Measure vertically from the supporting point up to the appropriate obstruction. Then stand at the front and take a separate side observation to check whether the two parts really overlap in plan.
Mark top height with the parts in the state used for the movement. A handle may need to stand above the rim before the empty bucket can be lifted. A pour spout, roller or fixed wringer can also make one end higher than the other. If an attachment stays in place during movement, include it in your external outline. If the instructions call for it to be moved separately, draw a second object and note its resting point. A container advertised by rim height alone can have a larger useful profile when there is a hand on its handle.
The proposed 80 mm lift in the teaching example is an input describing a movement, not a measurement that can be copied between kitchens. For your own drawing, mark the level at which the part that passes the rim first clears it, using an empty mock-up and the real side that will cross. If the sink rim has different heights along the sides, draw the side you intend to use. A trim lip or worktop overhang can become the obstacle instead of the inner rim. Record the necessary rise to the first clearance point and where a lateral movement would follow.
Trace the last part of the lift and the first part of exit
Hold the lightweight empty stand-in at the height at which it would begin to move sideways. Notice whether the top face or handle is now below a projection that wasn't directly above the bucket when it rested. There can be a location where one corner is already past the faucet and a second corner has yet to move through. The clearance that matters at that location may be across the width of two objects, not just along the height dimension. If you need several observations, draw one outline at rest, one at rim level and another at the first sideways step.
If you feel the stand-in would only come out with a particular tilt, describe what would need to rotate and what would have to stay clear. Rehearsing an empty tilted object tells you which walls and fixtures it may contact. It does not establish an appropriate way to remove a bucket with liquid in it. A container that requires an awkward grip, unpredictable angle or turn near a fixed faucet is a good candidate for a different filling arrangement. You can reject a route based on that observation without experimenting with a heavier version of the same move.
For another teaching comparison, suppose the bucket height stays at 300 mm and the chosen upward movement could change from 80 to 40 mm because a different, genuinely lower exit edge exists. At the same 350 mm overhead limit the numerical result changes to 350 − 300 − 40 = 10 mm. That new result applies only if the second edge has been located and if the whole container actually clears it at the reduced lift. In many sinks moving the exit edge also changes the part of the faucet overhead. Measure that condition again instead of transplanting the number into a different section.
Separate the local number from the usability of the container
A lower container offers a useful controlled comparison because it changes the envelope directly. In the example, the height reduction is 50 mm and the lifted clearance improves by 50 mm. The bottom footprint, available gripping surface, attachment requirements and intended way of handling liquid may also change when you consider a real model. Fit its empty shape in the basin and exterior route before deciding from the nominal height. The outlined bucket in the drawing is simplified and doesn't show where a wrist or a second hand would fit.
The lift comparison uses the overhead span, the height of the bucket and the proposed lift. Vary one number to see why the two original empty forms produce −30 and 20 mm with the same overhead and movement. You can record both the difference before the lift and the remaining difference afterward. The earlier number can be positive even when the proposed movement crosses the overhead line. Leave unknown measurements blank in your field notes and reset the controls before starting a second set of assumptions.
Trace filling and emptying as separate trips
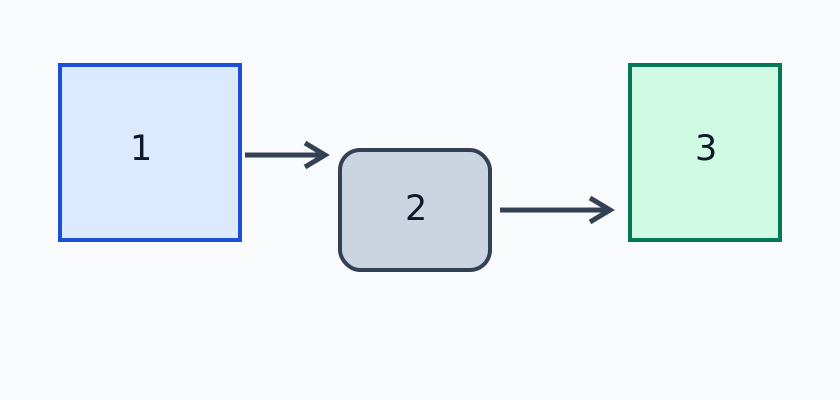
Open the full-size route sketch
Number 1 is the filling point, 2 a temporary placement, and 3 the selected emptying destination. Arrows indicate what to rehearse, not a measured clear route. Check doors, changes in floor level, where a wet bucket can rest and where splashes are acceptable. Use only a drain and disposal method permitted for the liquid and your local conditions; this article does not authorize putting cleaning chemicals into any particular drain.
First walk the exit from point 1
Standing where the sketch marks the filling station, imagine that the intended job is finished and the bucket has to leave its support. Check whether the bucket can be brought to a stable nearby surface without reaching over heat, passing an open cabinet door or crowding someone else at the sink. Make the trial with the empty form. Trace the move slowly so you can see where the bucket needs to turn, where you would stand and where the handle or bucket body would be when a door is used. If the natural movement starts from a position different from the one assumed in the section, update both the route plan and the local section.
A countertop next to the sink can look like a convenient resting place but be filled with a drying rack, cooking equipment or work in progress. Draw the clear surface as it is normally used. Determine whether it is appropriate for a possibly damp bottom and has adequate support under the product's instructions. Check the approach to the surface rather than measuring only where the bucket ultimately rests. A ledge might accept the last centimeters of the base yet offer no approach wide enough for the rest of the rim. A tray or mat that belongs there should be present in the empty rehearsal.
Then put the bucket down at point 2
The temporary placement has a specific job. It is where the person can briefly release their hands, deal with a door or prepare for the next part of the route. It may be on a suitable stable surface near the sink, or in another location already intended to tolerate the bucket's shape and moisture. A stop in an aisle that people or doors need does not meet that purpose. Choose a place where the normal room arrangement can continue without requiring someone to step around the bucket unexpectedly.
Try setting down the empty shape and picking it back up from the intended direction. The position of the handle after it is lowered may limit how it can be reached next. If there is a cabinet beside the landing point, open and close it while the empty stand-in is resting and see which direction the user can stand. A bucket in front of a cupboard can fit dimensionally while leaving no clear approach from either side. If the temporary position needs a drainboard, trolley or other accessory, confirm the appropriate product and surfaces with their instructions so you can test the real arrangement.
Draw the turning position and the track to the doorway from point 2. The measurement that helps is often the space between the edges of things encountered in a particular state. For instance, a refrigerator door opened to its normal reach might create a narrow bend near the resting point. A pullout bin may compete for the same floor area when someone is cleaning. It is useful to know whether moving one of those objects is already part of a predictable routine or whether the container would unexpectedly be stranded while a person gets by.
Walk back from the permitted emptying location
Before walking there, determine which destination and disposal method are appropriate for the actual liquid in the household and the local rules. Read the cleaning product's directions and obtain qualified advice when needed. Don't reroute a product to a more convenient fixture based on the geometry of the room alone. On the plan, point 3 should identify the specific intended location and leave unresolved any instructions the household has not confirmed.
Now trace the route backward from point 3 to the temporary placement. Backward tracing reveals where the person has to arrive with hands available or the room oriented a particular way. A door that opens toward the carrying route can be easy to approach from one direction and awkward from the other. Set the empty stand-in down at the boundary and decide whether it is possible to move the door while keeping the route and the floor clear. If there is a level change, do not infer that a way of lifting is manageable from the height. Record where it occurs and look for a more suitable arrangement if the intended transfer cannot be comfortably controlled.
The receiving fixture has its own approach and shape. With the container empty, check where the person is able to stand and what would constrain its outline at the intended position. The sink used for filling may be different from the permitted emptying point. Even when it is the same fixture, the exit orientation used while moving away can differ from how the empty container approaches on the return. A drying rail, fixture handle or edge may come into play in a different place. The plan should make the empty approach clear while handing actual liquid handling questions back to product instructions and the user's capabilities.
- Measure the bucket with its handle in the position required for the action. Record the sink's opening, bottom, rim and lowest faucet point from consistent references; leave unmeasured items unknown.
- With the water off, move an empty light stand-in through the intended path. If the stand-in catches or requires an uncomfortable lift, stop and compare a different container or filling method.
- Mark the route and temporary resting place without blocking a door. Test opening nearby cabinets and moving around the stand-in; a clear static footprint does not prove the carrying route.
- Consider how water will be added, moved and emptied without lifting more than the user can comfortably control. Follow cleaning product instructions and seek appropriate advice for disposal; never mix products based on this layout exercise.
- The lift comparison changes the vertical span, bucket height and chosen lift. A positive result describes only this one simplified section and is not a recommendation to lift a filled bucket.
Rehearse the collisions before comparing furniture or products
Stop beside a door, then look at the hand you need
With the empty stand-in in its travel position, notice whether both hands are occupied just when an opening, switch or latch must be used. A route that seems clear when measured wall to wall can still demand a different landing point at that action. If another person normally uses the room at the same time, include their ordinary counter and doorway movements in the sketch. You can rehearse the sequence with the person separately at first. Mark where the two paths cross instead of putting people and a bulky empty object into a tight test at once.
For an existing kitchen, operate the relevant cabinet doors and drawers slowly with the container resting out of their sweep. Add their intermediate positions to the plan. Check the entry and exit while a normally independent appliance door or bin is open. This doesn't mean leaving every door open at once. It means testing combinations that happen in ordinary cleaning, cooking or tidying. If two activities require the same temporary surface, designate which one moves and where it goes. Avoid carrying a bulky object through a blocked route while trying to improvise another resting place.
Sometimes the roof over the route is a shallow shelf or wall cabinet rather than the faucet. At the point where the empty stand-in is lifted over a step or relocated from the counter, check the height of handles and the direction of the user’s reach. It can be easier to turn at a wider area and carry the object through a narrow gap with its smaller dimension across the opening. Test the actual empty shape in that orientation and identify where it can be turned back. Passing a doorway with the narrow side ahead does not tell you whether there is room to change direction once through.
Record the approach width at a turn, rather than a single corridor width
A route can narrow when it turns because people and the object occupy different positions from those shown by the straight walls. Lay the empty footprint out at the corner and keep a clear standing place for the person who would guide it. A curved bucket rim with a projecting corner, spout or handle may be wider in the turning posture than when aligned with the doorway. A tape number across the wall at the narrowest point describes the building, while a photo or sketch of an empty rehearsal describes the movement. Record both if the fit is close.
If the proposed path crosses a threshold between floor finishes, check the actual edge and leave the intended floor condition clear. A mat shifted for the trial can invalidate the result if it returns to the path every day. If the temporary surface would have to move to make room, decide whether it will have a marked, compatible home and whether it still does its own job there. A new bucket that fixes the lift but requires moving two regularly used things at each trip should be compared with other candidates on the number and difficulty of movements as well as the original clearance.
Run a second rehearsal with an ordinary competing activity
For example, rehearse a normal cleaning sequence while the usual dish rack is on the counter and the main cupboard is closed. Then try a second reasonable state with a dishwasher or drawer in its normal working position. If the planned route crosses the same strip of floor, identify the point where the bucket can wait out of the way, or decide that those jobs will be done in sequence. This is a choice of room operation. Closing a door just to let an empty mock-up pass is only meaningful if it is also what the household would do while cleaning.
Where two people use the kitchen, divide the test into a walking path and an object path. Have each person walk the route separately, noting where they would stand to use a cabinet or the sink. Draw the overlap, then check whether both locations are actually needed at the same time. A shared obstruction may be avoidable by moving the temporary position toward the intended room exit. A daily conflict near the only passage calls for a different arrangement. The sketch should tell a person who did not attend the rehearsal which movement has to wait and where the bucket remains while it does.
A useful store of observations fits on a small set of photos or sketches. Take one at the point where the empty bucket is supported in the basin and one from the side where the obstruction was recorded. Add a third at the turn or pause. Name the condition shown in each one: appliance door at ordinary opening, rack in place or bucket handle raised. If a future repair changes the faucet but nothing else, this record shows which local view needs updating and which route observations can still be traced as originally made.
Compare the options where they actually differ
| Change to compare | Part that changes first | Other evidence to collect |
|---|---|---|
| A lower empty container | The local lifted outline and often the place used by the handle | Base support, opening width and a realistic number of transfers for the intended task |
| A different exit edge at the same sink | First upward movement and the later direction of travel | The overhanging fixture at the new section and where the bucket body can turn |
| A different permitted filling station | The full approach and removal sequence | New storage-to-fill route, temporary surface and suitable emptying location |
| Separate compatible supply method with the container supported below | How the container reaches the supply location and when it is moved | Equipment and fixture instructions, stable support and the permitted route for the task |
| A new temporary placement | The pause and door action between filling and use | Floor route, damp surfaces and the next grip in either direction |
Compare the original and alternative using a consistent unit and container orientation. If you're choosing a smaller bucket because only the lift is insufficient, document the revised silhouette before assuming the complete route changes. If the trouble comes from a route that repeatedly passes a busy entrance, changing the station can matter more than changing the bucket. A compact container should not be selected on the basis of the 20 mm result alone; compare its capacity and the implications for the task using product instructions and practical limits appropriate to the person.
When considering an alternative supply method, start with equipment that is explicitly suitable for the actual fixture and cleaning equipment. Some household products describe their own filling method or an accessory. Confirm the fit and intended conditions before planning connecting parts around it. A different method could let the container remain supported at a lower surface, but that change moves the relevant route and wet area to a different part of the room. Compare the complete placement with water off first. Never use a layout drawing to approve an improvised water connection or a disposal option.
There is also a furniture-only alternative: a storage position nearer an appropriate filling station and a clear temporary support, while the existing container stays the same. Moving storage can remove a doorway crossing from the empty trip without changing the geometry at the faucet. Changing the temporary placement can reduce a tight turn without making an unsuitable overhead clearance feasible. Keep the original constraint and record which option responds to it. If different actions fail in different places, address each in the plan and don't assume the first improvement completes the entire route.
An example of how the decision might unfold is a kitchen with an opening wide enough to accept the 300 mm tall container and a 350 mm overhead limit at its planned resting point. In this imagined situation the first dry check is successful because the installed faucet allows the empty stand-in to be lowered into the basin. The second dry check rejects the planned withdrawal: the 80 mm rise would bring the top above the overhead limit. Keep the observations distinct. A note that says the bucket “fits in the sink” would conceal the failed exit. A note that gives the intended direction and first collision tells the household which other exit to look at and lets the fixture supplier identify the relevant projection.
In a second hypothetical kitchen the lower outline can leave the basin, but its route to point 2 brings the user to a closed cabinet door with no suitable place to pause. Moving the container away from the tap does not fix that crossing. You could compare a different support location and note how it affects the rest of the trip. Checking a shorter route from the sink to a pause should include a return to the storage point when the job is done. The late part of each example demonstrates a specific planning decision you can record without presenting it as an observed installation.
Write a note installers and household members can use
An illustrative note can read: “At the illustrated sink section, the lower support is the basin bottom at the proposed resting point. The overhead projection is 350 mm above that reference. A 300 mm empty outline plus an 80 mm proposed lift crosses the projection by 30 mm, so this exit geometry is rejected. A 250 mm outline leaves 20 mm there, with handle and lateral path still to be checked.” For an actual note, include the location, measurements and parts that have been physically identified. Do not hand someone these illustrative inputs as specifications for a real kitchen.
On the route drawing, label the filling position, temporary placement and the allowed destination as separate marks. Keep the approved or unresolved status of any fixture and product instructions with the drawing. If the layout change is part of a renovation, note the selected faucet projection, sink model, opening dimensions and cupboard hardware as procurement information. Until actual choices are confirmed, write which dimension is provisional. For a working kitchen, a photo of the proposed hold point from the user's side and another of the obstacle from the side can be enough to accompany the route record.
Add the disposition of the empty equipment after the job. The path back to storage can be different because the outside of the bucket may be damp and attachments might have been removed. Follow cleaning and storage instructions for the actual equipment. Decide where the empty pieces can be appropriately kept during those steps so they are not placed in the doorway or on a surface intended to stay dry. A design that ends in a convenient filling operation but omits the empty return creates a choice for the household every time it cleans.
If there are removable accessories, outline where they wait during the transfer back and whether their location overlaps the next use of the sink. Give one person the route sketch and ask them to identify the right place for each item without adding their own temporary surface. If the accessory has no place assigned yet, resolve that detail before building a cupboard around a compact arrangement. A simple handover can show the bucket's supported resting position, the orientation for removing the handle or attachment where permitted and the place where cleaning is performed according to the equipment directions.
Leave the route ready for the next cleaning day
Return the empty bucket to the original storage point. Walk once more to the planned basin and stop at the action that was previously impossible. You should now be able to demonstrate the changed geometry with the empty object or point to the dimension still waiting for confirmation. Move it to the intended rest position and name the next destination. If the route requires borrowing a worktop or holding a door, that action should already have a place in the drawing. Keep the section and the route plan together.
You can use the worksheet again after a different bucket, faucet, piece of furniture or user changes the route. Start with the corresponding part of the trip instead of repeating a clearance number from the earlier configuration. The lasting result is simple: when a person starts with the empty bucket, they can see where to place it, where the difficult lift has been resolved or marked and which route has been checked at both ends.
The household cleaning closet guide addresses where equipment is stored between uses. Rehearse the complete route again whenever the bucket, sink or user changes.
TRY THE EXAMPLE
Compare the proposed empty-bucket lift
Enter the vertical span from sink bottom to the lowest overhead point at the bucket position, any additional uncounted projection, bucket height and a proposed straight lift, in millimetres.
Allowed range: 1–2000 · Step: 1
Allowed range: 0–500 · Step: 1
Allowed range: 1–1500 · Step: 1
Allowed range: 0–1000 · Step: 1
A negative remainder means the selected allocations overlap. Change the inputs or the proposal.
- Static gap above bucket
- 50 mm
- Balance after proposed lift
- -30 mm
Reference boundary — Sink bottom to lowest overhead point: 350 mm
Blue dashed line: comparison boundary. Red dimension: shortage.
Balance after proposed lift: −30 mm · Short by 30 mm
350 − 0 − 300 − 80 = -30 mm
Use an empty light stand-in with the water off. The result does not establish a safe lift, full movement path, disposal method or filled weight.
Teaching assumptions, not a surveyed home or a construction check. Results describe this simplified geometry or budget only. Changes stay on this page and reset on reload.