Toy Bin Pull-Out Space: Test the Whole Playroom Layout
Map a low toy bin both stored and pulled out, compare its footprint with a chosen floor zone, and test handles and tidying before fixing the shelf.
Toy bin parked versus pulled out
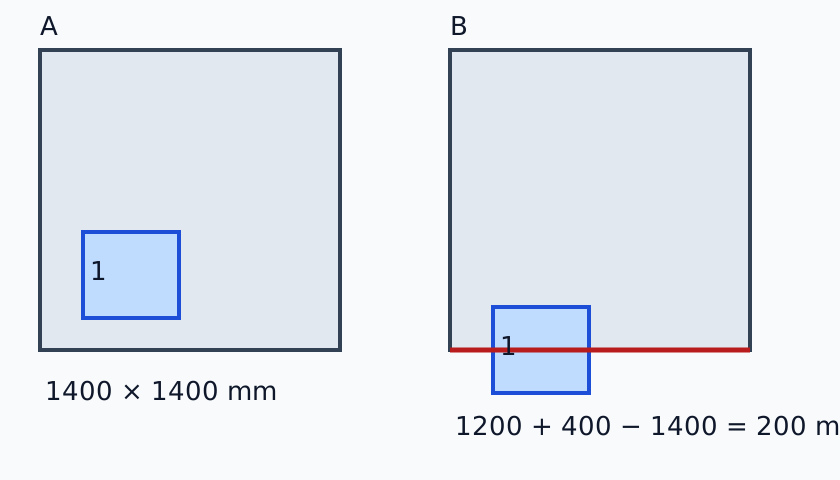
Within the 1,400 mm floor depth, the 400 mm bin depth ends 150 mm before the marked edge in A. Pulling the same bin to a 1,200 mm start in B carries it 200 mm beyond the edge.
Put an empty toy bin on the floor in front of the shelf. Now leave it there and walk to the door. Can you take the usual route without asking the person who is playing to move? Put a cushion where that person sits and try again. A storage photograph shows the bin parked, although its important place is often here, on the floor.
The room needs a home for the bin and a place where it can stay while somebody looks inside, plays and puts things away. It also needs a path between those positions. Draw those separately. You can then change the container size, the shelf assignment or the sorting spot according to which part of the routine is cramped. Try the floor outline and path with an empty, lightweight bin first. The figures below are model layouts you can replace with your own measurements.
Give the bin a home and a play address
The shelf address stays the same when play finishes
Draw the usable face of the low shelving and decide which bay would hold the bin. If it is a freestanding unit, account for its actual location after it is installed and secured as directed. Walls, baseboards, feet and neighboring furniture can affect where the front edge ends up. Measure the fitted opening at the height of the bin's lip and the bottom, and measure the support depth up to the closed or stored position. If an existing handle or edge projects past the shelf, include that projection in a plan of the parked bin. Someone walking past a fully tidied shelf still has to clear that part.
Check whether the shelf has a fixed stop, divider or track. Record which parts guide the bin, what support the manufacturer intends and whether an adult is expected to lift it completely out. An open container on a shelf and a bin intended to move on matching runners have different ways of being pulled and returned. A shelf with a deep ledge can leave adequate interior height but still require a lift at the beginning of the motion. Use the actual product's guidance and make a note of any detail that you cannot check before the new furniture arrives.
Assign a label or recognizable home for what goes back. If every bin looks the same, a mark on the front can show which one needs to be out for a particular activity. Make sure a label, fabric handle or marker chosen for the bin is suitable for the household and product. A recognizable assignment helps you observe whether the intended bay can be reached and lined up at the end, rather than simply putting the bin into any available opening during the trial. If another bin can only be put away by shifting the first, record the sequence at the shelf as part of the layout.
The play address is a place the bin can actually stay
Choose where the user will sit, kneel or stand while they look inside. Mark whether the bin stays partly on the shelf if that is an allowed use or comes completely onto a stable floor. An empty bin put just outside the cabinet may leave much of the play mat free, yet a child sits on the other side and pulls it across when they reach for the toys. Set an intentional place for the bin in that position. Make sure the top opening can be approached, the lid if any can move as intended, and there is room for the material that comes out.
Plan a small surface or mat for sorting loose pieces if the child or caregiver regularly empties the bin to find something. Draw the typical spread on the plan, away from necessary routes. A bin placed in the corner of the mat can use an available patch of floor, while its contents occupy most of the rest. If the play happens at a nearby table, trace the path from the shelf to the table and identify a stable place where the container can be put down. Keep actual toys and container use within the product's intended conditions and the user's abilities. An address on the floor is as important as which shelf the bin lives on.
One floor rectangle, two positions for the same bin
Open the full-size position comparison
This example shows an allocated rectangle 1400 × 1400 mm. The numbered smaller rectangle is a hypothetical bin 450 mm wide × 400 mm deep. In A, the edge of the bin closer to the top of the drawing is 850 mm from that reference, and the left edge is 200 mm from the left reference. The far edge in the top-to-bottom direction is 850 + 400 = 1250 mm. The selected lower boundary is at 1400 mm, so 1400 − 1250 = 150 mm remains. The word “top” here describes the drawing and need not mean the side of the room from which the user approaches.
In position B, the left offset stays 200 mm, the bin keeps the same size, and its top offset is 1200 mm. The far edge is 1200 + 400 = 1600 mm from the top. The difference at the bottom is 1400 − 1600 = −200 mm, or 200 mm beyond the allocation. The right edge is unchanged in both positions. Its margin is 1400 − 200 − 450 = 750 mm. This shows why a bin can stay clear of one pair of boundaries while using an area beyond a different edge. The figure compares static locations. It gives no instruction for how far to pull the bin or whether it must pass through a different orientation on the way.
The rectangle is a family-selected floor allocation for the teaching example. It does not declare a minimum play area, a required passage width or the location of a solid wall. Crossing it uses space assigned to something else. Ask what that thing is in your actual room. An edge of a play mat can sometimes move. A door swing, bed leg or necessary access route needs other treatment. If your boundary stands for a physical obstruction, draw its actual shape and the bin's path near it. Include handles, flared rims and other parts that will occupy room, even if the bottom of the bin itself is smaller.
Decide what the edges on your plan mean
Use a single reference corner on a floor sketch. Mark the two directions consistently, and label the width across the rectangle and the depth along it. If one wall changes direction or an alcove juts into the area, use the rectangular comparison for the relevant portion and draw the extra shape on your own plan. A chosen area can also begin at the front of the shelf or offset from it. Write down where you drew that line so the observations in the worksheet and calculator use the same origin. Taking one measurement from the wall and another from the shelf front can make the bin appear to move by a different amount.
Indicate floor features the simple rectangle does not include. Examples are a thick play mat that a bin has to climb onto, a floor register that must stay clear as required, a closed section of shelving that projects forward, a door frame and the range of a nearby drawer. Mark the intended walking route and where a child regularly sits. If two children use the space, show both likely playing positions. If a caregiver must sit beside one of them or approach to help, add that place. There is no need to prescribe an area for a person from an invented dimension. Use what the people and current furnishings actually need and confirm any applicable access or installation requirements separately.
Use the four edge differences to pick a rehearsal
The position comparison takes the allocated width and depth, bin width and depth, and the left and top offsets. Enter these in millimetres. It returns the differences at the four edges of that one bin position. A positive difference is room left within your chosen rectangle at the indicated edge, zero means the edges meet, and a negative result is the amount outside it. Reset restores the demonstration. For a different arrangement, make a separate copy of the input and indicate whether it represents a stored, active or temporary parking position. The results are geometric. They do not show the child's hand, the contents of the bin or whether a passing person is comfortable.
Try a smaller hypothetical bin 350 × 300 mm at the same A offsets. Its far edge is 850 + 300 = 1150 mm, leaving 1400 − 1150 = 250 mm at the lower boundary. The larger bin left 150 mm there. The difference is 100 mm because the depth changed by that much. This is an independent size comparison. It holds A's position and does not change the demonstration's position B. In your room a shallower box may reduce usable volume, or may accept the same set if the original had spare room. Verify the actual internal dimensions and contents. The plan comparison can show where room is regained without telling you what fits inside or how much it weighs.
Move only one input at first if you are trying to see what matters. Holding the box dimensions constant and moving it closer to the shelf changes its position. Keeping the offsets and choosing a shallower box changes the occupied area. Moving the shelf might change the starting reference and needs a revised sketch before you compare results. A position that works with the box shifted sideways may draw the user onto a route they normally keep clear. Overlay the user and door positions at the end. A decision made only from the largest positive number can ignore the side where somebody needs to sit.
Put a blank container in the marked zone and keep the play mat in place
Place the toy shelf and the floor mat the way you expect to use them, or represent the planned pieces with safe, stable temporary outlines. Mark the intended parked and active bin positions using a floor-appropriate method. Start with a lightweight, empty container. An adult can check basic fit, grasp and movement first. Involve a child only when appropriate for their abilities and under adult supervision. Avoid demonstrations that rely on heavy lifting, climbing, leaning against furniture, or forcing a stuck bin. Follow the product instructions for assembly, placement and safe use.
Start facing the shelf. Pull just enough to find how the container first moves. Pause where the rim leaves the front edge, then bring it to the chosen play address if the design allows complete removal. Trace the front corners as you go. In a tight room a user may rotate the box after one corner clears, so the box cuts across a different part of the mat from the straight line between A and B. A wide edge then becomes the depth in the new orientation. Look for the far corner touching a table leg, toy on the floor or an open door. Write in the sketch where the turn happens. The calculator's two end positions cannot supply that information.
Use three moments to describe the floor. At the first, nobody has opened the shelf and everything can be walked past. At the second, someone is drawing the container out and may have to kneel in front or beside it. At the third, the container stays at its use position while the person reaches and picks items. A door can make it past the shelf in the first condition and need the same area as the container at the second. A person walking to bed or bringing a basket into the room may cross the third. Observe the room in the condition you expect rather than clearing all details for the test.
Give the user a place to approach the handle
A bin's handle needs a place for fingers and room for the elbow to pull away from the body. A recessed grip at the top may need the fingers to rise before they can curl in. A fabric loop may hang toward the floor and require access below it. A two-hand container needs enough width at both sides when it is lifted, and the user may need to turn toward the landing point. Look at the hand position appropriate to the product and the person. Inspect for sharp edges, damaged parts or other hazards and keep the test within the instructions.
Open the full-size retrieval section
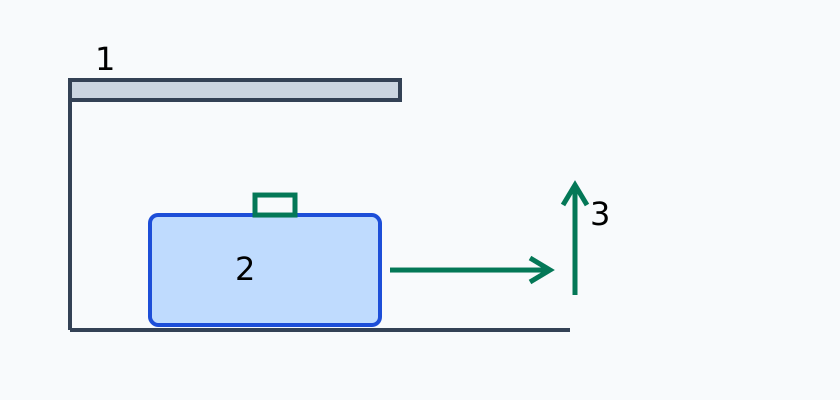
In the section, 1 is the shelf, 2 the bin and 3 the suggested removal direction. It helps identify changes in height as the container moves. The arrows lead out and up as examples of actions to observe. The drawing leaves out the body, fixing hardware and product-specific guides. Watch whether the handle passes under the shelf and whether contents above the rim catch when the bin is drawn out. Follow the bin's intended use. Depending on the design, it can matter whether the bottom remains supported or has to lift over a small lip before moving. This is different from the floor calculation.
Check the return separately. Sliding a box back in from the side requires the user to line up the two edges before letting go. If the stop is hidden from a kneeling position, someone might keep pushing even after the front hits a divider. Mark what the user can see and feel at that point. Where the product allows it, a clearer bay assignment or a more visible grip can reduce the need to reach between bin and shelf. Keep fingers away from pinch points and examine clearances with the bin unloaded before deciding whether the storage is workable.
Check the toys without making the trial heavier than it needs to be
Look at the kinds of pieces the bin will carry. A few long items that project over the rim can snag on a shelf above even when the container fits. Soft toys may stack above the height used to choose the bay. Small loose pieces can spill during a tilt if the container is not meant to hold them that way. See whether a different grouping, fill level or container would make the return easier. Store heavy items in a suitable location under the manufacturer's instructions and avoid heavy bins overhead. Make assignments for who handles what rather than treating the same tray as equally manageable for every child.
When a light test load is appropriate, add a few representative lightweight items at a time under adult supervision. Preserve the planned support and the bin's intended use. Watch how far back the load shifts, whether the handle is comfortable and whether the person can stop and set the bin down without struggling. If a representative example is already awkward, stop and compare a smaller or more manageable container or have an adult handle that part of the job. A rectangle predicts no weight, grip, spill behavior or tipping risk. The appropriate limit for an individual and product depends on what is actually used and how.
Think about contents after things have been put away quickly. A box filled neatly by adults for a product photo may leave space under the rim; an everyday cleanup can pile pieces into one corner. Mark the tallest expected contents against the underside of the shelf, the approach under rails and the hand grip. If the best result requires items to lie flat in a specific orientation, decide whether that is realistic for the user and provide an alternative storage spot for the few pieces that do not. If the bin has a lid, confirm product suitability and safe access for it separately. A loose lid taken off to play also uses a place on the floor unless it has an assigned home.
Design for the transition at the edge of the rug
A container that slides freely on the shelf can behave differently when the lowest edge crosses a soft rug or mat. Mark the transition on the floor plan and watch how the bottom is supported while the box passes it. An uneven edge can change the angle at which a user grips or lifts the box. The floor projection may remain inside the drawn area while a hand or the raised rear corner passes outside it. Compare lifting or rolling only as intended for that product and floor. Use an empty bin and keep the surrounding route clear. If the transition makes return awkward, look for a different position on the same surface or a suitable product before changing the whole room.
Where there is a hard floor, check what the bin's feet, wheels if present or other points of contact are intended to do. A bin that rolls away from the shelf may need an approved stopping or positioning method, and a product intended to be carried rather than dragged may be unsuitable for a movement you expected to be a slide. Confirm the intended use with the manufacturer. Record the mode of movement on the plan, since “pull out” can mean different things. Mark how the child or caregiver brings the container to a stop, and where both hands are while moving it back into its bay. This can give a practical reason to choose a different bin even when both fulfill the footprint calculation.
Decide what happens to the lid while play is underway
If the product has a lid, include its operation in the section and the floor plan. Where does a removable lid land during play? Can a person set it down without using the access route? If the lid is hinged, use the product's instructions for the allowed opening, support and closure. Measure the highest relevant part of the movement in the actual position. A lid may be reachable only after the bin is drawn farther into the room, while a fully removable lid needs a separate landing. Select a suitable product for the intended user and leave load, pinch and other safety decisions to the product instructions and appropriate supervision.
Walk through the chosen routine with the lid and empty box. Try opening and closing only in the position that the household can actually use. If it is easiest for an adult to open the box once and leave it in an assigned place, test what happens when play ends and the box goes home. If the lid moves under a shelf or table, check the real section across the hinge rather than assuming floor width establishes that clearance. Draw the hand shape or grip location you saw. Later, if a lid is changed or an insert gets added, the drawing shows which part of the access check to repeat.
Let two people use the same room
Run the setup as you expect it on a normal day. One person sets out a bin while another passes, opens a drawer or reaches a different shelf. Use dry, light objects and keep the route open throughout. If necessary, have an adult represent a user before inviting any child to try the arrangement. Watch where someone has to stop, move a toy or pull a leg in. A box placed within the chosen rectangle can overlap the place a sibling needs to kneel. The occupant can move around the bin once, but the room needs a workable recurring arrangement.
When two bins are commonly used at once, add a second outline. Keep a location for the objects already out and a path to return each bin to its bay. A shared work mat can handle sorting for one activity at a time. Simultaneous play can call for separate trays or a deliberate division of the floor. Write the label of each bin in its active position and see whether its normal route crosses the other user's. The part that matters may be the bin that comes out first or a set of blocks left in that spot while another one is opened. Decide whether bins can share one landing by taking turns or need distinct locations.
Put a door into the rehearsal. Start with the user in their normal place and another person opening it slowly through the appropriate travel. Check the bin, its handle and the space required to use the door. Keep bodies clear of moving parts. If a boundary represents a necessary route, preserve it both with the bins parked and while one is being handled. Also check the place a person stands to open a neighboring cupboard. A bin might clear the face of a drawer and still occupy the feet of the person using it. Use actual measurements and applicable requirements for any protected passage.
If the room is shared by children of different ages, decide what can sit in a reachable bin and what needs adult management or separate storage. Use the products' age and use instructions and suitable supervision, especially if contents include small pieces or other hazards. Changes in users or toys can change the whole allocation. The purpose of the plan is to keep each activity reachable and the route open. Child safety, compatible use, furniture stability and contents need their own decisions. Shared kids' room layout ideas
Give tidy-up one clear final move
Start the cleanup with the ordinary amount of toys spread out as a light, safe rehearsal. Put the container in the active position with the floor condition unchanged. Let the user put things in, then look at how they take the container from there back to the shelf. Someone who can pull a box to the mat may lack a clear grip once pieces have filled the top. They might tip it to see which bay it goes into or switch hands to get over a lip. Watch whether the last few moves need a change in container, fill level or landing position.
If one small box can be emptied, sorted and returned without another item moving, try that routine. If a large collection is always played with together and taking separate boxes back creates more work than the household can manage, compare an adult-managed larger container at another suitable place. Mark how many trips and which person makes each one as an observation from your trial. Avoid promising that a particular number of boxes solves every room. The daily arrangement can separate toys by activity or assign a single carry location, as long as the chosen positions and handling work.
Set up a trial return after the surrounding pieces are where they are usually left. A floor mat commonly moves, a small chair might be pulled toward the play area, and another bin can already sit out. The test should still leave a clear way to put the first box back or show which movable item must go to its own home before that happens. If helpful, set a natural order, such as loose pieces onto the mat, bin to the shelf, then cushion back against the wall. A clear order describes why the spot works better than a general instruction to keep the room tidy.
Diagnose the space that is missing
A negative margin at the bottom
If the parked box fits but the active box enters a part of the floor with another job, first look for a nearer position along the shelf front that leaves the opening accessible. A sorting mat offset to one side may help if it remains away from the route and if the user can still reach the rim. Another option is the shallower bin from the comparison. At the same position it reclaims depth, but check the actual contents and whether the remaining trips are manageable. Ask whether a different cabinet bay changes the available side of the play area. Move the planned location and draw the path, including any new turn.
Enough floor, insufficient space at the shelf
If the plan looks clear but the fingers or bin rim catches, focus on the opening. Observe whether it is the front edge, upper shelf, handle or projecting toys. A different grip or lower bin can help only when it matches the intended handling. If an adult needs to pull upward to clear a shelf lip, keep that as an adult task or choose an appropriate system that can be operated comfortably by the intended user. A rail intended to retain a bin may be required by the product. Leave it fitted and consult the instructions or maker about compatible containers. Furniture stability and anchoring remain installation checks.
Easy to pull, difficult to keep clear
If the adult or child can pull the bin and reach every item but somebody has to step around it to leave, rethink the play address. A small line of floor at one end of the mat can help distinguish the action zone from the route, as long as the person can see and use it. Use reminders that make sense to the household and do not create a trip hazard. Rehearse the worst routine you actually expect, such as another bin already out when the door needs to open. If the issue recurs, consider allocating play and storage to different suitable areas rather than accepting a repeated obstruction.
Easy to use empty, awkward with contents
Check the items assigned to the box. Long pieces might live in a suitable longer but shallower container or on another shelf that accepts them safely. You can reserve a lighter bin for the person who regularly moves the toys and keep parts that need help in a different place. Ask which set is taken as a group, whether the user normally carries or leaves the box at floor level, and whether putting one extra item inside changes the way the top and handle behave. Try the revised light arrangement under the intended supervision. The stored footprint is only one measure of success.
A new room or a new stage of play
Measure again when a bigger mat, second bed or new set of drawers changes the working area. A bin may become too small for toys that go together, or the same user may prefer to sort on a table instead of the floor. If you expect those changes soon, an adaptable arrangement might leave some room at the shelf front and let you change which items share a bin without moving installed furniture. Choose furniture for the actual user, product and mounting conditions. Do not count future growth as proof a reach or load works now.
When toys belong to another activity, change the route as well
A bin of blocks may live at the end of the play mat. A box of art supplies may mostly travel to a worktable while an adult helps. The two bins can have the same exterior and use different active positions. Carry each empty container from its intended shelf to the actual site of play and put it on stable support. If the most direct path runs through a doorway, observe where a helper needs to open it or stand aside. Check whether the intended child handles that leg at all, and keep items that need adult help in a suitable adult-managed place. That decision can simplify the floor plan without treating every bin as something a child has to carry.
If the older activity moves to a different corner of a shared room, move the location of its bin on the drawing first. Put a new shape for the person and the active box next to each other, and see which part is easiest to reposition. The shelf may already work and the new workspace may let you reclaim the area originally assigned to the box. Alternatively, a new desk can cover the only suitable landing next to the shelf. Before moving or buying anything, lay out the empty container where it will be used and trace the full route under those conditions.
Preserve the floor area that needs to recover at night
A playroom can also be a bedroom or an adult's work area. Decide which floor objects remain in place and which are put away at the end of that use. If a bin is left out for an unfinished project, give it a temporary parking location that does not block necessary movement. A project mat that stays in place can be combined with an intentionally empty route to the door or bed. Keep the room serviceable in both the ordinary active state and the tidied one. An evening route that relies on stepping over a box is evidence that its active or temporary address needs to change.
Check the morning start in the same room. If a bin is parked beside another piece of furniture overnight, it still needs a place for the next person to pick it up. Leaving one bin in a convenient temporary spot should not prevent a second bin or drawer from operating. Mark that position separately from permanent storage and usual play. Rehearse which moves happen first when the room is restored. Even a small family-selected rectangle can be treated as available for one activity at a time if its users can reliably keep shared paths and necessary access clear.
Leave a map someone can use at the end of the day
The field record asks for the chosen floor rectangle and reference corner, the bin footprint and both positions, the empty grip and shelf observation, and the light-load, door and anchoring checks. Enter the exact position each reading belongs to. Record which bin and contents were used, who observed the routine, and which details still need confirmation. Leave missing values blank. If the furniture is on order, ask for the opening and support dimensions or the instructions you need rather than assigning a number to the empty field.
One sample note could say, “Bin is inside the assigned floor rectangle when parked. When moved to the marked play spot it crosses the door-side line, and the usual seat puts a leg in the remaining route. Try the shallower container at the nearer position. Use the empty mock-up to check the turn at the shelf.” A second note could say, “Plan clear in the revised location, but the handle catches the upper front edge on return. Check the intended orientation of the holder and clearance with real hardware.” These are example observations. They give different next actions even though both start with a bin that looks fine stored.
If the shelf is being installed, carry the floor sketch and the recorded opening and bin profile to the installer. Confirm anchoring and other furniture requirements with the manufacturer's instructions and professional help where appropriate. Keep moving parts, hinge gaps and floor pathways in view during the trial, and repeat with the actual pieces once properly installed. A floor rectangle can't establish tip resistance, material strength or safety. Check compatibility, furniture stability, loads and the user independently.
The finished plan can show two marks and a route. One mark is the home where the box goes back. The other is the address where play happens. Keep a space at that second address for the real person who will reach and sort. If somebody can bring the box out, use it and return it while the rest of the room remains available, you have a useful layout. When the bin or the daily routine changes, start at the play address again.
TRY THE EXAMPLE
Compare the stored and pulled-out bin
Enter the chosen rectangular floor allocation, the bin footprint and its offset from the top-left corner, in millimetres. A and B are separate positions, not a swept path.
Allowed range: 1–5000 · Step: 1
Allowed range: 1–5000 · Step: 1
Allowed range: 1–2000 · Step: 1
Allowed range: 1–2000 · Step: 1
Allowed range: 0–5000 · Step: 1
Allowed range: 0–5000 · Step: 1
Positive remainder under these assumptions. Check the actual use and product requirements before choosing a layout.
- West remainder
- 200 mm
- East remainder
- 750 mm
- North remainder
- 850 mm
- South remainder
- 150 mm
Reference boundary — Allocated width: 1400 mm × 1400 mm
Blue dashed line: comparison boundary. Red dimension: shortage.
1400 × 1400 mm
The boundary is a chosen allocation, not necessarily a wall or passage. Rehearse the full movement with an empty bin and check shelf, grip, load and door separately.
Teaching assumptions, not a surveyed home or a construction check. Results describe this simplified geometry or budget only. Changes stay on this page and reset on reload.