Baby Bath Storage Layout: Dry, Move and Put Away
Compare flat and upright storage for an empty baby bath, then rehearse the drying, handling and supported storage route before choosing a space.
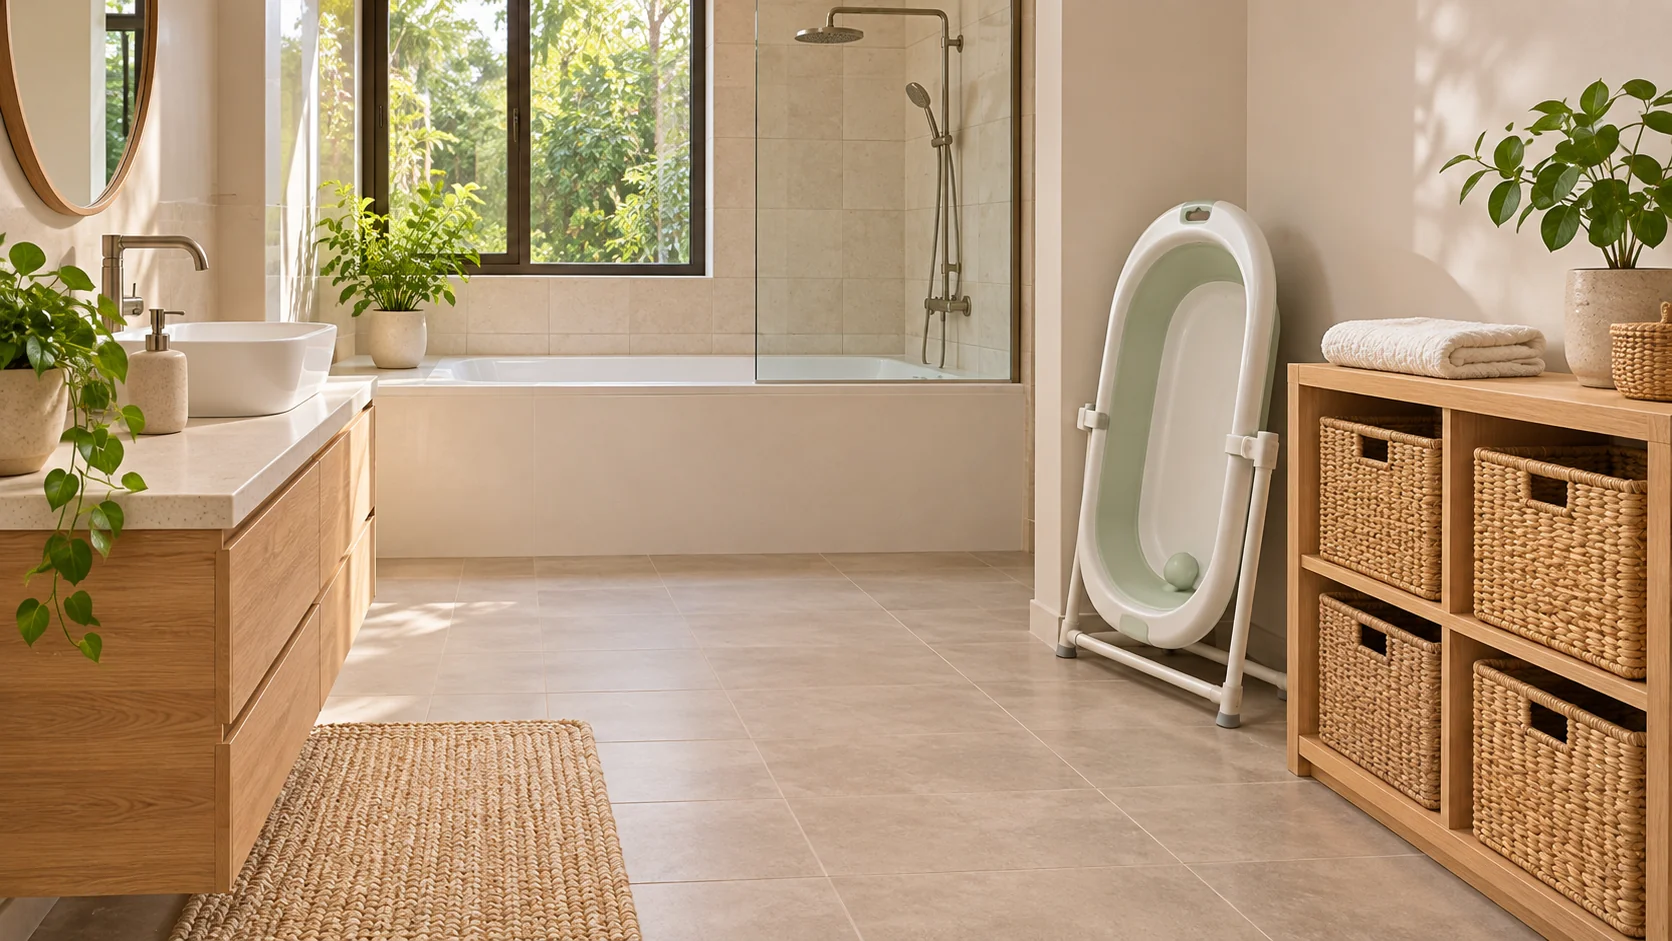
Empty baby bath flat and in a supported upright position
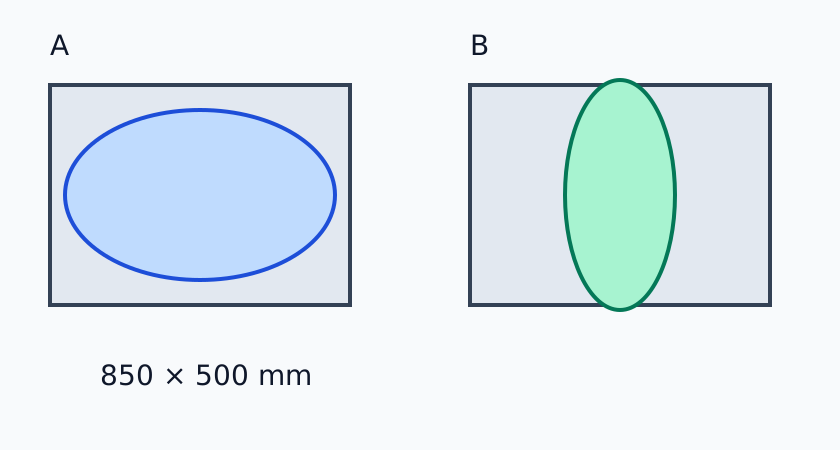
The empty 800 × 450 mm teaching footprint in A starts 20 mm from both edges of an 850 × 500 mm zone, leaving 30 mm on the far sides. B illustrates the change in occupied space if the product permits supported upright storage.
Before reorganizing a small bathroom, draw where the baby bath ends up at three points in the household's routine: after cleaning, while drying, and once it has been returned to storage. Sometimes all three marks cluster in one place because it is the only open spot. In that case, a tidy photo of the room between uses tells very little about how the room works. A towel, door or laundry basket may have to move every time the empty bath goes back.
This is a before-and-after plan for the empty product. It deals with the appropriate surfaces, permitted supports and movement between them. Use an empty bath or a lightweight outline of one for every rehearsal. Keep actual bathing and childcare decisions separate and follow the product's instructions. The two drawings show a support comparison and a sequence, so you can compare the place the empty bath occupies with the way it gets there.
Before the change, map the three positions as they are
Imagine a household that usually cleans the empty bath near one fixture, waits for it to dry in the corner and later stows it in an available part of a cupboard. The drying corner is also the place where a door opens, and the cupboard is behind another door. This is a hypothetical room. Its value is that the trouble appears between clean-up and putting away, although the storage rectangle looks generous.
Draw the room in its ordinary state. Add the clean-up position, the temporary position and the place used for final storage. If a position changes from day to day, sketch the alternatives and ask what causes the switch: a folded towel occupying the expected surface, a door that needs to stay clear or an accessory temporarily waiting to be put away. The sketch helps distinguish a problem that occurs during drying from a cupboard that cannot be approached while carrying the empty object.
Draw the outer edge as it actually rests. For a baby bath with a flared rim, the floor contact can be much narrower than the shape that comes near the wall, cabinet or door. A stand or frame may introduce another footprint during the part of the sequence in which it is present. Check the product directions to identify which accessories remain attached during cleaning or storage. If a detachable part normally goes elsewhere, draw its own position.
Compare which activities need space at the same time. The route needs to be clear while an empty bath passes. The candidate drying position must serve its purpose while the room is used for other tasks. The final storage space must be available between uses and when someone retrieves the bath. A door opened once while the bath goes through may suit one plan. A door that has to stay partly closed throughout an uncertain drying period calls for examining the room's other uses. Refer actual drying directions to the product information.
Describe the recurring inconvenience
If you usually have to move a laundry basket, name the two points that compete for that part of the floor. If the problem is getting to the drying location while carrying the empty bath, write where you need to stop and reposition your hands. If the bath lives on a dry surface because that's convenient, confirm that the material is appropriate under the care instructions and how the bath reaches that stage. The next comparison depends on whether the difficulty lies at the first movement, in the temporary area or at long-term storage.
A plan before a change can be recorded with three notes rather than three photographs. One might name the clean-up site and the place currently receiving drips. A second could identify a hinge-side restriction at the shared door. A third could give the usable dimensions of the shelf where the dry item goes. Write whether each item was observed, measured or taken from the manufacturer's directions. Use the same categories in the after plan so that you can tell which difficulties were resolved.
Keep the product empty throughout this comparison. An empty outline can show where an edge crosses a door or where a surface is too small to contain it. It supplies no conclusion about using the product for bathing.
Compare flat space and supported upright storage
Open the full-size position comparison
A is flat storage; B is an upright position that must be supported as the product allows. For a teaching example, assume a flat storage rectangle of 850 × 500 mm, and a simplified empty bath footprint of 800 × 450 mm placed 20 mm from the left and rear edges. The right and front differences are each 850 − 20 − 800 = 30 mm and 500 − 20 − 450 = 30 mm. These are arithmetic results, not installation or handling allowances. Handles, rims and the real shape may extend beyond the simplified rectangle.
Turning the bath upright can free some floor area, but it introduces a different height, support and fall question. The sketch does not establish that this model may be stored upright. If the product does not specify a secure method, leave that option unresolved and seek the manufacturer's guidance. A flat position may take more floor area but avoid depending on an unverified upright support.
Measure the rim, usable support and approach separately
Begin with the actual empty bath in the orientation permitted in the instructions. Measure the longest parts of the upper edge, any grips that extend farther, and the base that sits on a supporting surface. A product may have a broad outer edge and a much smaller area that needs support at its base. Draw the overall projection on the plan and label the required support from the directions as its own information. Any frame used to support the bath has its own dimensions and intended position.
For a recess or cupboard, measure the region at the far end and the opening through which the empty shape must pass. A face frame, door hinge or handle can make the opening smaller than the interior. The container may pass a narrow part before turning toward its storage orientation, so mark which end goes in first. See whether that direction leaves space for a hand to guide the object after it starts to meet the supports. The area where you carry the bath and the area where the product eventually rests need their own observations.
In A, the two arithmetic differences match because of the chosen inputs. For another hypothetical cabinet, suppose a back panel reduces the usable depth from 500 mm to 470 mm at the same rear reference. Keeping the 20 mm offset and 450 mm bath depth gives 470 − 20 − 450 = 0 mm in front. The outline reaches the edge, while the right difference stays 30 mm if its dimension does not change. This example explains how a panel can affect one axis alone. It says nothing about room to insert and remove the bath or whether a particular shelf assembly is appropriate.
Avoid using an empty gap on one axis to hide an obstruction on the other. Shifting the teaching outline in one direction can change the front or side difference, but at home it also changes where the person can reach and where the needed support lies. Use a separate case with its own approach. If a hinge projects across a cupboard opening, a shape that fits the interior still needs a way to pass the hinge. Mark where the hand will be before comparing the dimensions of two actual products.
Upright changes what has to be demonstrated
Treat upright or hanging storage as a configuration to check only when the actual manufacturer supplies or confirms the appropriate stable method. Look up the exact model and any required supporting parts. A hole that feels handy is a mounting point only if the manufacturer identifies it that way. A photo of a similar product tilted against a wall gives no evidence for this one. If the method is unresolved, compare the identified flat area and the movement around it while you seek the manufacturer's guidance.
For a position described by the manufacturer, record the full empty height, how the base is supported and how far the rim, stand or accessory projects. A smaller floor area can leave a higher profile beside a door or shelf. See whether nearby furniture would cross that profile during ordinary use. If a fixture is required, verify what it is intended to attach to and who can confirm that the proposed site meets the directions. Building fixings and access to stored objects should never be inferred from the teaching outline.
Make a separate drawing of placing the empty item into that supported location. It may need to turn or rise through a larger space than it occupies at rest. Follow the directions for storage. An empty profile can be sketched across a doorway and turned in a wider part of the room without propping it somewhere unverified. If the return action cannot be represented without guessing the instructions, leave that part open. A plan can choose a documented flat arrangement or identify another location while the upright candidate remains under review.
Give flat storage a fair comparison
Flat storage gives a broad footprint but may be easy to retrieve from one predictable side. It can suit a clearly defined surface if the instructions permit the use and the object doesn't occupy circulation. Compare a wide low cupboard opening, a shelf with suitable support and an appropriate floor area only as relevant to the specific product. A low spot near the doorway can be easy to access and inconvenient for people walking through. A hidden shelf can be visually appealing and require the removal of adjacent objects. Keep the order of access visible.
With similar dimensions, two support surfaces may behave differently as furniture. A purpose-made shelf can be recessed behind a frame. An open side might let both hands guide the empty bath, while a deep front limits both. A sloped or irregular surface calls for checking the instructions before generalizing from the word “flat.” Leave the usual nearby objects in place for the comparison. Clearing the rest of the cupboard for the first trial can disguise a conflict that occurs on ordinary days.
Treat drying and storage as two distinct places
Open the full-size transition diagram
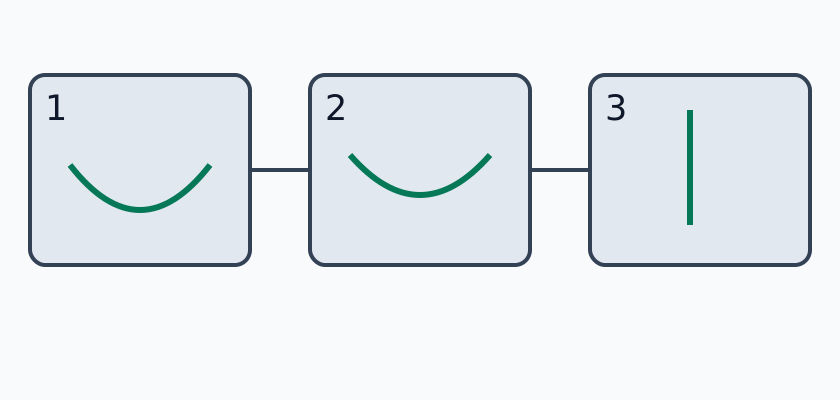
The figures identify 1: cleaning after use, 2: a temporary drying position and 3: the final storage location. Trace the empty bath's path between them, including door swings, corners and the surface that may receive drips. The picture does not demonstrate that a bath is dry or safely supported. Follow the product's cleaning and storage instructions, and keep it from falling or blocking a route.
After the change, give each position a distinct job
The clean-up position needs space to reach the empty shape
At position 1 on the sequence drawing, consider where the empty bath is held or set down while you follow the product's cleaning instructions. Mark the location with the product in its intended condition and with any parts that remain attached. Make sure you can reach the surrounding surface as well as the object. If a countertop and cabinet surround that position, note how far the rim projects before a door or drawer is brought into the picture. A wide edge can prevent a drawer from opening despite the bottom being well inside the surface.
Record where water could reach under the stated cleaning directions and which room finishes can be exposed to it. If the bath is usually moved after cleaning, note where it might contact a door casing or slope toward the next resting point. Consider doing the geometry comparison with the dry product first. A diagram cannot establish that a household surface is appropriate for the cleaning method or what product maintenance requires; consult the relevant material and bath care instructions before deciding.
Accessories belong in this part of the sketch too. In a hypothetical arrangement, a removable insert can be kept in one place according to the directions while the main basin goes to its drying position. The handoff is clearer if there is a permitted place for each empty piece before the basin moves. If the current practice leaves something inside the basin during moves only because no alternative spot has been planned, check the model's guidance and document the intended position of that object. There should be no loose contents in the basin during route rehearsals.
The drying position has to work while the room is still being used
Position 2 is not merely the end of a short arrow. It is where the empty product remains while the household goes on using doors, towels, laundry and other equipment. Pick a potential position consistent with the product instructions and a surface suited to what may contact it. Draw both the bath and the full movement of the nearby door. Include what will be dry or in use nearby. A position that seems vacant in a picture before the door opens can intrude into a routinely used route, especially if it has to stay occupied for more than a brief transfer.
Identify where drips could land from the relevant edges and where the room finish would meet the wet product. Observe moisture only in the circumstances allowed by the exact products and surfaces, and use the information only to understand the layout. Edge shapes, removable components and a tilted support, when actually permitted, can change the possible receiving surface. Write what can be confirmed about the drying position as a facility question: what surface will receive a drip, who can reach it for cleaning, and what other use does it serve while the product remains there?
The manufacturer may distinguish cleaning, drying and storage conditions. Check the actual model's instructions for which faces need attention and which orientations or supports are described. Different materials and constructions can have different directions. The room plan can reserve access to the surfaces concerned. It cannot determine that an item is dry or ready to be stowed on an assumed schedule. If the materials around a proposed position cannot receive moisture, consider a different suitable surface rather than relying on a new household routine to keep them dry.
In a small bathroom the drying position and final storage may be adjacent even when their purposes differ. Use separate marks if one is a temporarily occupied moisture-tolerant area and the other is a clean dry space for the empty product once the instructions allow that. Count how far the rim reaches into the common opening in each position. If the best verified arrangement uses the same support for both stages, put “drying” and “stored” on the same plan area and describe which other activities can happen in either state. The comparison still has two stages.
The final location should be ready for retrieval as well
At position 3, follow the intended support method for the exact product. Think through bringing the empty object to the position as well as resting it there. Note where hands need to move to guide the front and back of a wide rim. A shelf at the far end of a cabinet may offer a large planar area yet place the release, support or usable handle far from the side where the person can stand. Observe which part of the bath is first to move during retrieval, and check the space required for it to return through the opening.
Make sure the room does not rely on keeping frequently used objects permanently out of the way. An empty bath that can be flat on top of a shelf of towels may still need to be lifted over the towels each time. The next time someone reaches for a different object, another piece could end up in the same footprint. Put each item's normal shape back in the drawing and indicate which object goes in first. A dedicated footprint is easier to keep usable when the household knows why the open space is there.
Compare the old sequence with a revised one
| Stage | Before, in the hypothetical room | After, what the plan would need to show |
|---|---|---|
| Clean-up | Empty bath handled near the usual fixture while another object waits in the same spot | Room to reach the necessary surfaces, with a place for each separate piece as required |
| Temporary drying | Empty bath occupies the door corner until it can be moved | A position assessed for the material, adjacent movement and the model's support directions |
| Transfer | The carrier has to pause to move a door or basket | A clear path and known place to stand while dealing with any door |
| Storage | Flat cupboard has room when cleared for a picture | Measured usable area and opening, ordinary contents in place and retrieval represented |
This table is a way to express a change, not a measurement. If you complete a real review, replace the illustrative before column with your own observations and keep questions that remain in the after column. A clear candidate may still require the manufacturer's confirmation of support or an answer from the furniture supplier. Add the person or information source that can resolve the open question. This makes it possible to review a different cabinet without repeating all of the drying observations.
Try the empty route in both directions
Start with the real opening and turn
Measure the smallest useful doorway opening with the actual door and hardware in the intended position, rather than measuring the space before the frame was installed. Consider a nearby handle that projects only partway into the opening. With the empty bath or its lightweight outline held in the way allowed for handling, move toward the door and check where the widest part approaches. An empty footprint can be rotated on the page, but the real user may need a different standing position to rotate it while holding the product.
Take a second look at the area immediately beyond the opening. A narrow opening can be clear for the basin with its short end ahead, yet lack room for the turn required by the next shelf or drying surface. Draw the route as a series of silhouettes rather than an arrow running through a little circle. Include the point where the person would prepare to change direction. At a corner formed by two pieces of furniture, trace the outer edge of the rim as well as where the base and the person stand. A sharp change around an angle can create a conflict only in the middle.
Put door and drawer positions on the plan that actually affect the task. An existing bath can be quietly stored behind a closed cabinet and every trip still depend on using an open entrance door. If one door has to be moved between carrying and setting down, identify the position where the empty item can wait without blocking the room, provided that support is appropriate. Stop a test that requires an awkward reach or that you cannot control comfortably. Compare a different sequence or position without solving a space problem by taking a risk during the rehearsal.
Work backward from where the empty bath will be found
Start at the planned storage point as if preparing to retrieve the empty object for the next use. Which end will move first? Can the person reach the intended handholds from the same side after other objects are stored? Does a cabinet door need to open farther than it did when the bath was put away? Every return route has an entry direction and an exit direction, and an unused corner may be available on only one of those trips. If a collapsible or detachable item changes shape, sketch the form permitted by the exact instructions for each stage.
Now follow the path from storage toward the preparation area with the baby bath empty. It may be shorter than the route used to put a wet empty item away because there is no stop at a drying position, but its corners and doors still matter. The approach to an interior shelf can be clear when a person has already pushed aside another object, yet awkward when they arrive from the entrance trying to get the bath out. If the return is hard to reproduce, redraw the approach before specifying fixed storage.
For feedback on which part is difficult, ask someone who regularly handles the empty object to use the normal path. They can point to where they lose their view of an edge, want to shift hands or need to stop. They do not have to demonstrate any bathing action with a child or with water. If more than one adult uses the space, take observations separately. A layout that relies on one person's particular reach or knowledge should be assessed for how it works for the people who actually need it.
Account for accessories without borrowing their space twice
A separate stand, sling or removable piece might need a different supported storage location under the manufacturer's instructions. Take a plan for the same exact model rather than guessing from the outline of the main basin. When a part is present, include its shape in the movement drawing for the stages that require it. When it is separate, decide where it may go and how one person can get it later. The available space for a basin cannot simultaneously be counted for a stand if they both occupy the shelf at the same time.
Mark the dimensions of the stand as it would be stored in the permitted position. If it folds only as described in the instructions, measure the resulting outline without assuming how every model behaves. Compare the door and the shelf with both pieces having their real places. For an existing product, include an empty rehearsal of pulling out the required pieces in the likely order. A narrow cabinet opening may admit each part individually and still leave little space after one part is in position. A picture of the empty cupboard can hide that timing problem.
What changes in a shared or rented bathroom
Start with surfaces the household can actually use
For a household that cannot change fixed furniture, list which locations and supports are available under the property's conditions and the product directions. Put the fixed glass, wall, door and countertop in the drawing as constraints. It is often possible to compare a different cleared flat area before discussing changes to built-in work. Any attachment to a wall, door or furniture would need relevant permission and appropriate instructions. A broom hook or a towel bar should not be assumed to support a baby bath because an empty outline can be drawn next to it.
If laundry and the bath share a room, try the plan with a basket and ordinary towels at their usual places. Where they need to move, make that action and its destination part of the drawing. Creating space by temporarily placing a basket outside the bathroom can be a genuine design choice only if the new place is normally available and appropriate. A more convenient empty-bath route should not depend on leaving everyday items in another doorway. For the same reason, compare a candidate inside a cupboard with its normal contents and not only as an empty cavity.
Opening a door for a transfer and leaving it in a special position for drying are different arrangements. Note which other room functions need the door, towel area, shower entrance or walk through during the temporary stage. A moist surface near a fixture may be permissible for one product and still interfere with the approach to another. Record the area that must stay usable for the household and check that it is free with the empty product in its intended drying and storage positions.
Choosing furniture before the bathroom is built
In a proposed room, mark a likely opening width, usable shelf shape and space to turn based on the available drawings. Request details for the furniture front, frame, hinge and any back panel. A listed cabinet depth may include the door and trim. If a pipe or construction detail will take part of the usable depth, show the affected section in outline. Keep unknown values labeled as provisional until actual hardware and products are selected. This lets a cabinet design be adjusted on paper before it depends on a specific empty shape.
Give a joiner or furniture supplier information about the planned product type and the exact dimensions you have. Record a depth measured from the usable rear boundary, an opening measured between actual projections, and a plain description of where the empty bath needs to be held. If the choice is between a lower shelf and an open ground-level position, show both approaches and describe which surfaces must support the product as specified. The supplier can confirm the furniture section. The manufacturer's bath information still governs the appropriate handling and support.
If the room plan changes, decide which stage needs a new check. Reversing a cabinet door can change both the transfer toward storage and the access to retrieve the bath. Moving a towel rail could change the drying footprint or the reach around it while leaving the cupboard unchanged. Fitting another door can change the turn at a threshold. Save before-and-after versions of the sketch so that a new drawing can be reviewed for the change rather than assumed to inherit all previous observations.
If the dry storage is outside the bathroom
A nearby cupboard in a hall can offer a dry supported location under the product directions while leaving the bathroom free for the first two stages. It also creates a transfer through two rooms. Rehearse that trip with the empty and dry object, starting with the bathroom door in its normal position and the cupboard arranged the way it is usually used. Identify where the empty shape can turn before it reaches the cupboard and whether a coat, bag or mat at the doorway projects into its path. Keep any passage used by others clear. The extra trip matters particularly if the originally proposed dry storage had a more consistent approach.
Keep an explicit distinction between the condition required before the object leaves the bathroom and the shape it will have after it gets there. If the surface in the hall is meant to stay dry, the product's care directions and the actual condition of the item determine when such a move is appropriate. The drawing can explain that condition and where it will be checked without defining a drying duration. Include how to bring the empty bath back before the next use so the same door or near shelf is not evaluated only once.
There is a simple three-drawing comparison for this choice. The first shows the current bath position extending toward the door during drying. The second shows a possible drying area consistent with the stated product and finish conditions and a final storage spot inside the bathroom. The third keeps that drying position but moves final storage outside. Compare the new task added by the third drawing with the space released in the room. If it trades a conflict near the bathroom door for an equally difficult turn at the hall cupboard, the before-and-after record should show both effects. A location is useful only in the context of the two spaces it connects.
- Measure the empty bath including its rim, grips and any stand. Record the actual doorway and the intended storage surface; leave unknown values blank.
- With no child, water or loose items in the bath, carry the empty object through the intended route. Check grip, turns and doors. Stop if the path requires an awkward or uncontrolled movement.
- Identify an appropriate drying location and the final location separately. Check what surfaces are suitable for moisture and how the item will be supported according to the product instructions.
- In the three-stage comparison, switch among route, drying and support and record what evidence you have gathered. An unchecked stage remains unknown; checking a box is not an automatic safety approval.
- Repeat after changing the bath, stand or furniture. Keep any child, water or loose items out of the product during the storage test; follow the product's directions for its actual use.
Use the interactive record to show evidence, not completion
The three-stage comparison separates the route, drying and support checks. Select the stage that matches the question and record only what you have checked. For instance, you may have measured a cupboard and followed the empty route while the manufacturer's permitted support for a vertical orientation is still unknown. Keep that last item open. Checking another box need not change an unresolved part of the decision. The interface is a field prompt; it cannot approve the plan, certify furniture or tell whether the item has dried.
Use the printable record alongside the tool when different people will review the plan. For the route, write the direction from which the empty product passes an opening and how the cabinet door is usually positioned. For the drying question, identify the surface and applicable care directions rather than giving an estimated number of hours. For support, give the confirmed model and the source for the proposed orientation. A person reading the record later should be able to find the spot, reproduce the check and see which information was not yet available.
For example, a handwritten entry might read “A flat storage rectangle was the option compared today. In the teaching dimensions, the 800 × 450 mm outline at a 20 mm left and rear offset leaves 30 mm either side of the opposing edges. Real opening and handling measurements are pending. Appropriate supported storage and drying will be checked in the actual product instructions.” On an actual project, identify which two edges you mean rather than deriving a general margin from the illustration. Where the instructions do not address the proposed position, ask the manufacturer before treating it as a settled option.
Judge the change by what happens after clean-up
Return to the place where you started the before plan. In the revised one, can the empty bath go from clean-up to its intended drying position without putting the first two pieces of furniture out of use? While it waits there, can people open the necessary door and reach what they normally use? When the directions and condition allow the empty product to move, does its selected support remain available and can someone bring it out again? The answer should identify the particular support and the surface, not just the name of the room.
Keep a short note that someone else in the household can follow: the clean-up position, the temporary drying position and the final place for the empty product, with any confirmed reasons for those choices. A future change in the product, supports or furniture can start from that note. The finished plan is the difference between hesitating with a bulky empty object in the doorway and knowing where the next supported handoff belongs.
For the larger room and storage plan, see the nursery room layout guide. The choice of position should preserve the real door and daily movement paths.
TRY THE EXAMPLE
Compare route, drying and support evidence
Choose one candidate arrangement and record evidence for the empty bath. The three steps are self-reported and do not certify safety.
Carry the empty bath around the real door and corners. Record the grip and any obstruction; if movement is uncontrolled, leave the route unresolved.
Test only an empty bath without a child or water. Follow the actual product instructions and keep doors and daily routes clear.
Teaching assumptions, not a surveyed home or a construction check. Results describe this simplified geometry or budget only. Changes stay on this page and reset on reload.