Stacked or Side-by-Side Recycling Bins: Space Check
Compare two recycling-bin arrangements by width and height, then check lid opening and each empty-bin removal route before choosing storage.
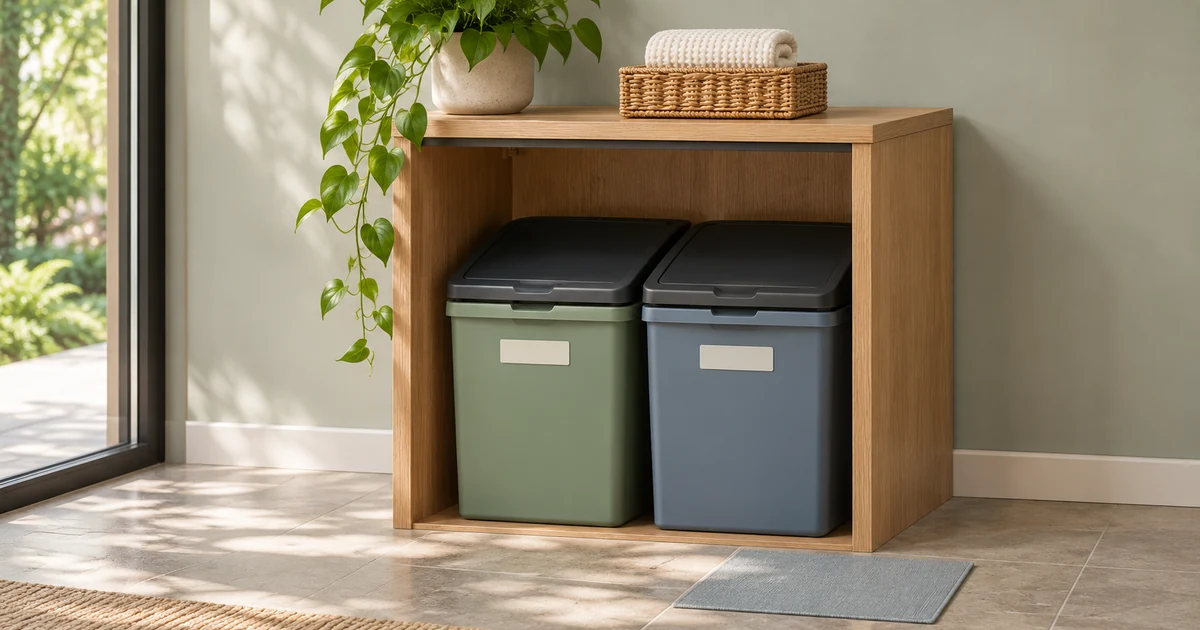
Two recycling bins side by side or stacked
The 600 × 800 mm opening contains a 580 × 400 mm pair in A before the trial allowance. B uses less width but reaches 820 mm, 20 mm above the actual opening even before adding the 30 mm trial allowance. The dots and floor pad show a separate lid check and a trial pull-out route with a place to set the bin down.
The paper bin is ready to empty. Can you take it out while the other bin stays put? Answer at the cabinet rather than in a catalogue. Then try depositing a flattened package with both bins in place. Those two actions give you different reasons to prefer a row or a stack. A narrow footprint has real value in a busy kitchen, provided the most frequently emptied bin does not become the hardest one to reach.
The following numbers are a teaching example in millimetres, not a measured cabinet, a standard clearance or proof that any particular bins can be stacked. Follow the bin and furniture manufacturers' instructions, and test with the actual empty containers before committing to the arrangement.
Decide which bin can move first
Write the streams your household collects and what usually goes in each. A small container used throughout the day puts a premium on a direct opening. A bin you empty every evening puts a premium on a direct route out. Another stream might accumulate much more slowly because it contains material that can be flattened according to local collection guidance. If the more frequently moved bin should leave without disturbing the other, make independent withdrawal an explicit condition before measuring. A narrow vertical pairing that requires both bins to move will otherwise look artificially attractive on the drawing.
Four actions are worth tracing. Deposit a clean permitted item from the normal standing point, with the bin where it lives. Reach the handle and release anything the manufacturer requires before removal. Carry the empty container past the bay and on to a safe place where it can be set down. Finally, open or slide the unit far enough to clean the container, the liner and its support. These actions may use the same door in different states. Mark which bin, user, door position and object belong to each trial. A bin that can be pulled out for a scheduled trip might be inconvenient to slide every time a small package is deposited.
Rank the conditions you are willing to trade against width. Required routes are kept open. Manufacturer-stated stacking and loading conditions also need to be established. Ease of withdrawing the most frequently emptied bin might be next. A matching pair with the same finish might be a preference that yields to a smaller size or to containers at two stations. If a candidate has unknown support or an unknown lid path, keep it pending until the relevant evidence is available. This makes the decision easier to discuss with someone who values a different part of the routine.
For a vertical arrangement, identify how the upper container is supported. Products that nest together when empty are not necessarily made to carry one another in service. Even very similar-looking rims can have different load points. Use the model number, compatible configuration and manufacturer instructions to establish allowable support. An independent shelf is a different layout: it can leave the lower bin movable on its own, but the shelf and frame use real height and width. Draw the supporting parts as pieces of furniture, with their own specified loads and access conditions. A similar front view can conceal two very different ways of handling the bins.
| Priority | Question | What to check after the answer |
|---|---|---|
| Route and support | Can the listed configuration be used and carried out with the required route open? | Product compatibility, cabinet rating and normal door travel |
| Depositing | Can the frequent item reach the open lid or hatch while the other bin stays put? | Shape of the item, hand access and opening motion |
| Independent removal | Which unit comes out first when a bin is ready to empty? | Handle grip, threshold and destination beyond the cabinet |
| Cleaning and reset | Can liners, both containers and the support be reached and returned? | Parts that move, separate set-down location and drying |
Measure the mouth of the bay as a separate object
The inside width at the back describes where the bins can sit. The front opening describes how they get there. Hinges, a divider or a centre frame can make the front narrower. A wall or another handle can also limit the normal opening position of the door. Measure the closest parts with the doors in that position and at the height of the bin's widest portion. Record the hinge or rail itself in the drawing. If it occupies only the top of the bay, it could affect an upper bin or an open lid without reducing the floor width available for a different layout.
Take height from the real support level to the lowest fixed surface along the path. A narrow horizontal strip at the front can be lower than the main shelf. Its height might matter only when a bin reaches the threshold, so give its depth and height separate marks. The bin could have an open lid that clears the shelf in the back, then meets the rail only when shifted forward. If there is a raised lip below, record its top from the same support level. Include both overhead and underfoot constraints in any later lifting comparison.
Measure depth to the first fixed object that takes up space, including rear hinges, trim and any fixture the manufacturer needs to remain accessible. Side handles require space for actual fingers. A gap convenient for a container with a recessed front grip might leave no way to reach the inward-facing handle of the adjacent bin. Before ordering, trace the hand from the open door to each handle as well as the stored rectangle. A case that opens widely enough for a whole bin to pass may still need a different bin order to provide adequate access to those points.
Use differently coloured outlines for cabinet and bin. The cabinet outline includes the threshold, opening and normal door position. The bin outline shows its widest rim, closed lid, handles, wheels or feet and any feature that protrudes during use. If a removable liner sits inside a frame, draw a third outline for its raised handles and lifting direction. The volume on a label is not an external width, and a bin body measured without its rim is not the outline that must pass the hinges.
Sliding a shelf to a higher approved position might free the lower bay while reducing usable space above. Draw the shelf in both positions and include its thickness, permitted supports and anything it must still carry. Find out which configurations the furniture documentation allows before comparing loaded options. If the existing bay cannot support a vertical layout in its intended use, investigate a row in another bay, smaller independent bins or a plan with two collection points.
Read both axes in the known-size bay
Suppose an unobstructed opening is 600 mm wide × 800 mm high. Each of two equal bins has an outside envelope of 280 × 400 mm, including its rim and closed lid. Allow 20 mm between bins. Add a separately selected 30 mm trial allowance on each axis; that allowance is an example, not a required handling or installation clearance.
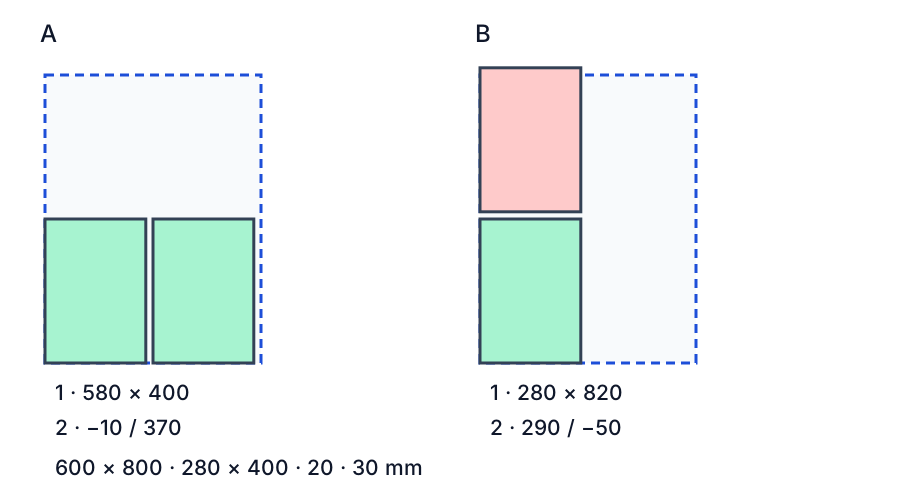
Open the full-size arrangement comparison
The dashed outline is the opening. In A, the bins occupy 2 × 280 + 20 = 580 mm in width and 400 mm in height. The width balance is 600 − 580 − 30 = −10 mm; the height balance is 800 − 400 − 30 = 370 mm. The actual envelopes fit the width by 20 mm before the trial allowance, but the chosen allowance is short by 10 mm.
In B, stacked envelopes occupy 280 mm in width and 2 × 400 + 20 = 820 mm in height. Width balance is 600 − 280 − 30 = 290 mm, while height balance is 800 − 820 − 30 = −50 mm. Stacking exceeds the opening itself by 20 mm even before the allowance. In the drawing 1 identifies occupied width × height and 2 gives the width/height balances. Neither result includes depth or a lid in motion.
Try both in the arrangement comparison. Change the opening, one bin's outside width and height, the gap and the allowance; an empty field remains unknown. For example, replacing the bins with otherwise equal 260 mm wide envelopes makes the side-by-side occupied width 540 mm and its width balance 30 mm. The narrower bins may hold less, and their actual lid and removal dimensions still need checking. A positive result means only that the chosen rectangles and allowance fit this front view.
Work backwards to the size you can shop for
The two negative values in the example have different implications. Along A's width, the two outlines fit by 20 mm before the reserve, and the chosen 30 mm reserve is short by 10 mm. Along B's height the stack is physically taller than the opening by 20 mm, with an additional 30 mm requested for the trial. If you retain only the balances, a later reader can mistake both for the same severity of interference. Write the raw gap as well as the reserve balance in each comparison, and explain why you selected that reserve.
Hold the opening, 20 mm interval and 30 mm reserve. For two equal bins in A, the widest each can be before exceeding the width budget is (600 − 20 − 30) ÷ 2 = 275 mm. Without the reserve the boundary would be 290 mm. For B, the highest each can be within the same height budget is (800 − 20 − 30) ÷ 2 = 375 mm. Without the reserve the threshold is 390 mm. These outcomes can narrow the catalogue search. Product specifications, restrictions and the motion still determine whether any model works.
Returning to the calculator, try reducing the equal bin width to 260 mm while leaving their height alone. The earlier example leaves 30 mm after the associated width reserve in A. If you instead look for an equal pair 375 mm tall, the stacked envelope in B would be 2 × 375 + 20 = 770 mm, with zero balance left beyond the height reserve. A closed box dimension does not include an opening lid or the hand that will use it. Find the appropriate drawings and note which further dimension still controls the shortlist.
If the streams use different sizes, work the sum and the maximum on paper. For example, suppose one bin is 300 mm wide and 400 mm tall, and the other is 240 mm wide and 360 mm tall. Keep a 20 mm interval and the teaching bay. Side by side, their width is 560 mm and height 400 mm. The 30 mm reserve leaves 10 mm in width and 370 mm in height. Simplified stacking gives width 300 mm and height 780 mm, leaving 270 mm in width and a shortage of 10 mm in height after reserve. The stacking model assumes the specified gaps and no sideways offset. Actual nesting or support geometry may change both, so measure or obtain the assembled outline.
The gap between the units and the reserve have different functions. The gap might come from a joining part, thin divider or spacing in a drawing. The reserve is a chosen budget for the axis. If fingers are needed for a side handle, they need identifiable space at that specific point even if the width balance is positive. Draw the fingers at the narrowest place and decide whether the side-by-side bins have accessible handles. For a manufactured stacking pair, use the assembled dimensions given by the maker and avoid adding a gap it already includes.
If the verified bay is 585 mm wide at the relevant point rather than the assumed 600 mm, the 580 mm pair in A leaves 5 mm of raw width or −25 mm after the 30 mm reserve. This line concerns the assembled arrangement. Compare an individual bin's moving width separately where two bins can pass through the door one at a time. A hinge at one height can constrain a raised rim during removal without affecting the same bin when it rests farther inside.
Get the opening and closed dimensions from the particular product
Ask for the widest and tallest external dimensions with the lid fitted and the bin ready to stand. A rim or a side handle can project beyond a tapered case. The dimensions on the packing label might describe a nesting stack empty or the outside of the shipping box. A maker's assembled dimensional drawing should name which parts are included and how the bins can be positioned. If its permitted vertical configuration includes a set of support pieces, ask for that version and its usage and load instructions. Keep those details with the compatibility decision.
Capacity is another comparison, independent of external size. A smaller container may provide enough room for one stream if it is emptied regularly. Loading instructions and whether an item is allowed in the local collection determine what can actually go in. A larger bin that you have to remove before every use of a smaller one increases the number of handling actions, even if its own capacity is welcome. Record who does that work and how often. Consider a smaller dedicated inner liner if the maker provides one and you can remove it independently within its allowed use.
Change only one input for an initial sensitivity check. If the opening, bin, gap and allowance all change on the same line, it is hard to tell what resolved the problem. Once an approach looks plausible, replace all approximate values with the verified product and opening dimensions for the new comparison. A hinge width measured with the door at its normal limit is more useful here than an exact nominal cabinet width. Leave an unknown width or height blank until it has an appropriate reference.
Give the lid a drawing of its own
Draw what happens when an item is deposited while the container is in place. A rear hinge moves through a section above and behind the lid. A flap can open within the bin's width while requiring clear space in front for turning a package. A lift-off top needs a safe resting place between opening and closing. Give each design a separate diagram with the hand and a representative clean item. A closed front outline helps place the furniture but says little about any of those motions.
A folded piece of paper and a permitted bulky package require different approach angles. Try representative items with the actual empty bins when the setup is appropriate. Local sorting requirements are independent of storage geometry. The item's largest face might fit the bin itself but need more room to enter its mouth beneath a shelf. Trace that rotation without catching fingers or forcing the lid. If an infrequent item needs a different collection location, record the separate arrangement along with the ordinary process.
Try the lid in the door's ordinary position, which may be less than the maximum opening. A cabinet door can reduce access to a partly open lid or obstruct the hand near the inside bin. If you must pull the bin forward before depositing, mark the resulting position in the room. It may be easy in a pantry alcove and intrusive near a frequently opened room door. With a purpose-designed stack, use the documented compartment openings and do the comparison in the approved configuration, rather than drawing a lid held ajar as a permanent arrangement.
Compare features that affect different directions. A thin cover lowers the closed height, but it could need a large swing. A front hatch may free height while asking for additional clearance ahead of the bin. A removable lid can be useful with a large object while adding an intermediate move every time someone opens it. For the more frequently filled bin, choose a configuration where the user can deposit the item, close the bin and step away without holding one object while reaching around another. Confirm that both lids can be used as required while the other bin remains in place.
For the trial, write which action was observed with empty containers and which was inferred from drawings. A diagram that gives the closed width does not verify the lid’s full travel, and one whose hatch is shown open may omit the space used by a hand. Where product documentation suffices for a comparison, record the reference. Where it does not, flag the missing view for the supplier. This is especially valuable if you are choosing the bins before the cabinet is ready.
Follow the empty bin beyond the cabinet
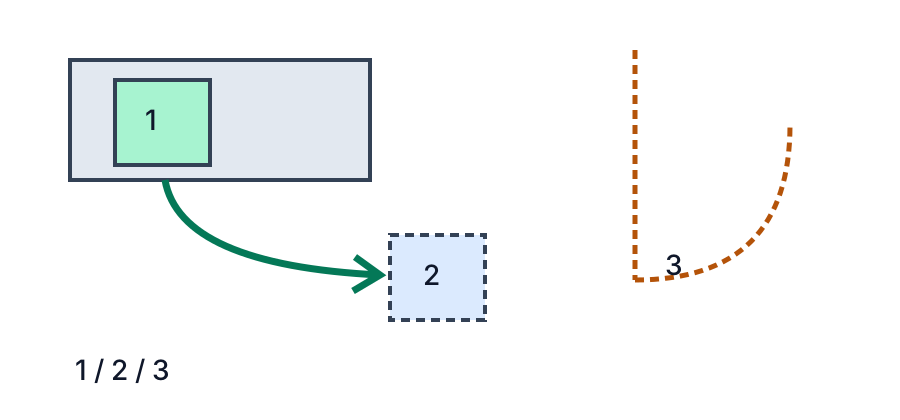
Open the full-size removal-path sketch
This sketch is not to scale. Position 1 is the stored bin, 2 is a possible temporary position and 3 is the nearby door. Follow the arrow from the bay: a bin may need to move forward before it can be lifted, and the temporary position must not block the door or the route used by others. If the upper bin has to be removed before the lower one can come out, the saved width carries a daily handling cost. Also compare how each lid opens when the bin is still stored.
With the actual empty bins, gently rehearse depositing a small clean item, opening each lid and withdrawing each container through the narrowest opening. Stop before a lid or bin catches. Add the bag, contents and weight only in accordance with the product instructions; the geometry here cannot determine safe lifting or load capacity.
Describe removal as a grip, a threshold and a turn
At the grip stage, include the space taken by fingers as well as the part they hold. A centre handle may lift above the lid while side handles put hands between bins or beside the cabinet wall. A suitable removable inner liner can let the outer cabinet body stay in place, but its own handles may rise higher and its extraction direction may change. For the weekly route, record the handled liner if that is what goes out. For a periodic cleaning route, also show how the complete outer unit moves.
At the threshold, observe how far the container can slide before it has to lift. To illustrate, suppose a fixed lip is 25 mm above the support. An ideal bin resting on that surface would have to bring its bottom above the lip when crossing it. A 400 mm high body lifted by 25 mm occupies 425 mm of height at that depth, even before considering its raised handle. If a fixed overhead strip sits at 420 mm in the same section, the simplified result overlaps by 5 mm. Draw the line of movement on the side section. A documented alternative path or tilted position has its own envelope.
There are two reasons an upward move can be awkward. The first is the physical interference that the calculation describes. The second is the hand position before the person can lift. If the side wall blocks the lowest part of the handle, a standing person may have to pull the bin partly forward before being able to grip it safely. The same initial movement can take the lid or rim to a different height obstruction. Put the reach and lift in order instead of drawing an arrow that starts at a place the bin cannot yet occupy.
Once a bin clears the opening, leave room for it to turn into the aisle. Its near corner reaches sideways when it rotates, even if it is shallow enough to travel straight out. Mark the cabinet's face as the position at which that turn becomes possible. A wall return or an open room door just outside the cabinet can make a straight route into a turn with an obstacle. Watch the whole action in plan instead of judging the turn from the completely removed position. Then check the height of handles or furniture projecting into the area where you stand.
A vertical pair can introduce another removal order. If the upper unit has to come down to release the lower one, map the upper bin's path first and mark where it will sit. The next body has to leave while that spot is occupied. The last step is restoring the upper unit to its approved position. List each hand-off in order. A sequence that works for one weekend cleaning task might be a poor fit for the everyday route. Empty-bin rehearsal confirms geometry only. Check the manufacturer’s instructions for allowable support, contents and handling before applying it to a loaded installation.
An independent shelf changes this sequence without requiring an approved supporting connection between bins. Place the shelf, supports and any fixings at their actual dimensions. The upper unit still needs a practical height, and the shelf might limit space for the lid, the hands or a raised handle on the lower unit. A side view for the lower slot and a separate view for the upper slot are helpful. A positive balance in the stacked-box calculation does not include a shelf unless its thickness and supports were explicitly accounted for.
Put the temporary position on the plan
The most convenient-looking floor area could be inside a nearby door swing. Mark where the removed empty bin first touches a stable surface, where the person stands and which direction they will travel next. Trace the door from closed to its normal maximum, including the handle and the person opening it. Do not depend on a bin to hold the door in a particular place or stage a container in any required path. If the plan relies on the door remaining closed while the bin is put down, compare against another workable position that keeps circulation available.
Plan what comes after the first set-down. A bin going straight outside may be carried past furniture in a small gap. A liner going to a shared transfer spot may need to be supported briefly while the door is opened. Try the intended action only with empty containers in clear conditions. Observe where the hands and shoulders are while a person turns. If the route is shared, account for the reverse movement of someone else using the kitchen or doorway. Draw a clear path independent of the parked bin rather than relying on someone asking others to wait.
The qualitative removal sketch does not give room dimensions. Use tape or a removable marker to indicate footprints without putting hard objects into a path being tested. If there is a possible staging place on either side of the door, trace both while the cabinet and room doors are in their ordinary positions. Mark the required reach to the lid from both sides. For an upper unit that must be removed to use a lower one, include time to place the first unit securely before the second moves. If the layout needs staging to happen in the same narrow bay, that is a reason to compare another arrangement.
Try the route in three different cabinet positions
Begin with the everyday door angle. Note what prevents it from going farther, such as a wall stop or a routinely parked trolley. Check the actual usable opening and the path from the main work area. In a second trial, use the cabinet's ordinary fully open configuration where it is safe and allowed. A route that works only in that position depends on that particular real use. In a third drawing, show the door in the position that another person commonly leaves it. That condition may reveal why a plan that worked during a scheduled test is inconvenient in daily life.
If two doors meet at the cabinet centre, determine whether they must both open to release a wider liner. In a row, the inward handle of a narrow bin may be close to that centre or next to a hinge. Changing which side the narrow bin occupies changes the point where a user stands without changing overall width. Move one empty bin at a time and leave the other where it would be stored. A label on each side of the plan makes it clear which particular outline, lid and handle were tested at each side.
Do not ignore reset. Return each bin to its intended support without pushing a second object aside. If it needs to line up with a stop or locate on a manufacturer-designed connecting feature, practise that action while the piece is empty and with the suitable configuration. Make sure the liner can be seated again without interfering with closure. Check whether removing a bag exposes a clip or raised handle that affects clearance on the way back. Before purchase, ask any unresolved installation and safe loading questions of the appropriate supplier.
Weigh capacity, frequency and usable floor together
A smaller unobstructed container can be more useful than a large bin behind another one. Consider which stream fills first and whether the person taking it away can make more frequent trips. A single bin of greater capacity might reduce trips for that stream, but width and height still matter and the particular maker's load guidance remains relevant. Compare these effects on the two ordinary collection routes. An arrangement with independent withdrawal may be more valuable if people use the bins at different times and cannot reset the pair for each other.
A separate station can be useful when packaging is handled far from the eventual carry-out route. Put a suitably sized and stable container at the ordinary point of collection if that location offers clear access and allowed use. Set the other stream closer to its usual exit or routine activity. Draw how each gets emptied and returned, since a two-station layout trades less crowding in the cabinet for a possible extra walk. The routes and storage conditions should remain compatible with the furniture, bin and local sorting requirements. Try a safe empty-container mock-up before committing to purchases or rearranging built-in fittings.
A horizontal arrangement with unequal widths can solve a frequent-removal problem without requiring two identical bins. Use one wide bay for a stream that needs more stored volume and a narrow bay for a stream that is emptied frequently. The narrower component can go next to the route if that gives its hand and latch better access. Put the exact product names and handed positions on the sketch so a later change in models does not silently move a hinge or protruding handle. Re-run both the occupied-envelope calculation and the lid test after switching the order.
A smaller pair that can be independently withdrawn may have an offset in its closed lids or different foot positions. Check both if the opening is tapered or if a narrow threshold supports only part of the base along the way. Product guidance may set conditions for how the bases bear on a support. Keep suitable support and stable placement explicit rather than trusting similar external shapes. Where the documentation for stacking remains unresolved, leave a one-level candidate active. If none fits the usable opening, start from the limiting width, height or depth and search again.
Cleaning can decide between two options that handle deposits equally well. A removable insert may let you clean the primary contents without lifting the outer bin. The full carcass still has to move if you need to reach the floor below. The top section of an approved vertical pair may come apart for maintenance even though the two ordinary deposits use independent hatches. Check how components return to their supports after they are clean and dry, following the equipment instructions. Record a reasonable sequence and temporary resting places rather than adding the load of several pieces to one trip.
Compare the cases by their limiting step
Set the alternative drawings next to one another. For each, trace the common deposit, the handling of the more frequently emptied bin, the other bin, and eventual cleaning. Write whether each action was observed using empty components or inferred from the relevant dimensional drawing. If you do not have a needed dimension or evidence, leave it pending. Keep the stack compatibility and manufacturer loading information attached to the correct option. The entries will show quite quickly whether saving floor width imposes a cost you accept or a movement you would repeat too often.
Select one practical rehearsal that would distinguish the two best choices. For instance, a side-by-side pair may fail because it needs a clear right handle opening when the door is limited by a wall, while a two-slot shelf may fail because the lower unit's lid rises too far. Trace both features with the actual empty components where suitable. The next question for the supplier is usually about the hinge range or the lower slot's usable height, rather than whether an entire category of bins works in a generic cabinet.
Set a review trigger once you choose. A change in liners might alter the way the handles move. A replacement door can reduce the opening at the threshold. A new habit of emptying the upper container more often can make a well-supported arrangement impractical. Changes should prompt another check at the affected action rather than just a repeat of nominal width and height. If you change the bin or cabinet model, carry the existing plotting reference forward when possible and update the new object and moving envelope separately.
End with a hand-off somebody else can follow
Run a dry sequence with an appropriate empty setup. Deposit a representative clean item, work the lid, grasp one empty bin, pass the threshold, set it at the drawn safe location and put it back. Repeat for the other bin with the first in place. If the upper or adjacent container has to move, record which one, where it goes and what happens while it is there. Stop before forcing a stick or catch. The aim is to know the limiting step and how it can be repeated, even among different household users.
A good final entry is concrete: “two separate bins in the row; the right handle passes the hinge with the door against its existing stop; the outer body stays put when we empty the liner.” It names the specific arrangement, one point of clearance and one step that does not require lifting another thing. “Stack it to save width” misses the evidence about support, the upper bin's destination and the withdrawal route. Where you have a pending answer, name who will verify it before purchase rather than treating the sample drawing as a completed installation.
Bring the recording sheet to the cabinet
- Measure the narrowest usable width, height and depth, including hinges, rails and shelf edges. The internal dimensions and the door opening can differ.
- Record both bins' complete outside dimensions, open-lid envelope, handles and manufacturer-stated stacking limits. If the bins are unequal, calculate each separately; this interactive example assumes two equal bins.
- Compare both arrangements and mark the bin-removal route and a temporary empty-bin position. A larger bin can reduce emptying frequency but takes more room; a smaller bin may fit while needing more frequent emptying.
- Confirm the support surface, stability and allowed load with the relevant product instructions. Do not stack containers that are not designed for it or obstruct a door to gain storage.
- Recheck after adding liners, dividers or a new bin. Use the kitchen pull-out bin guide for a different cabinet mechanism; that guide does not validate this freestanding stack.
TRY THE EXAMPLE
Compare side-by-side and stacked bins
Enter the measured opening and each bin's full width and height. The same chosen trial allowance is reserved once in each axis. This is a static front elevation only.
Allowed range: 1–3000 · Step: 1
Allowed range: 1–3000 · Step: 1
Allowed range: 1–1500 · Step: 1
Allowed range: 1–1500 · Step: 1
Allowed range: 0–500 · Step: 1
Allowed range: 0–500 · Step: 1
A negative balance means the selected envelopes and trial allowance exceed the boundary.
- Occupied width × height
- 580 × 400 mm
- Width balance after allowance
- -10 mm
- Height balance after allowance
- 370 mm
Rehearse depositing and removing each empty bin using the actual products. A static fit does not prove stacking compatibility, stability or access.
Teaching assumptions, not a surveyed home or a construction check. Results describe this simplified geometry or budget only. Changes stay on this page and reset on reload.