Small Bathroom Layout Ideas: Showers, Vanities, Doors, Storage
Compare small bathroom layouts with shower placement, vanity sizes, door swings, toilet clearances, storage, and a 3D planning workflow.
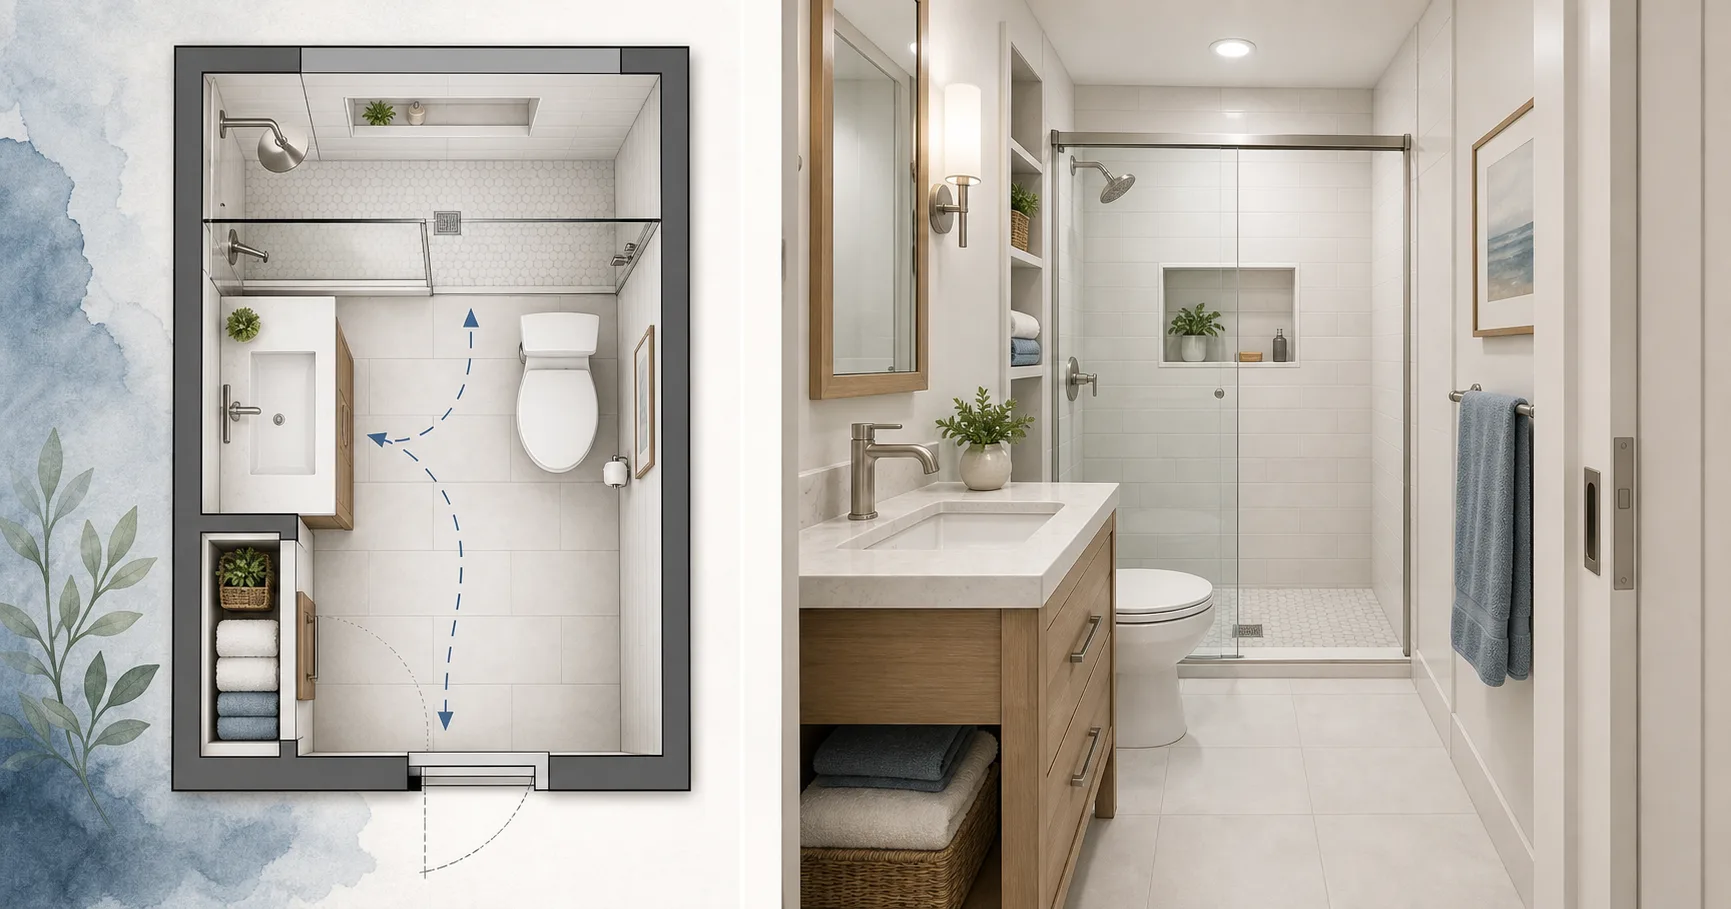
A small bathroom is not difficult because it lacks style. It is difficult because every object needs clearance at the same time: the door swings, the toilet needs side room, the vanity needs standing space, the shower needs dry access, and towels need a home that does not drip into storage. When the plan is wrong, no tile choice can save it.
This guide focuses on layout before finishes. Use it to test a compact bath in Aedifex, then choose tile, mirrors, and fixtures after the movement works.
Start with Door and Plumbing
Two constraints decide most small bathrooms:
- Where the plumbing stack already sits.
- How the door enters the room.
Moving a vanity across the room may be simple. Moving a toilet drain can be expensive or impossible, especially in apartments. Before designing, mark the existing toilet centerline, shower drain, water supply wall, and door swing.
If the door opens into the bathroom and hits the vanity, a pocket door or outward-swinging door may solve more than shrinking every fixture. In narrow rooms, the door decision can free 0.5 square meters of usable space.
Useful Minimums
Codes vary by location, so always verify local requirements, but these planning numbers are a practical starting point:
- Toilet centerline: roughly 380-450mm from side wall or obstruction.
- Clear space in front of toilet: about 600mm or more.
- Compact vanity depth: 400-460mm.
- Comfortable vanity width: 600-900mm for one sink.
- Shower width: 800mm minimum, 900mm feels better.
- Main circulation: try to preserve a clear 700-800mm standing zone.
These dimensions should be tested together, not one by one. A vanity that is acceptable on paper may fail when the door, toilet, and shower screen all compete for the same rectangle.
Layout 1: All Plumbing on One Wall
This is the most common small-bath layout: vanity, toilet, and shower lined up along one wall. It is efficient because plumbing stays compact and the opposite wall remains visually calm.
Best for:
- 1.5m x 2.4m bathrooms
- Apartment renovations
- Tight budgets
- Rooms with one long plumbing wall
Place the vanity closest to the door, toilet in the middle, and shower at the far end. The vanity becomes the first thing seen from outside, which is better than seeing the toilet first. Use a frameless glass panel or curtain to keep the far end visually open.
Layout 2: Shower Across the Back Wall
If the bathroom is short and wide, put the shower across the full back wall. The room reads larger because the wet zone becomes one clean band.
This works especially well with:
- Walk-in showers
- Linear drains
- Wall-mounted vanities
- Recessed storage niches
The risk is splash control. If there is no door, the shower needs enough depth and a well-placed glass panel. Test where a person enters, reaches the towel, and steps onto dry floor.
Layout 3: Vanity Opposite Toilet
In a slightly wider room, the vanity can sit opposite the toilet, with the shower at the end. This shortens the path and gives the vanity more visual presence.
Use this only when there is enough space between them. If the vanity drawer opens into knees or the toilet feels wedged into a corridor, return to the one-wall layout. Wall-hung fixtures help because visible floor makes the room feel less crowded.
Layout 4: Wet Room for Very Small Spaces
A wet room removes the shower threshold and treats the whole floor as water-managed space. This can make a tiny bathroom work, but it requires better detailing: floor slope, waterproofing, ventilation, drain placement, and splash planning.
It is a layout choice, not just a style choice. Wet rooms are good when the room is too small for a separate shower door, but bad when storage, towels, and electrical outlets cannot stay dry.
Storage Without Making the Room Smaller
Small bathrooms need storage, but deep cabinets can destroy the layout.
Prefer:
- Mirrored medicine cabinet instead of a flat mirror
- Recessed shower niche instead of hanging caddies
- Wall hooks behind the door or beside the shower
- Shallow shelves above the toilet
- Vanity drawers instead of deep open shelves
Avoid floor towers unless the room is unusually wide. Vertical storage works best when it occupies dead wall area, not standing space.
Light and Mirror Tricks That Are Actually Practical
Large mirrors help, but only if they reflect useful light or open sightlines. A mirror reflecting a dark shower corner does less than a smaller mirror with good side lighting.
Use:
- Side lighting near the mirror to reduce shadows
- One ceiling light for general brightness
- Light tile on the largest wall plane
- A consistent floor material into the shower when possible
- Warm wood or muted color in one element to avoid a sterile room
For broader small-room lighting principles, see Lighting Design for Small Rooms.
A 10-Minute Layout Test
Open Aedifex and build the bathroom as a simple rectangle. Add blocks for the vanity, toilet, shower, door swing, and towel zone. Then test:
- Can the door open without hitting the vanity?
- Can someone stand at the sink while another person passes?
- Does the toilet have side and front clearance?
- Can someone exit the shower and reach a towel on dry floor?
- Is there at least one storage spot that does not block movement?
If the answer is no, change the layout before changing finishes. In a small bathroom, the best tile is the one installed on a plan that already works.
For whole-home planning, combine this with Room Planner or compare renovation tradeoffs in the renovation budget checklist.