Toilet Paper Holder Placement: Test Before Drilling
Compare temporary toilet paper holder positions using seated reach, roll replacement and door clearance, then record the evidence before mounting.
Two mock-up positions for a toilet roll
From the seat-front and seat-top lines, A places the roll center 120 mm forward and 180 mm up. B places it 100 mm behind and 250 mm up. The scene supplies test coordinates, not a verified reach envelope.
Mark two possible roll centers and put the drill away. An empty bathroom makes a small holder look easy to place, especially if you are standing at the doorway looking at the tile joints. A seated person reaches from a different position. A full roll also sticks out farther than the bare bracket, and the new roll has to travel farther than the hand that takes one sheet. Test those details while the marks are still easy to move.
Here is a two-position trial you can do with a full roll, the real product or an accurate template, and an appropriate temporary support. Each position gets one record. Mark the location, try taking paper from the usual seated posture with the willing user's consent, and replace the roll while checking the door and nearby furniture. A trial observation can settle which position feels useful at home. Product fixing requirements, wall construction and any applicable access requirements are separate decisions.
Put two candidate marks on a common drawing
Sketch the toilet and the wall or cabinet side where a holder could go. On a side view mark the front edge of the seat and the height of its upper surface. Carry those lines to the finished mounting face so you can measure two locations without changing the reference. On a plan view mark which side the holder is on and what room the product has to project. Two centers can share the same coordinates in the side view while the mounting surfaces place them quite differently in relation to the user. If the toilet or cabinet will be replaced, note which measurements come from the old fixture and which will be checked when the new one is fitted.
Record the position of the roll center in your trial. Record the position of the proposed bracket separately if you know the product and its mounting template. The axis of the roll can be offset from the fixing plate. A holder with a narrow post and an open arm can place the full roll off to one side of the backplate. On another product the cover sits above the axis and projects farther toward a cabinet door. When giving a dimension to somebody else, write whether it refers to the center of a full roll, the tip of a spindle, the mounting plate or a specific fixing mark.
Use a removable marking method that suits the finish. On a fragile, porous or unknown surface, put the mark on an independent drawing, freestanding template or other non-damaging support instead of presuming tape will come away cleanly. Mark both positions as provisional so the locations are not mistaken for drilling marks. A tape line or paper silhouette on the wall can be useful to spot obvious problems. It cannot replace the projection and handling of a full roll. For a seated check use a stable temporary representation that cannot fall or become a support someone might lean on.
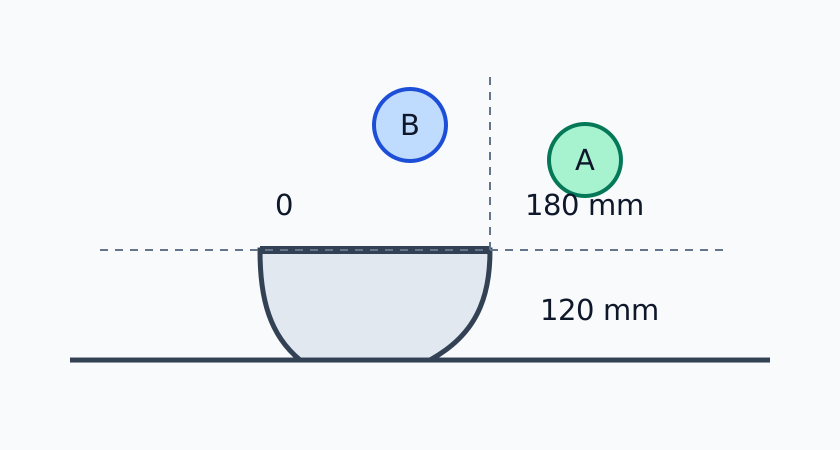
In the invented comparison, A has its center 120 mm forward of the seat front and 180 mm above the seat surface. B has its center 100 mm behind the same front reference and 250 mm above the seat surface. These numbers are coordinates for reproducing two mock-ups. The figure is schematic and leaves out the body and room fixtures. Use your own candidate coordinates. Neither the horizontal difference nor the vertical difference establishes which position a person can reach.
If the nearby vanity or door is in front of the toilet, a forward position like A may bring the roll near one of those fixtures. A location like B may put the roll farther from the opening and require a reach behind the user. Treat each as a possibility to observe, not as an expected outcome. One actual room might let A work while the same paper holder on the opposite wall makes B convenient. Another room might have insufficient space for the projection of either position. Test both with the actual surroundings and observe which hand and posture people choose.
Make a candidate card that describes the full product
Write the product or template on the top of each card. Enter the toilet or seat reference used, the position of the full roll center, the full outer diameter and roll width, the maximum installed projection from the wall, the loading direction and any cover or handle movement. A line for the finish can identify whether the product is against tile, a vanity side or another surface the fitter has yet to inspect. Note any points you have not measured. An open space on the card can represent a product data request rather than an assumed zero.
In plan, outline the full roll in its stored position. A modest change in roll width can affect a side opening next to a cabinet even when the center and diameter stay the same. Add an outline for the opening cover and, separately, the movement a new roll needs before its axle is engaged. Take those from the particular product instructions and a stable demonstration where possible. A compact empty spindle is fine for identifying one center, while the room test needs the largest complete roll the chosen product is intended to accept. The mock-up should reproduce the geometry without relying on a paper fixture to carry normal loads.
If a proposed holder has yet to be purchased, sketch the critical dimensions available from its supplier. Mark any motion you have only inferred from a photo. Retain an unresolved item for the actual product or a permitted sample. A catalog might give the width of the metal holder and omit the return of a paper roll beyond the arm. Compare the working envelope of each candidate, including the prominent corner or exposed end, and obtain the installation details before you choose a wall or a screw location.
Run each position through three checks
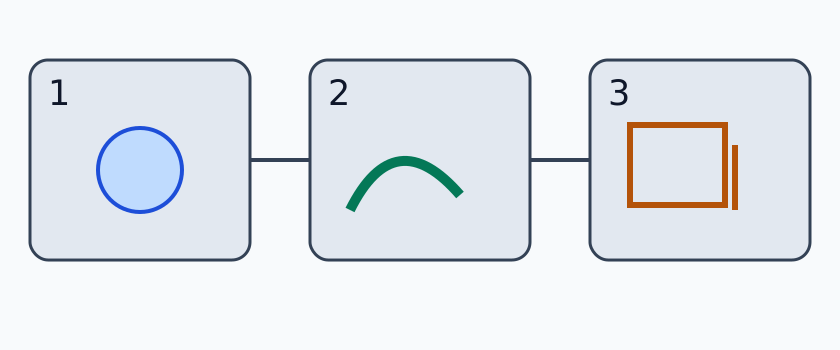
Open the full-size testing sequence
Figure 1 is the temporary position of a full roll, figure 2 the seated motion, and figure 3 removal and replacement. Set up one candidate at a time. Leaving two placeholders on a wall is useful for comparison, but the working support and its full roll belong in just the position you are trying. Establish safe conditions before anybody sits down. Use two records even if you modify only the height. That way the conclusion cites the position where the actual observation was made.
Check one: confirm the mock-up matches the installed envelope
Begin with the finished surfaces you expect to keep. If trim or a vanity will be added, represent its known dimensions and leave unconfirmed sizes open. Hold the product in the intended orientation using a stable support that neither damages the finish nor puts items in essential circulation, transfer or foot space. A model with a lid that opens upward must have room to show that movement. An arm with the open end on the right should stay facing right if that is how it must be installed. Check permitted orientations in the manufacturer's documentation before you assume the mounting can be mirrored.
Put a full roll in place in the intended unrolling direction. Confirm the center with the card and remeasure the front projection. Include points such as an end cap, raised cover or guard that stick out farther than the paper. If a helper is holding a light template during geometry checks, establish where they can stand without shifting the candidate's coordinates, and without intruding on the seated check. A person holding the roll in the reach path may unconsciously move it toward the hand. Stable placement makes the positions comparable and avoids turning reaching into a moving target.
Mark nearby objects that can change position. A closed drawer front and a faucet lever are easy to outline. The drawer's end and handle take more room when it opens, and a hinged vanity door has more than one potentially close point in its sweep. Mark what is open, what is closed and what has been left at a normal stop. This check is also a way to find a clearly unworkable trial before asking anyone to sit down. If the full roll protrudes into a transfer area or interferes with opening, hold the trial and change the location.
Some bathrooms have a freestanding cabinet or toilet controls near the side of the fixture. A change from a bare wall mock-up to a cabinet side may alter side reach even if the roll height stays the same. Record both the plane of the holder and the route from the seat to its paper edge. If a holder would occupy a fixed item's operating space or a place that needs routine service, give that item its expected operation on the drawing. An unobstructed static photograph is just one of the conditions you intend to test.
Check two: observe a natural seated motion
Ask the actual users who wish to participate whether they are comfortable with a fully clothed, ordinary seated demonstration. Give them privacy and control over what is observed or written down. Do not ask someone to repeat a painful reach, transfer unsafely, or use the temporary support to steady themselves. Observe only what you need for comparing the fixture. A person can describe their own reach and discomfort without showing it to somebody else. For anyone with specific mobility or access needs, prioritize their preferred methods and involve the appropriate professional where needed.
Let each person start in their usual seated position with the room and any existing support set as intended. Without prompting a particular hand, ask them to reach for the end of the paper and draw it to the place they would tear it. Record whether they used the nearer or farther hand, whether they could find the end without turning to seek it, and which part of the movement felt awkward. Stop on discomfort or strain, or if the motion would require a transfer the person cannot make safely. Put that observation beside the coordinates. A line reading “right hand reaches the front edge but needs to turn to see the paper end” gives more direction than “eighteen centimeters feels wrong.”
Observe three instants if the person can comfortably finish. First, see how they get the paper end. Next, see the direction in which they draw the amount they need. Finally, see what happens as they separate the paper and return their hand. A person may take hold easily while the draw or tear moves their elbow toward a vanity. With a covered model, lifting the cover can need a different movement from reaching the roll itself. If the user's ordinary motions include another hand on an approved support or mobility aid, leave that hand's job unchanged. Check that the temporary holder does not take the place of any such support.
A full roll lets you see the maximum outside projection; an almost empty roll can make its end sit farther in toward the wall or around the core. Once the full-roll test is complete, a second dry check with a partly used roll can help decide whether the paper end remains easy to find. Keep those observations distinguishable. Record the actual paper orientation and shape of the holder. A flap, shield or friction point may affect how a person draws it. Avoid comparing one position with paper feeding over the top and the other with a different setup unless that change is part of the product comparison.
Use the same starting conditions for the second position when feasible. Hand choice does not have to be identical. Sometimes switching hands is natural because the product is on the other side; sometimes it is only possible with a twist the user does not want to make. If two users give different answers, record each separately with their agreement. A household can rule out a candidate that causes discomfort for a regular user, then consider a different projection, a different model, another wall or more suitable professional planning. A requirement for a public or regulated setting should be checked against the applicable local original source and the actual room, along with user needs.
Check three: take out the core, load a full roll, and swing the doors
With the seated tester safely clear, follow the chosen model's opening and replacement procedure. Remove the empty core from the actual direction the design allows. The motion might involve lifting a cover, compressing a spindle, lifting one end out of a socket, or sliding the whole roll sideways. Then offer up a full roll without bending it around the cupboard. Watch what has to move outside the stored envelope: fingertips at the release, the cover's rear edge, both sides of a spindle, or the full width of the new roll on the approach side.
Use the side normally available for loading. If a vanity wall leaves room to pull paper but the end of the arm sits against its face, the new roll might never line up. A spring spindle may need two hands at places a nearby wall limits. An upward cover might meet a shelf or countertop lip. A different allowed loading direction or holder form could give you the needed movement with the same roll center. Try the actual model or a dimensionally accurate representation of its movement rather than assuming a substitute will behave the same way.
Next check the room doors, vanity doors and drawers through normal travel and the applicable limits. Observe whether the paper or holder nearest the door is touched. Keep fingers away from closing gaps and make observations from a safe position with the door moving slowly. Compare with the full roll installed, since a small core can let the door miss the point you need to check. A drawer front that clears the paper while open can strike the projecting cap in the middle of the sweep. A swinging room door might pass the roll but touch an arm that projects farther. Mark the actual part of each item at contact rather than recording a generic door conflict.
Include the route used to bring a new roll in. If spare rolls live in the vanity, open the cabinet as a user would and remove one, then close the door and replace the used roll. Check whether getting a spare blocks standing space or whether a door must be kept open and then closed before the replacement hand can reach. If the only person who replaces the roll has a different reach from the main user, ask how they will do it. There is a difference between reaching from the seated position and loading from the position where the product can be approached.
Look where water is likely to come from during ordinary use, such as a bath enclosure, washbasin or cleaning operation. Consider direct splash, wet hands, and whether a cover, nearby cabinet edge or stored goods affect what you can wipe. Use the product and finish instructions for appropriate placement, materials and cleaning. Keep safe access for housekeeping around the toilet, the wall behind the holder and the support people might need. A holder placed behind a door may stay clear during simple reach, but cleaning that corner could involve moving the same door several times.
Read the result sideways across the two cards
Write a conclusion for each task rather than giving a single score. A candidate can work for seated reach, run into a loading obstruction and still be worth keeping as a coordinate for a different product. Another can be easy to refill and interfere with closing the bathroom door. An unresolved wall material means the place can remain a promising mock-up while the mounting is evaluated. Write observations as conditions the next person can reproduce.
| What you observed | What to change for the next trial |
|---|---|
| The usual seated motion is comfortable, but the roll hits the vanity when replaced. | Try a permitted loading direction or another holder shape at a comparable center, then check the whole motion again. |
| A hand reaches the paper but the user has to twist to pull and tear it. | Try a position farther toward the natural approach and verify its full protrusion and door space. |
| The doorway is clear with an empty core and touches a full roll. | Move the candidate or compare a suitable lower projection, keeping the full roll in the door check. |
| Both positions work on the wall but a support or transfer space is affected. | Set those mock-ups aside and determine the requirements and suitable positions with the user and appropriate help. |
| Only the bracket is available and the cover details are unknown. | Obtain the real part or the product drawings before marking a fixing position. |
The rows are example conclusions, not reports of actual users. Give your own trial a detail about the room, product and starting posture. An observation that “the door touched during closing” should include at least the door used, the state of the full roll, and which edge touched. A useful entry for seated motion says which direction was easy or difficult, while respecting consent and avoiding unnecessary personal information. Keep observations about room constraints and those about the product separate enough to decide which is practical to change.
Compare changes that move a single obstruction
If someone twists from a position behind the seat, move the temporary center forward toward their natural approach and retain approximately the same height for the first comparison. Use the curtain, door and cabinet in the same positions. If reaching improves and a new collision appears, record both effects. Try adjusting the height while holding the center's forward position for another candidate if the surface and intended product allow it. Recheck all three actions for the revised candidate. An improvement in how the roll is reached may put the replacement approach closer to the side of the sink.
If reach is already fine but a product partly blocks movement, keep its intended center drawing and compare another form of holder. An open-sided product, double-post spindle, covered design or roll-and-spare unit each has a different installation and refill envelope. Check functions, intended rolls and any allowed orientation in the product instructions. If you need to add a shelf or store a second roll to meet the household routine, draw their maximum extent as a separate footprint. A spare that rests where the main roll must slide into place will have to be moved for every replacement. That may suggest keeping the spare in a cupboard that is reachable without crowding the roll.
If there is no suitable mounting face on the wall, investigate a suitable cabinet side or stable freestanding product that fits the room. See whether the cabinet manufacturer permits installation on the selected panel, and whether fixings, drawer slides, pipes or wiring are affected. A freestanding holder should suit its intended use and remain stable where it stands, without intruding on necessary space. Try taking paper under its ordinary conditions without leaning on it. A product that moves when pulled may need a different rated product or location. Ask a qualified person about the mounting or placement when there are uncertainties about materials, accessibility or safety.
Sometimes the position of the toilet itself is changing. The coordinates of the old mock-up can guide a discussion with the trades, but the new seat front and surface must be used for the final trial. Even a difference in seat shape can shift the horizontal origin. Changes to skirting, tile and cabinet depth may move the finished mounting surface or change a door sweep. Keep a dated card with the actual fixture and product details. A small paper template moved once late in a renovation is easier than changing a real mounting plate after an obstruction appears.
Try a different design while keeping the same roll center
A holder with a projecting arm can give fingers more clearance around a roll but require extra room for its loading path. A compact holder could leave more open floor or cabinet access, with the paper closer to the wall. Compare at the same marked center first. Show the actual projection of each product and where its paper end is most likely to lie. Then reach for the paper and replace a complete roll again, using the allowed loading direction. A design that changes the usable edge of the roll enough may require a fresh position, so keep the first comparison before you adjust its coordinates.
For a covered holder, the lid can take on separate positions while closed, while lifted for changing the roll and while the paper is being drawn. Draw the changes if the top catches under the side of a countertop. Check what the product allows a user to do with one hand, and what must be done with two. Do not assume a diagram of the uncovered roll represents the whole installed shape. When evaluating a unit that stores an extra roll, record the footprint as loaded with both. Then empty one position and try reaching the spare and filling it again. Some combinations can be operated without moving anything else only if the spare is taken in a particular direction.
A simple diagram can leave the axis rotation ambiguous. Mark which direction the spindle points in plan and which end needs to be clear. If the same holder can be installed facing the other way under the product instructions, try that allowed orientation at the same center. Compare the open end against the vanity side and then the new paper edge with the user's usual hand. In a confined bathroom, a bracket could be symmetric from the front even though its release motion is possible on only one side. Write the chosen orientation on the preferred card and check it against the installation drawing so the fitter can reproduce the trial.
Leave a reference for a new roll or replacement product
A fresh roll in the size the household uses is part of the test. Keep a note of its measured outer diameter and width and the range the holder is designed to accept. If you change paper products, a roll that is wider or thicker may affect a previously tight spot. You can compare the new roll against the recorded outline with the door open, then slowly test the closing movement once the roll is installed. Use only sizes intended for the product. A larger candidate roll can reduce finger space even before it touches anything and may also alter where the paper end is easy to reach.
If you replace the bracket later, preserve the drawing of the seat and the accepted roll center. The existing hole positions can be useful measurements for the fitter, but the new product can put its axis somewhere different. Point out existing holes and the affected wall finish, rather than automatically reusing a fixing or drilling a second set nearby. Have the wall and suitable installation assessed as needed for the product and location. Repeat the seated and loading test with the new geometry, including the newly placed cap, lid or bracket. Use the trial to guide selection and the maker's instructions and installer to guide mounting.
Think through more than one use of the same room
Consider an evening visit with only ordinary room lighting and the paper end lying in its usual position. Someone may rely on touch to locate the paper, while another needs to see it before reaching. Use lighting that allows a safe trial and respect the user's comfort. Set the toilet lid or relevant nearby items as they would be. Test with the position of the vanity door and bathroom door that normally applies. If the best reachable position changes when a door is open, decide whether there is a layout change that can keep normal opening clear in both conditions.
A person who uses an assistance device, receives help or needs space to transfer may have different requirements from a seated reach trial. Keep the layout and the testing method aligned with their preferences and applicable guidance. Leave existing supports, assistance areas and access routes available. A paper-holder test never serves as a test of the safety of a transfer or of an aid. Invite appropriate help to evaluate that part of the room. Document the constraints that apply without asking the user to perform a maneuver they would otherwise avoid.
If the toilet is used by guests, favor a product and location that ordinary users can find without rearranging things, so long as the regular users' needs remain met. A paper roll tucked behind a wall return may be possible to reach once you know it is there. Consider where a person looks and where they put their hand as they rise, and whether the product sticks into that approach. Give spare rolls a recognizable place that does not take away the working area. The whole arrangement of seat, doors, washbasin and storage is worth checking together. Small bathroom layout ideas
Compare the two positions without asking for a second painful reach
If one candidate was ruled out by its door sweep, carry that finding forward without giving it to the user to try again. Where only the reach is unclear and the user prefers not to demonstrate it, they can describe a suitable general direction or ask to move the temporary position in a more comfortable range. Record “declined,” “uncomfortable,” or “observation pending” as appropriate, and keep detailed medical or personal information off a shared drawing. Where you need professional planning, pass on the spatial constraints and any relevant preferences the person agrees to share. The installer needs a position, room clearances and an intended product for the mounting decision.
A two-user comparison can resolve another problem. Suppose a full roll can be loaded in both positions and neither interferes with the vanity. One user finds the paper edge in A by touch. Another finds B easy but turns to take paper at A. Try a third position or a different suitable projection before asking either person to change how they sit. Keep a fixed room and roll outline for that new test. This illustrates how to record a disagreement without averaging coordinates and assuming the middle point is comfortable. The users can choose which observations matter for their room, subject to any applicable layout requirements.
Protect the actual mounting work from later layout changes
If a vanity, toilet seat or door is still on order, date the candidate drawings and show what has been confirmed from dimensioned product details. Mark the elements that will be on site when the fitter sets the fixing. Ask when it is possible to trial a full-size roll against those completed surfaces. Existing dimensions can help screen several candidates before the work takes place; the actual seat and adjoining parts give you a more reliable point for the final check. If the holder must be chosen before the room is finished, compare product envelopes and talk through a fallback location if the first one fails.
Consider whether a later addition near the holder is likely. A shelf or spare roll cupboard can reduce the top clearance for a cover or put a handle into the refill path. Keep the space used for holding and replacing the paper roll marked on the finished room plan. This is especially helpful if another trade is engaged after the holder has been chosen. The usable space includes the open cover and the approaching roll, so show both on the sketch with the cabinet doors in their normal positions.
Convert the useful position into a mounting decision
Start from the accepted card. Draw the correct roll axis and orientation against the final wall or vanity surface. Then use the selected manufacturer's template or fitting dimensions to locate the actual bracket. Check the offset between the roll center and each fixing hole. Keep the mounting reference separate from the trial mark so somebody does not transfer a center line onto the wall as if it were a screw position. If the fitting method changes between surfaces, ask the product maker or the installer to confirm the right hardware.
Have the wall construction and any concealed pipes and wiring checked by the appropriate professional before permanent mounting. Especially beside a sink, toilet or shower, a thin surface or a fixture on the other side of a wall can hide services. Give the professional the planned mounting face, the product information and a record of observed operating clearance. Let them assess the substrate, suitable fixings and compatibility with the finish and local requirements. An inspection of the planned location is still required even if the mock-up stayed safely in place and the roll was easy to reach.
If the preferred center cannot be mounted in the intended place, ask what adjustment or permitted support method is available. Make a new card for the revised position or product. Repeat the loaded geometry, seated use and replacement and door checks. Avoid choosing a new drill point solely because it is close to the trial mark. A shift that seems small standing at the wall can leave the mounting plate close to an edge or reduce the path the roll needs for loading. Protect any required waterproofing or wall finish in accordance with the appropriate installation details.
The three-stage evidence check can keep track of which observations you have obtained for one candidate. It stores temporary marks that reset on reload. A checked stage means the observation was recorded by the user, without certifying reach or code compliance. Use the field record to carry observations forward to a supplier, another family member or the installer. Keep one record per candidate or drawing revision, and leave missing items as unresolved instead of giving them a default value.
For one hypothetical set of cards, A could read, “Seated use comfortable with the nearer hand. The new roll touches the vanity during sideways loading. Compare a holder that opens the other way.” B could read, “Door clears with a full roll. The intended user can touch the paper but prefers to turn less. Leave B aside for this user.” These example records lead to a new product trial at A or a fresh position. They give a fitter more information than two unlabeled marks on a tile.
The position to carry forward is the one whose record can say how someone takes the paper, how a new roll gets in, and which doors can move freely. After the agreed installation, try those same actions again, with consent and comfort for the seated check, and recheck the full roll and surrounding doors. Keep the receipt or product instructions with the selected position if its orientation or loading motion was part of why it worked.
TRY THE EXAMPLE
Compare evidence for each holder position
Use one temporary position at a time and record three independent observations. These checks are not an accessibility certification.
Record roll centre relative to the same seat front and height, plus roll diameter and bracket projection. Without the real product dimensions the location remains provisional.
Respect consent and comfort, use non-damaging temporary support, and check concealed services and applicable local requirements before permanent mounting.
Teaching assumptions, not a surveyed home or a construction check. Results describe this simplified geometry or budget only. Changes stay on this page and reset on reload.