Under-Desk Headphone Hook: Avoid Chair Collisions
Find why a chair catches headphones under a desk, compare hook positions and armrest height, and test the full chair path before attaching a hook.
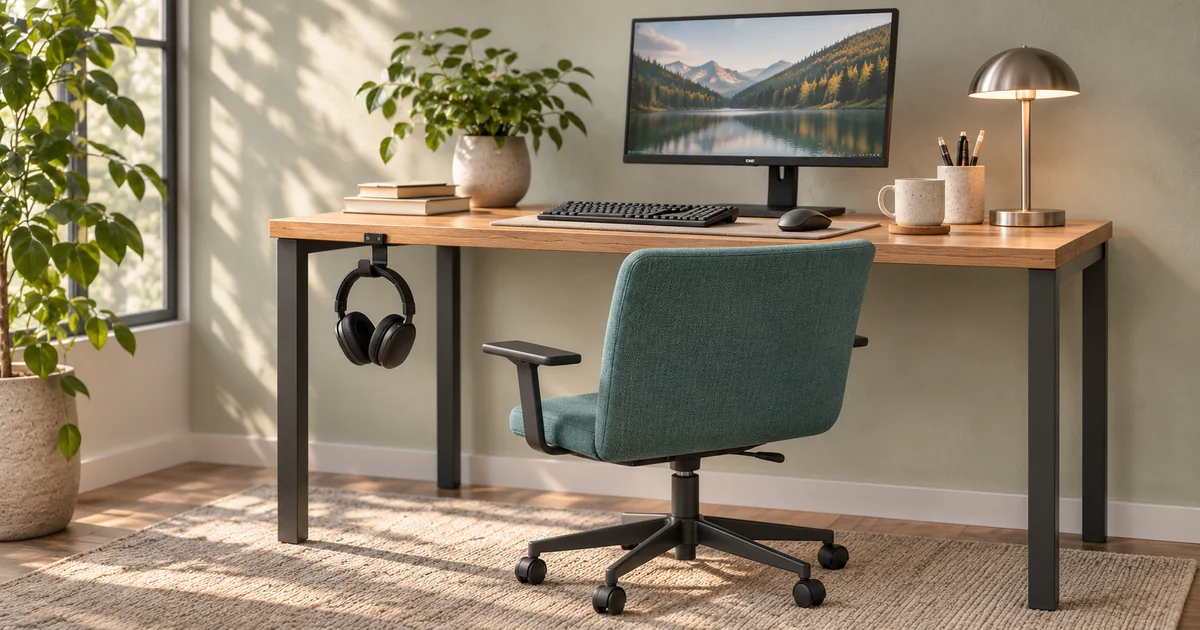
Hanging headphones versus chair arms
The headphones reach 590 mm above the floor. The 650 mm armrest intersects that height envelope by 60 mm in A. A 520 mm armrest in B leaves 70 mm before the chosen trial allowance. Floor dots trace one illustrative armrest path between the working position and the exit.
An earcup is on the floor, the hook is still under the desk, and the chair looks clear of both. What happened between sitting down and finding the headphones? The armrest could have passed through the hanging position while you turned toward a drawer. A cable could have come along with a knee or a wheel. A lightly seated headband might also have slipped without the chair touching it. Start by finding the event and the first point of contact. Keep the working chair at the height and angle that suit the person using it while you investigate.
The examples use millimetres and are invented for teaching, not measurements from a real office. There is no universal clearance in this article. Use the actual chair, headphones and desk, and check the hook's mounting and load instructions.
First isolate the contact
With the headphones unplugged and the chair empty, place a soft temporary marker at the proposed hook location; do not fasten hardware yet. Slowly move the chair through its normal working, turning and exit positions. Look for the armrest, seat edge and any accessory that passes under that marker. Then hold the headphones at the intended height and trace their outline without moving a chair into them. If an adjustable armrest changes height or width, repeat at the user's normal settings.
If the chair never enters that location, compare the reach instead: can the user take and return the headphones without leaning over a hot drink or pulling a connected cable? The monitor-arm guide addresses a different moving assembly; a clear headset hook does not establish monitor-arm clearance.
When was the last time the headphones stayed put?
Reconstruct one ordinary use of the desk. The most helpful account is usually a short sequence rather than a photograph of the aftermath. Someone sat down, pulled the chair close, turned to reach a notebook, stood and slid the chair back. Write which of those events preceded the fall. If nobody observed it, treat each likely movement as a hypothesis. A chair can be clear when parked and clear when the person is already sitting, while an armrest reaches under the edge halfway between those two positions.
Document the hook itself before changing it. Mark its mounting point and the exact spot where the headband normally bears. Look for signs the fitting moved on the desk or the headphones slipped off an unmoved fitting. A loose fitting calls for review against the maker's instructions and the mounting material. When the fitting remains solid but the headphones migrate, the next useful check is how the headband sits on the contact surface. An angled contact surface, a folding headband or a straight peg without suitable retention can change that seat before any chair comes close.
Look at the headset in the condition that causes the problem. Ear cushions might swivel outward when the pair is hung by the headband. A detachable microphone might still be extended. A cable connected on one side can pull that cup toward the desk edge as it hangs. Speaking into a boom microphone with the chair stationary is a different situation from storing the same unit while the desk is changing height. Write down whether the set was working, parked, charging or disconnected when the movement occurred. It is easier to isolate a loose component if the states are recorded separately.
Test the chair without the headphones or cables in the area first. Mark the closest arm at inward motion, the turning point and the exit. Then add a lightweight soft outline for the headset and stop as soon as an overlap is visible. Check how far the seat shifts with the occupant in normal use separately, using an observer and clear movement space. The unloaded chair is a convenient tracing tool, but an empty cushion or different sitting position can change what passes under the desk. Never put fingers between the chair and desk to judge the gap while the chair is being moved.
What happens if the armrest is nowhere near the mark? Inspect the chair back, coat, cushion, arm adjustment levers and anything fixed to the seat that could snag the set. A clip on an arm or a pocket on a chair cover can be farther out than the arm itself. Watch the desk edge for a cable dragged during typing or during a turn. If the headband overhangs its support, establish how the mounting position and headset shape fit together before moving the hook. Moving a loose fitting elsewhere can leave the original failure unchanged.
A useful note describes an event. “The outer edge of the right arm catches the left cup while turning out” tells you where to watch. “The desk has 740 mm of room” leaves the action, the side, the item and the measuring reference unspecified.
Find the outline that actually hangs down
Measure from the hook's support contact to the lowest point of the fully assembled hanging item. The headband or its strap may bed into a soft surface as it takes the load. An earcup can hang lower when the joints are opened, and the microphone stalk may be farther out than either cup. Outline the assembly in the way the user actually hangs it, rather than setting a folded unit on its side and measuring the box around it. Check a second headset in its own orientation if both will use the position.
The bottom dimension used in the lab concerns the body of the hanging headphones at the point being compared. Give the cable a separate outline with its own low points and projected loops. A plug can be the lowest part of an unplugged cable, while a connected cable constrains the route between two fixed points. Because that route changes as a chair turns or a desk rises, a single hanging length cannot describe it. The desktop may be clear of loose cable while the loop occupies a space beside the armrest. Capture the shape that belongs to each state before trusting a clean-looking desk.
Use the same local floor reference when comparing the hook and chair. For a desk on a hard surface and a chair rolling partly on a mat, note where the armrest height was measured, and whether the relevant wheels will be on the mat at contact. If the arm pad is tilted, measure its highest outer edge at the crossing point. A rounded or padded top can make the exact outer envelope hard to mark, so record where the approximated outline sits. The same principle applies to the headset outline where the earcup rotates or has a thick cushion.
Turn the vertical comparison into a threshold
The displayed subtraction is hook contact minus hanging length minus armrest top. If you look at the side drawing using the same floor reference, the 150 mm hangs down, which reduces the hook height available to the chair. A minus sign simply means the lowest headphone point is below that higher armrest reference. It establishes the order of the two heights in that section. Actual contact requires the outlines to coincide in plan at the same time. The chair can avoid the headset horizontally even when the vertical number looks poor.
Reverse the example to answer a different question. With an armrest at 650 mm and a body hanging down 150 mm, the hook contact height would be 650 + 150 = 800 mm for the two illustrative height references to meet. With the selected 30 mm reserve it would be 830 mm to leave zero balance after that reserve. Compared to a contact at 740 mm, the difference is 90 mm for the reserved version. The under-desk edge may give no way to gain that height. This useful limit points to an alternative position while keeping the work chair at its own setting.
A second reverse calculation can be made without moving the hook or chair. At a 740 mm contact, above a 650 mm armrest, a body extending below the hook by 90 mm would just meet the armrest height. Deducting the hypothetical 30 mm reserve leaves 60 mm of hanging length. The existing 150 mm example exceeds that by 90 mm. Before considering a shorter drop, check whether the headphones can be supported in another orientation approved for their design. Compressing a headband, hanging the set from a fragile stalk or tightening its cable would change the load and introduce other problems.
Use the existing A and B examples to understand what flips the result. Holding the hook height and the headphone body fixed, changing the armrest from 650 to 520 mm shifts the signed result by 130 mm. At 650 mm the potential overlap is 60 mm, while at 520 mm the vertical difference is 70 mm. After the same reserve the two results are minus 90 and plus 40. Neither calculation suggests a target setting for the user's chair. It is legitimate to compare a different chair in a shared workspace or preserve a different already comfortable armrest setting and recalculate for it.
| Desk check | Use these reference points | Ask a second question |
|---|---|---|
| Height | Hook bearing point, lowest headset point and armrest top at the same station | Do the two outlines ever reach that station together? |
| Horizontal separation | Projected outer edge of each cup and the armrest's full turning trace | Is the gap still present when putting the headset on the hook? |
| Cable route | Connector, first loose loop and every point near wheels or levers | Does the route change during standing, turning or moving the desk? |
| Reach | Normal seated and standing positions, with the headset in hand | Can it be lifted clear, and can the user see or feel the support? |
| Attachment | Actual desk construction and hook's documented mounting surface and load | What does fitting or servicing the hook require access to? |
Do one controlled sensitivity check at a time. With the 740 mm hook, 150 mm drop and 520 mm armrest, suppose a different orientation increases hanging length to 190 mm. The static gap would fall from 70 mm to 30 mm, leaving zero after the example reserve. That could happen because an earcup folds differently or an attachment is fitted. Keep the configuration next to the number so that a photograph of the other orientation does not stand in for the new result. If the real hanging length is still unknown, leave that field blank while you collect it.
The reserve is useful when it has a stated purpose. It might reflect variation between desk users, different mat positions or flex in an accessory during normal handling. It might also be a deliberately chosen margin while the drawing is coarse. Write the reason in the record and keep the value fixed for a fair A–B comparison. Rough measurements near zero deserve another pass in the actual space. An incomplete measurement is more informative when shown as pending than when entered as zero, since zero creates an apparent conclusion for a physical condition you have yet to check.
Read the height example against the chair trace
Suppose a hook is 740 mm above the floor and the hanging headphones extend 150 mm below it. Their lowest point is 740 − 150 = 590 mm above the floor. In case A an armrest top is 650 mm above the floor at the same horizontal location. The signed vertical difference is 590 − 650 = −60 mm: the armrest reaches 60 mm above the headphone bottom. Deducting a separately chosen 30 mm trial allowance gives −90 mm. This warns of a potential conflict in this single section; it does not by itself prove that their shapes collide.
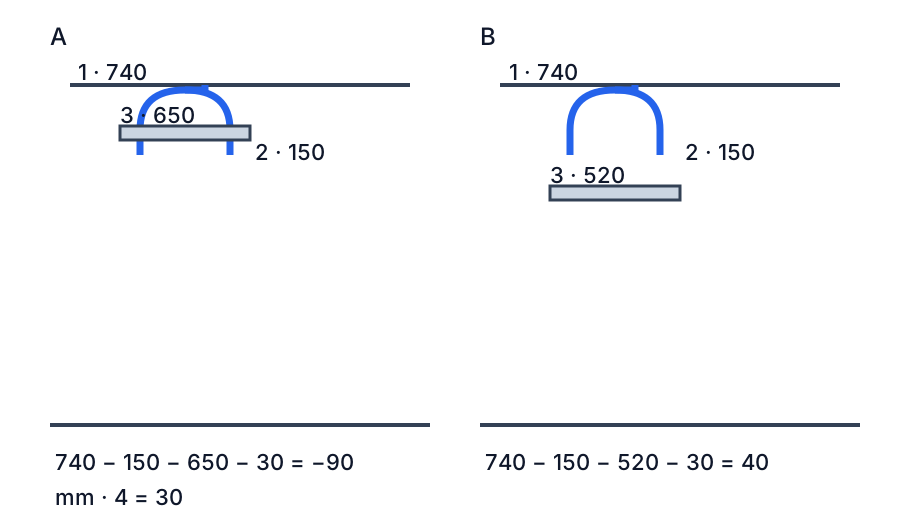
Open the full-size height comparison
Read 1 as hook height, 2 as hanging length, 3 as armrest height and 4 as the chosen allowance. In case B the armrest top is 520 mm, so the gap is 590 − 520 = 70 mm, or 40 mm after the same allowance. This is a changed teaching condition, not an instruction to lower a chair. If changing arm height makes the user's posture worse, move the hook or choose another storage position instead.
Use the height comparison to enter actual hook height, hanging length, armrest height and your own trial allowance. Unknown values remain unknown when a field is empty. A positive result describes a vertical difference at the assumed shared location; it cannot show a horizontal route, attachment strength or whether the headphones can be reached.
Reconstruct the chair path in plan
Start with the chair square to the keyboard, parked where the person normally works. Put removable tape at the positions of the chair arms. Draw the outer sides of both arms and mark the centre of the chair base. Then have the user show the usual way out while an observer records intermediate positions. Someone may push back first and then swivel, or rotate while still close so a foot can reach the aisle. The two traces cover different patches of space. Mark the widest chair position at several points rather than drawing a straight line between the initial and final positions.
Capture the opposing motion as well. Rolling into the desk may start from the aisle with the chair angled, whereas the person normally stands by sliding straight back. A right-hand exit that leaves the hook clear does not predict the left-hand entry. Check the approach of each regular user where a shared desk allows either direction. If space is tight, give each route a simple letter on the diagram so an observer can refer to the reproducible movement that led to the closest pass.
Map the base and chair attachments on the same drawing. A rotating star base can put a wheel farther sideways than the armrest at a given stage. The low part is primarily a cable issue if the headset hangs well above it. The front edge of a movable arm pad, an under-desk keyboard tray or a drawer can share the higher band. Give heights to the things that come closest rather than filling the plan with every fitting. Where a cabinet foot blocks the base before the arm reaches the headset, record that as an independent constraint on movement.
Test a side position with a full outline. The hook itself may be outside the path while the nearest cup overhangs back into it. Use the outer earcup as the first reference, and include the tilt of the entire headset while lifting it off. If the hook swings or folds by design, assess the positions the instructions describe for use and storage. An extension beside the desk can clear the chair path but project into a walkway, or land exactly where a drawer opens. Draw the inside and outside routes around that edge before reusing the side position for another desk.
Check the hand as a moving part
A side hook is only useful if it is easy to finish the movement. Pick up a lightweight outline from the normal working position. Follow the lift needed to clear the hook and the move needed to bring the headset to the seated user. The headband can travel closer to the tabletop while the cups turn toward a drawer or the chair arm. A pegs-and-loop arrangement can require a clear approach from above, whereas a shelf may accept a direct horizontal move. Follow the attachment instructions for the candidate hardware and recreate its required motion on the sketch.
When returning the headset, find the support without changing the normal sitting position. A sideways reach over a mug or a deep reach under a writing ledge can make a theoretically tidy position unpleasant. In shared use, repeat the trial for anyone who uses the chair. If reaching is awkward, compare a location readily visible at the desk end or a nearby shelf that lets the user stand comfortably. For someone who mainly stands at the desk, represent that actual task, including which way they approach the hook and whether a cable crosses their route.
Consider where the headphones are taken off. If they are normally removed in front of the keyboard, reaching under that point can be easy but put the hook directly above the entry trace. If they come off at a different side while the user handles a call or reaches a charging point, a nearby support can reduce the distance the headset travels. Making the sequence shorter can resolve a handling conflict even when the absolute differences in clearance are small. The floor marks have more value when they show the actions being supported as well as the coordinates of the objects.
Find the usable side position
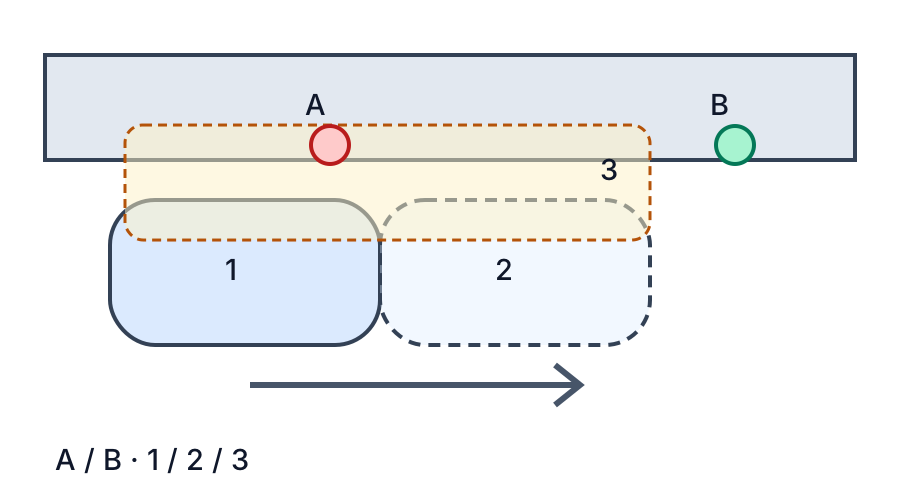
Open the full-size chair-path sketch
The sketch is not to scale. The solid chair outline is 1, the exit position is 2, and 3 is an illustrative armrest sweep; the arrow shows one possible movement. Hook A sits near that path; B is to the side. Look at the entire movement, not just the two end positions: rotation and a different user's approach can extend the path. Moving to B may clear this selected path but require a longer reach or put the headset beside a drawer. Mark the alternative and rehearse both the chair movement and taking the headphones off the hook.
A headset cable adds a separate moving envelope. If the product can be disconnected, follow its instructions before the test. Never pull the cable tight, route it across the chair's wheels, or assume an attractive loop stays clear as the desk height changes. For a sit-stand desk, repeat the check at every working height and through the movement permitted by the manufacturer.
Follow the cable through each working state
Begin at the first fixed point, such as the jack on the headphones or a cable guide on the desk that the product allows. Draw the route to the other fixed point, then circle the free length that will move when the user picks up the set. A loop close to the underframe may be outside the armrest path but inside the area where a knob sticks out. A low plug on the floor can be rolled over even if the earcups are on a high shelf. At a sit-stand desk, draw the fixed points in the room and the points that move with the top in separate colours.
For the unplugged carrying and storage check, follow the maker's instructions about unplugging or stowing cables. A detachable cable can have a dedicated path or storage position distinct from the headset. A permanently attached lead still needs a resting position that avoids pull on its entry point. Look at how the lead lies when it is relaxed. Moving the hook until the lead is stretched can protect a loop at one position while creating a strain when the user takes the pair off. Keep any sharp turn, closing edge or moving rail out of the planned route.
Repeat the evaluation when the headset is connected if that is a normal working state. Mark the positions of a laptop, interface or other source used at this desk, then check normal handling with the chair, feet and cables away from moving desk parts. A cable must travel far enough to place the set on the user's head and to set it back without loading its connectors. A small length running between the chair and desk can catch when a person stands and turns. A wireless set may still have a charging cable in storage. A shelf whose only convenient charging route crosses an aisle presents a different problem from an under-desk hook that itself clears an armrest.
An adjustable desk raises the top and attached hook while leaving some objects on the floor or wall stationary. The relation between the hook and armrest can be different in the seated and standing setups. Check the intended height range and the manufacturer's operating guidance. With all people and loose items clear of moving parts, observe where any cable would travel. Look for the condition in which the cable has least usable slack and the one in which there is a low loop. If the operating instructions require keeping the area beneath the desktop clear, that requirement belongs in the location decision before fitting any accessory.
A short tracing record can link the state to the evidence. “Headset stored disconnected at sitting height, no lead at the floor” describes one route. “Connected while seated, cable reaches around the chair arm during entry” describes another. When the same desk supports calls, music recording or several devices, decide which states the location must handle. A hook with a cable that works only when the computer and microphone stand never move may be a reasonable dedicated station, but that constraint belongs in the decision record.
Give the existing furniture priority
Before proposing a lower armrest, return the user to the way they normally work. The chair structure, supports and desk height establish how the person sits, reaches the keyboard and moves into the aisle. Ask whether they already use a lower position for a particular task. That lower position is a real candidate state if it is comfortable and approved for the chair. Lowering an arm simply to make the geometry come out positive can force a change unrelated to headset use. Move the storage point within the working arrangement first.
A desk can have a front rail or reinforcement that leaves less vertical room beneath the edge than there is beneath the broad top. A drawer chassis or keyboard slide may occupy the nearest usable mounting face. Measure the actual surface where a clamp or screw mount might go and the space behind that surface when its hardware is installed. Use the desk and hook instructions to assess compatibility and load. Some tops are constructed differently in the centre and at the frame; if the actual construction is unknown, request the maker's guidance or select another place to store the headset.
Map alternatives based on the failure you observed. A side or underside position outside the trace addresses a collision close to the entry path. A visible shelf can address difficult hand access or allow the body to rest in a supported position. A suitable stand can avoid attaching hardware to an unsuitable desk and can be moved as the workspace changes. An enclosed location may keep the cable away from chair wheels but requires its own room for the cradle, connector and extraction. Evaluate each solution for the particular failure, then make sure it still supports the way the equipment is used.
Check mounting hardware after the location passes the functional rehearsal. A removable clamp still has to fit the actual thickness, finish and edge shape. An adhesive fitting depends on the surfaces and conditions stated by its maker. A fastener can interfere with a drawer box or penetrate a wiring route on the opposite side. When the desk maker cannot confirm a fixing method, choose a mounting method or storage location with a clear load and surface specification. Keep the headphones off a temporary mock-up that was only used to show geometry.
Work through a desk used by two people
Take a hypothetical shared workstation where one person approaches from the left and one comes from a doorway to the right. Both prefer their own approved armrest settings. Give each person a paper copy of the plan and a different colour to trace. Draw the earcup outline on both copies from the same fixed desk reference. If the position works for the first person and falls inside the second turning trace, compare both motions before installing a second hook. A single alternative a little beyond the desk edge may work for both, provided it stays clear of the shared aisle and still has a compatible mounting surface.
Suppose the measured hook in this exercise is 740 mm above the relevant floor, with a 150 mm headset drop. The first user has a comfortable 520 mm armrest and the R-shaped exit of the sketch does overlap it in plan. The static height separation is 70 mm, with 40 mm left after a chosen 30 mm reserve. The second person uses a 650 mm armrest but approaches from the other side, where their arm never leaves the far side of the desk. The simplified height balance is minus 90 mm, yet the particular traces do not show contact. If they both later switch which aisle they use, those previous results need a fresh trace. Chair setting and route each have a role in the worksheet.
Now introduce a different headset with a protruding microphone. Start by locating the protrusion relative to the two earlier cup outlines. Only a protrusion that reaches the armrest height and enters the armrest trace changes that collision verdict. The microphone might instead occupy the overhead space that a hand needs when lifting the headset clear. Show the extended and permitted storage positions if the manufacturer describes both. Keep the candidate open only while you can still write a simple, repeatable take-and-return action for both regular users.
In a shared desk record, leave the final height setting with its normal user and equipment combination. Avoid a sign above the chair that instructs a person to move it for the convenience of the stored headset. If the storage position cannot handle every routine movement, consider a desk-end holder with a visible approach from both sides or a separate storage spot away from the desk. Record the last remaining interaction to check, such as how a larger headphone rotates before being seated, and arrange to try it with that equipment before purchasing the fitting.
Compare a clear site with a usable site
A promising plan location can become less attractive when you map what happens just behind the desktop. Imagine there is room to wrap fingers around the headset at the left edge, but the desk has a drawer that must stay closed whenever the headset is hanging. If that drawer contains a daily-use notebook, this exchanges a chair problem for a storage problem. Move the headset marker one position at a time and draw the hand motion again. A site beside a seldom-used shelving unit might be easier to accept than one that covers an everyday drawer, even with similar numerical clearance.
Ask how the owner knows the headset has reached a stable resting position. From beneath an opaque lip, a shallow support may be hard to find without looking under the desk. A good trial confirms that the headband settles on the intended bearing area after the hand releases it. That outcome depends on the chosen headset and its support geometry. If the person needs to rotate or lean to check the position every time, observe whether a more visible surface farther from the chair makes the overall action simpler.
Look at the route when the user carries the headset away from the desk as well as when they put it on. A temporary point under a return along the side of an L-shaped desk can work for someone putting on headphones there. When taking them into another room, the user might be forced to lift them around the monitor, desk divider or glass edge before turning toward the aisle. Draw that carrying path from the support rather than choosing a point solely because it is free of the armrest. A side shelf with a more direct exit can support the whole movement without requiring the chair to move first.
A small day-to-day maintenance action is also relevant. Can the hook be dusted and the headset removed while accessing a cable hub? Can the drawer be taken out for service without taking the new mount apart? Consult the fitting guides for the chosen hardware and desk. Periodic access is often easier to allow before drilling than after everything is attached. Put maintenance on the same plan with its own date or label, so it is not mistaken for an extra requirement on every time the user reaches for the headset.
Close the case with the movement that caused it
Recreate the first observed event after the installation and repeat it with the same chair settings. Roll toward the same favourite spot and turn the usual way. If the first contact now occurs with a cable or a different accessory, record that as a separate problem rather than assuming the change solved it. Test removing and returning the headphones from normal use without a nearby drink or loose cable. Watch whether the headset settles evenly on the specified hook bearing point. Record the nearest part of the chair by name so another user can repeat the check.
Keep one useful before-and-after observation in the worksheet. A record could show that the right cup reached inside the seated exit trace at A, while B placed the outline beside that trace and could be reached once a drawer was shut. Such a note describes a particular desk and user. It tells you to reopen the decision if the chair, hook, earcups, drawer layout or cable changes. Include sketch references and what the person changing the setup should test first, so the next fault can be traced to an event instead of to the generic size of the desk.
If the alternative was rejected, write why. A candidate might give up drawer access, require a mounting surface that the desk maker has not approved, or force the user to bend across the side of the chair every time. That is more actionable than a bare label such as “B failed.” Retain only acceptable candidates in the shortlist and keep the measurements that influence the choice. Where every eligible point under the desk causes a conflict, create a nearby storage candidate above or away from chair movement and run the same hand and cable checks on that one.
Keep the installation facts alongside the sketch
- Record the hook point, lowest hanging point, armrest top and actual chair settings from the same floor reference. Include cushions or attachments that change the outline.
- Mark the chair's real approach, turn and departure. Check the hook location and the headset's full width against that trace; the simple vertical calculation cannot certify the route.
- Compare a side hook, another approved surface or storing the headset away from the chair. A side hook may be harder to reach; an enclosed drawer consumes storage and must fit the headset without crushing it.
- Verify the chosen hook and desk surface are compatible and support the load as specified by their manufacturers. Do not drill into unknown wiring or a desk structure merely to preserve the first idea.
- After a proper installation, gently verify normal movement and reach again. Keep drinks, fingers and loose cables clear during the check; stop if anything catches.
TRY THE EXAMPLE
Compare the hanging headset and armrest
Use the same floor reference for hook and armrest heights. Enter the full hanging length and a separately chosen trial allowance in millimetres. This comparison applies only where their horizontal paths overlap.
Allowed range: 1–2000 · Step: 1
Allowed range: 0–1500 · Step: 1
Allowed range: 1–1000 · Step: 1
Allowed range: 0–500 · Step: 1
A negative remainder means the selected allocations overlap. Change the inputs or the proposal.
- Vertical difference
- -60 mm
- Balance after allowance
- -90 mm
740 − 650 − 150 − 30 = -90 mm
Trace the chair and headset in plan, check the entire cable route and reach, and follow the hook and desk instructions. Do not change a comfortable chair setup solely to make this example fit.
Teaching assumptions, not a surveyed home or a construction check. Results describe this simplified geometry or budget only. Changes stay on this page and reset on reload.