Vertical Baking Tray Storage: Size and Access Checks
Choose a vertical baking tray organizer by calculating bay widths, then test the door, tray removal path and hand grip before fitting dividers.
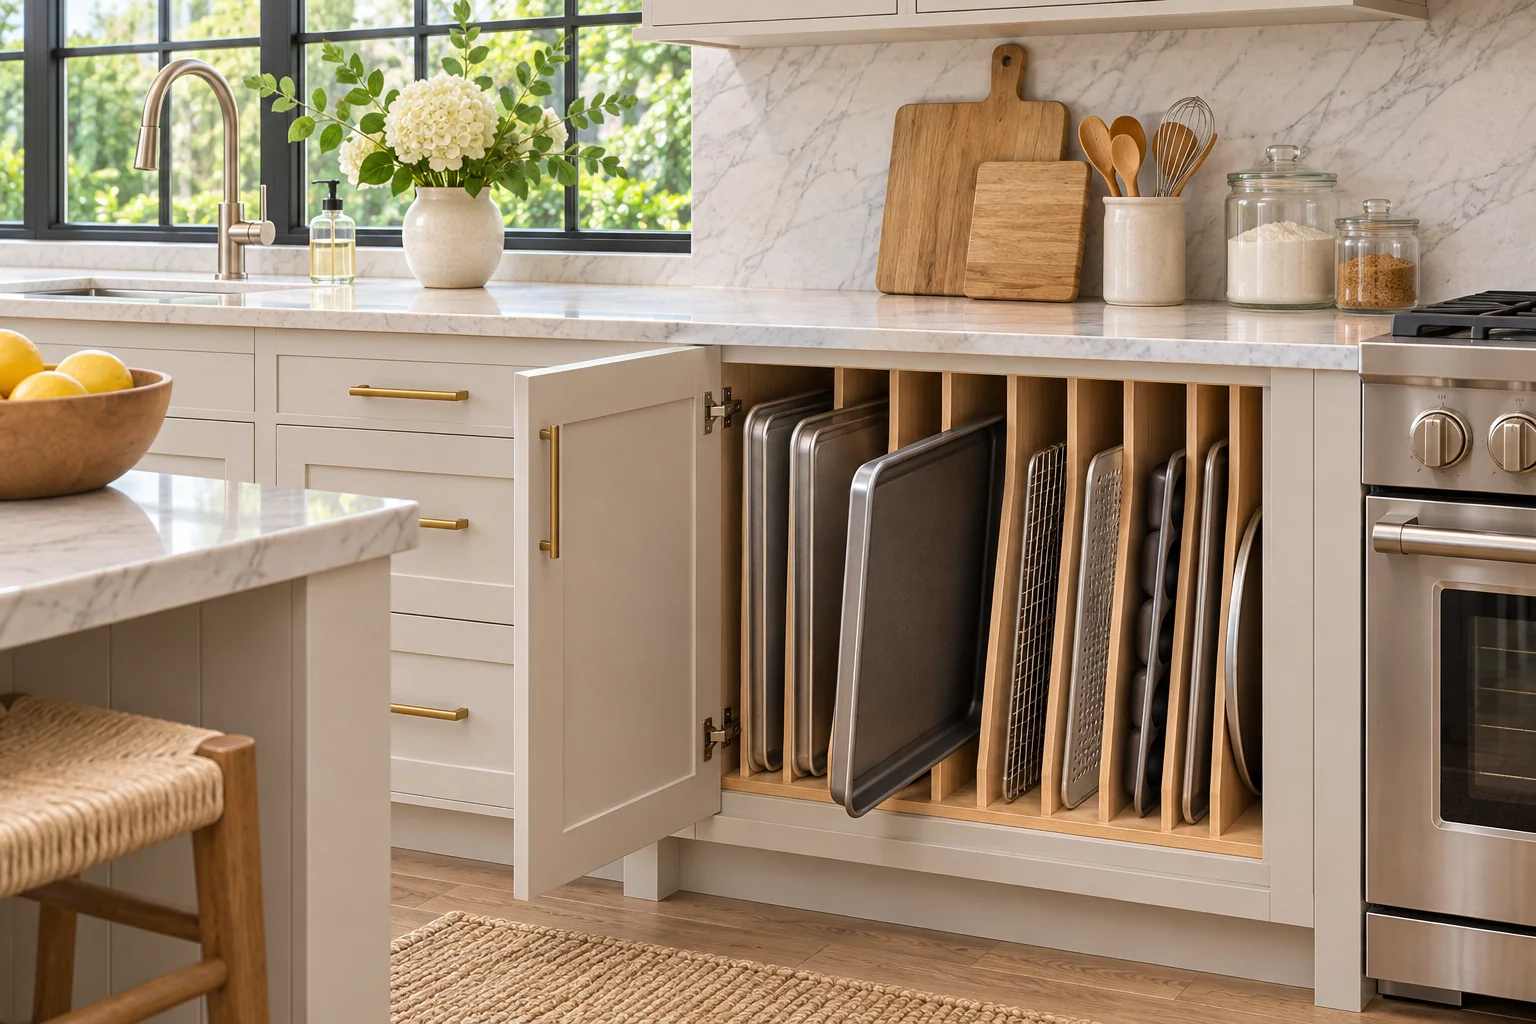
Four or five vertical baking tray bays
Inside 500 mm of width, four 100 mm bays plus three 12 mm dividers use 436 mm. Five bays and four dividers use 548 mm, exceeding the clear width by 48 mm.
Put your most awkward baking tray on the counter before looking at organizers. It may be a deep roasting pan with handles, a sheet with a rolled rim, or a broad cooling rack that twists as you pick it up. That piece can tell you whether a vertical rack belongs in this cabinet and how wide its most important bay needs to be. A product photo with five tidy sheets in five slots answers a different question.
Design a home for the awkward piece first, then allocate the remaining width. A tray gets its own spot only when it can stand there, pass the fitted opening, and come out in a controlled grip. Use the first diagram to assign width. Use the second to challenge the route through the door. A lightweight template can answer the geometry without putting your hands near a sharp edge while you try speculative positions. The dimensions below are constructed examples.
Write the storage brief around the tray that causes trouble
Lay out the items that actually need to live here. Include the ones that usually end up on the bottom of a stack or that have to be removed before you can reach something else. Note which piece you use every week and which one you would be content to store elsewhere. Separate flat matching sheets, raised rims, deep pans, trays with fixed or folding handles, cooling racks, and pieces with coated surfaces that the care instructions say to protect. Shape matters. Two sheets of similar nominal width can use different bay widths because the rim or handle stands proud of the body when they are upright.
For each piece, choose a candidate stored orientation and identify the edge that will rest on the support. Record the upright height from that edge, the depth from front to back, and the thickness across the bay at the thickest part. Use the product and cabinetmaker's guidance for support if the piece is heavy or has a finish sensitive to pressure. A long tray can be turned so its shorter edge dictates the height, though the longer dimension may then go to the back or project from the front. Locate handles and flanges instead of assuming their maximum projection occurs at the same depth as everything else. Sketch the silhouette when the dimensions alone are ambiguous.
Now name the tray most likely to defeat the proposed setup. In a shallow cabinet, that can be the longest one even if it takes little width. In a taller cabinet with an overlay door, it can be a deep pan with side handles or a light sheet whose rim hides behind a divider when you reach for it. If separate trays govern the height, depth and grip, give each a name and write what it controls. On a sketch, you might label a large rimmed sheet as the height test, a handled pan as the grip and bay-width test, and a cooling rack as the one most likely to tangle with the divider. Use the actual kitchen pieces rather than representative product categories alone.
Write a one-line goal for the cabinet. For example, “Daily sheets and cooling rack lift out separately through the ordinary door opening; the deep roaster gets one wide bay or another shelf.” As a separate goal, someone may want a clear cabinet top and be willing to remove a couple of light matching items together occasionally. State that upfront, because a requirement for every single tray to be independent leads to more dividers and potentially narrower slots. Check whether the divider design and appliance care instructions permit stored items to share a bay or touch. Test the intended group as a group instead of measuring and adding the pieces in isolation.
Sort storage pieces by how they are used
A frequently reached sheet belongs where the open door gives the best approach and where a hand can get around the rim. An occasional tray can go farther away if it still has a clear route and a stable support. If you use a sheet and rack together, see whether taking the first out exposes an easy grip on the second. If the rack's wires catch on a post or screw head, a simple panel or another orientation may suit it better, provided the selected system is designed for it. Choose a safe storage position for each shape. A vertical arrangement for baking sheets does not compel you to turn every deep or heavy pan on its side.
Include what every user needs to see and feel. A clear front label or a visible rim can distinguish similar trays without shifting several first. If an item is close to the floor, picture the user lowering it with their chosen grip and keeping their wrist clear of the edge and frame. Some people can reach the low cabinet from the side, while the open door may require a direct approach. On a narrow kitchen aisle this affects which item is practical to store here, even if the width calculation is generous.
Work the width arithmetic before choosing a rack
Find the number that belongs in the calculation
Measure the finished clear width between the sides where the organizer will go. Check both the front and the rear, and take another measurement at the height of any rails, decorative frame or panel the intended product must clear. Show the relationship between that width and the fitted doorway. A face frame can be smaller than the box. An organizer sold with a wide base may need to come through the doorway before it is assembled or fixed. Check the assembly instructions for the intended method, and ask the company whether the organizer can be safely assembled in the cabinet if that becomes relevant.
Decide where end panels, feet, fixing flanges or rails belong in the section. If the stated usable width is already measured between the finished inner faces of fixed side panels and no other organizer side components take that width, you can use it directly. When the organizer adds its own side panels inside those faces, include their real projection in the layout. With narrow slotted tracks, find out whether the dimension on the drawing refers to centers, openings or exterior width. Spacing from divider center to center includes material that the item cannot occupy. Ask for the inside clear opening your trays will use. Keep nominal rack width, clear bay width and fitted cabinet width identified by name.
Note any grooves, sockets or fittings required by the system. A removable divider may need room to lift out above the shelf or a clear route to tilt and disengage. A product that adjusts across its width may require a particular clearance before it locks in. Record the relevant values from the product drawing. A bay count provides a starting allocation, while the planned hardware tells you whether the reserved space can be used as drawn.
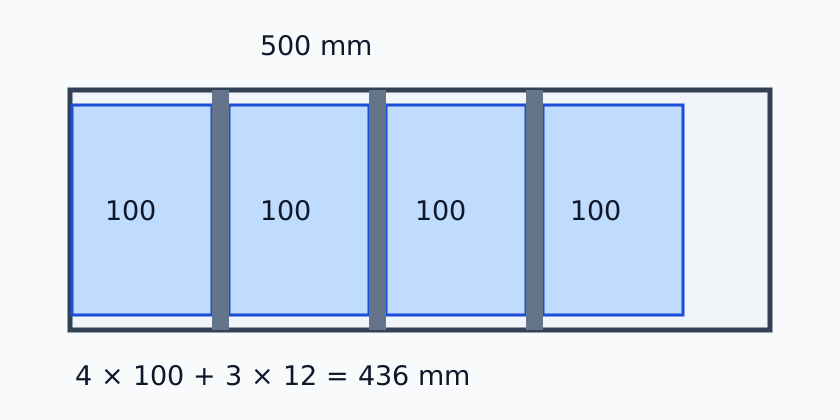
Open the full-size bay diagram
Read the four-bay and five-bay cases
In the figure the hypothetical width between usable interior faces is 500 mm. Four bays each take 100 mm between their boundaries. There are three 12 mm intermediate dividers because a divider separates two neighboring bays. The two cabinet faces serve as the outside boundaries in this simplified calculation. The occupied width is 4 × 100 + 3 × 12 = 436 mm, leaving 500 − 436 = 64 mm. The figure collects that remainder along one side to make it visible. In a built layout you can assign some of it to a wide bay, end fittings, or the installation space the chosen system requires.
Keep the width and the chosen divider thickness fixed, and try five bays. Now there are four intermediate dividers. The width needed is 5 × 100 + 4 × 12 = 548 mm, exceeding the available width by 48 mm. The extra bay requires both its own width and another divider. If you reduce the five bays equally to 88 mm each, they use 5 × 88 + 4 × 12 = 488 mm, leaving 12 mm. This fits the allocation on paper before end fittings. Any tray, rim and hand that required the former width now needs a separate check. If a rack includes end panels whose combined actual width exceeds the remainder, the reduced proposal also fails to fit the assembly.
The bay comparison uses the same equal-width rule. Enter an internal width in millimetres, the chosen clear width per bay, the whole number of bays, and the thickness of an intermediate divider. Compare the used width with the amount remaining before end fittings. Reset brings back the teaching case. When the remainder is zero, the proposed bays and dividers exactly use the input width. Look at the system's actual fixing method, hardware and installation requirements before finalizing an order. If you use an input with the end fittings already reserved, make a note of that reference and avoid subtracting the same hardware again when you review the output.
Spend the remainder on a useful bay
A cabinet that can fit four equal slots may work better with unequal widths. For a paper exercise, assign three of the original four slots 100 mm and give the last 130 mm to a handled tray. With the same three 12 mm intermediate dividers, the total is 100 + 100 + 100 + 130 + 3 × 12 = 466 mm. In the same 500 mm opening it leaves 34 mm before further fittings. This is a separate hypothetical width allocation calculated by hand. The on-page equal-bay tool continues to represent the original article example. The wider slot must still be tried against an actual tray and grip, and the other three slots have to fit the pieces assigned to them.
Compare that with the five narrow slots on your own list. Write the intended item or group in each slot. If the extra slot carries an item that could go elsewhere, while the roaster has to scrape a divider every time, the five-slot version is not delivering the use you need. If all five items are slender and their rims are easy to grip, five may be worth a mock-up. First check where the fittings sit in the remainder. Then try removing the middle piece with both adjacent bays occupied. A tray that comes out when the neighboring slots are empty can be hard to grip after the actual assortment is loaded.
Work from the person's hand as well as the item's thickness. A tray with a rolled lip can be gripped along the front if it projects far enough. A pan with handles on the sides needs space to get fingers around a handle without grinding it against the divider. A long sheet that sits flush with the cabinet front may need a grip farther back that the neighboring trays obstruct. Try the gripping position with a lightweight shape and marks showing its handle, rim and support points. Mark how far forward the tray can sit while allowing the door to close without contacting it. Product instructions and the support that keeps it stable can limit how much of it may project.
Keep the width record useful to the cabinet shop
Draw each bay between its intended boundaries. Note the clear width and which item needs it. Mark which pieces are loose, adjustable or fixed and whether there is an end panel on either side. Round measurements only as appropriate to your chosen product and fitting method. A workshop may ask for dimensions from one finished left or right reference and a separate verification of each opening. Confirm which values are nominal, which are measured and which describe fittings that have not arrived. Avoid leaving a remainder on the sketch without saying whether a side fitting, wider bay or clear hand access should use it.
On the order, the relevant question is where the clear width sits, from the support to the top edge, and whether it continues behind the front frame. If a narrow front fitting reduces that opening, give its width at the height where the important tray crosses it. Show whether the end fitting is in addition to the cabinet side or is itself a side of a prefabricated organizer. If the product is adjustable in steps, show the actual slot positions you want to use. A theoretical opening between two positions does not exist until the system can be set that way.
Prove the exit with a template before buying
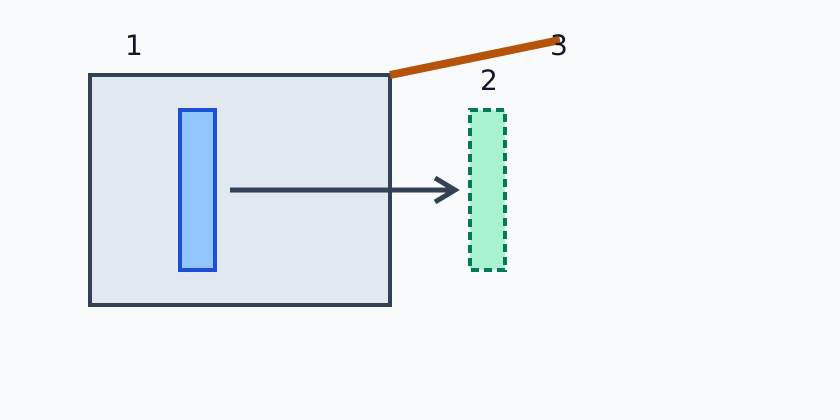
Open the full-size extraction diagram
In the plan, 1 is the tray in its stored position, 2 its withdrawn position, and 3 the open door. The arrow gives a route to test through the fitted opening. The figure is schematic. Look at your own hinges and door panels, the lip and front frame, the neighboring counter and appliances, and the place your hands come around the rim. The available doorway can be smaller than the inside box. Measure it where the tray crosses, with the door at its normal opening and the fitted hardware in place.
Make a light template of the outline most likely to get stuck. Carry through the raised rim and handles rather than cutting a rectangle to match the central sheet alone. Where thickness matters, add a light block or fold that represents the fullest part of the rim. Mark the support edge, fingertips and direction of removal. Give the template smooth edges. Firmly set any temporary guides or use simple marks that leave the cabinet and floor unharmed. A light shape won't establish how the real piece's weight behaves, but it can identify which corner hits first without loading or forcing it around a door.
Start with the door where it usually stays. Put the template into the intended slot, using its orientation at rest. Pull slowly. Watch the forward edge near the first hinge, then the trailing edge as it comes out. A part can pass the frame when moved straight forward and strike it as you turn to face the counter. Mark the point at which you can change grip or use your other hand. Keep the withdrawal area clear. If reaching the opening means opening another appliance or moving a furniture piece out of its usual place, that arrangement should be recorded explicitly and tried on an ordinary day with the rest of the room in use.
Try closing the door after the piece is seated in the bay. If the rim rests behind a hinge but moves forward when another tray bumps it, check the actual support and fixing conditions of the chosen system. Ask the manufacturer how the items are intended to rest and whether the design keeps them within the allowed stored position. If a homemade organizer would carry appreciable load or protect fragile pieces, have the cabinetmaker assess the material, structure and fixing. A dry layout exercise cannot establish how an unsupported item behaves under load.
Check height at the front and through the turn
A separate height comparison assumes a 380 mm gap above the support to the lowest internal obstruction, and a complete upright tray height of 360 mm. The static difference is 380 − 360 = 20 mm. That reading describes the upright tray where it stands. A front rail can lie lower than the internal ceiling, and tilting can change which point of the tray is highest at the doorway. Use the real support plane and take another height at the most restrictive edge the template has to cross. If the only feasible route tilts the tray, record the angle or movement as an observation instead of treating the static reading as clearance for it.
In many cabinets the path is not a straight line. The door may reduce width at the top and middle hinge, yet the bottom can have an uninterrupted opening. A tray held upright may pass with a slight translation at one point and need to turn around the frame at another. When you see that kind of conflict, first ask whether the organizer can go farther to the non-hinged side or whether the awkward item can take another bay. Trace the template as it moves instead of drawing only the stored and final positions. If the only route relies on flexing the metal or pressing against the door, take that as a reason to look for another assignment.
Take the tray to the next surface
Withdrawal ends at a stable, clear worktop where you can put the item down. Mark the nearest place it will actually fit flat if you plan to turn it level and use it there. Follow the movement all the way from the bay to that point, including a second hand if the item is broad. Consider the dishwasher door, oven, nearby drawer and people preparing food. A tray released over an open drawer can occupy the same space that someone else needs to close it. When the landing surface is often used for prep, decide how it will be cleared before lifting out a large object.
Try the way back as well. You may rotate the sheet differently when returning it from the counter, and can lose sight of a low locator as you set the edge in place. The slot should have a repeatable assignment and a direction the user can recognize. Verify the final support and how it keeps pieces from leaning into each other under normal use. Use clean, cool, empty trays for checking storage, with safe grips and a stable cabinet. Product and food handling instructions govern the use of hot or loaded cookware. Limit the storage trial to the empty items you plan to put away.
Test how the middle tray behaves with its neighbors present
Start with an empty mock-up. Let the important tray shape pass the hinge and door on its own. Then add light profiles of the two items that would stand next to it. Fold a rim or handle into those shapes if those parts extend toward the middle bay. Draw one line on the presentation face of the intended organizer that indicates how far forward each stored item sits. If the selected item rests deeper than its neighbors, observe whether your hand can reach its edge before those neighboring rims meet your wrist. If a front edge needs to be more exposed, adjust the intended position only within what the selected support and closed door allow.
Try a uniform arrangement with all their front edges lined up, then stagger the positions if the organizer allows it. Different positions of the visible front edge can make it easier to identify which piece you want. A stagger can also push a wide edge near the hinge. Measure from the fitted front, and carry the outermost projection onto the door check. For a deeper pan, check which side of the handle you can reach. Your fingers may find it from the neighboring bay when that bay is empty, while the saved slot width only works with the other tray removed. Record that dependency clearly if it is acceptable or give the pan its own easier position.
A stack of nested, compatible baking sheets is a different storage job. If the manufacturer permits that storage arrangement, you can use a bay for the group, provided the whole group is supported and does not tip or jam. Try how you would remove the individual sheet from the group. If you have to carry all the sheets out, place them securely on the worktop and replace the others, that may be fine for occasional pieces. It is unlikely to suit the drawer or cabinet that you opened to simplify daily access. Compare a group bay with several single bays using the same working position and tray assignment.
Check what changes on the inside of the closed door
Many cabinet views show the back of the door as a straight line. Check any inner bumper, latch, routed edge, bracket or other projection in the actual door build. A tray may stand just inside the drawing line but touch a bumper when the door closes. A frame that is shallow at the bottom can protrude farther inward near an upper hinge. On a flush cabinet, measure where the frame and opening meet the tray, not just where you can easily put the tape across the middle. In a cabinet with two doors, check whether either is meant to stay closed during ordinary access and whether a central feature remains after both are opened.
If the approach to the cabinet is at an angle, draw where you and the far end of the tray go while closing the door after withdrawal. A corner cabinet next to a range can require an early turn toward the worktop. A freestanding appliance or dishwasher can occupy that same turning space when opened. Give the long tray a labeled landing and see whether there is a straight or gently turning route to it with the door at a normal opening. Set up the template with these surrounding objects represented, especially if the room is under renovation and the appliances have not arrived. Leave uncertain positions marked as such and verify after the finished equipment is in place.
Compare the products that can pass the trial
A fixed divider can make good use of a known set of sheets. Choose it when the dimensions and intended positions are established and the fixing surfaces suit the specified system. Ask the cabinetmaker how the divider is held top and bottom, how the shelf or base supports stored trays, and what can be moved later. In a built-in layout, a heavily used pan may be easiest to remove from the wide end bay, leaving the repeated thin slots for matching items. If the tray set changes, an inflexible pattern can send the newer pan to the bottom of a stack elsewhere. The question is how often the arrangement needs to change, and whether you can leave one adaptable area for the exception.
A removable holder lets you try another configuration or take the organizer out for cleaning. Its outer base and sides still take space. Check whether its assembled footprint clears the door and where it is meant to be supported. Some removable designs grip the shelf or slide into holders and still need an exact place for those parts. Follow the instructions for whether it should be fastened and what load it can hold. Check that putting a tray away does not shift the rack into the path of the door or leave its position uncertain. With a heavy item, avoid relying on a light trial organizer until its rated use and stability are clear.
Adjustable partitions can put a wide bay wherever the awkward piece lands. Understand how the slots or track select the new width, where the hardware remains after removal, and whether the partition can be adjusted with the cabinet already in place. A product must be capable of the specific widths you want. The first and last position may leave space for structural or hardware requirements. Ask whether one remaining unused track interferes with the feet of a wider piece or impedes cleaning. If you rent, determine what alterations are allowed before choosing a fixed system, and use a permitted solution that suits the cabinet material and weight.
A plate rack or wire file organizer shown in a photo may look similar to a tray divider. Check what items and loads its maker specifies, the dimensions of the base and gaps, the quality of support and the clearance to its top edge. Thin trays can slip or lean depending on wire spacing, and deep rims may catch. A system designed around the selected dishes or sheets is easier to evaluate if the manufacturer supplies the relevant measurements. Compare products using the same real tray list, then eliminate ones that fail the intended door and hand access. Kitchen open shelving guidance
Consider the cabinet next door
Sometimes the right decision is a different cabinet. If the chosen space has a center stile, deep lip or hinge in the only safe hand position, use the awkward tray as a template in an adjoining cabinet whose door opens clear. A tall cabinet that fits the height may put the tray too far above or below the person who handles it. Check that the base or shelf is designed for the load and that the route to a landing surface is suitable. Try the template through the actual opening. With two cabinets available, use one for the most frequently handled trays and the other for larger or less frequent pieces if both have a suitable grip and reach. The physical fit is valuable only when the storage place can be used in its normal surroundings.
Check whether the proposed cabinet is already doing a job that would be lost. If it holds serving dishes, lids or frequently used containers, write where those will move before judging the new tray arrangement. Test whether moving them blocks prep or forces awkward lifts. A product that holds every tray can still be a poor use of this specific cabinet when it takes more useful storage away. Even within the tray set, smaller sheets may fit nicely in a single allocated slot under the organizer's instructions, freeing width for the roaster or the items the cabinet hosted before.
Ask three product questions before committing
- What actually passes the door? Ask for the widest rigid component as supplied, whether it is delivered assembled, and where its foot or end hardware sits. Compare those dimensions with the finished door clearance along the full entry path and the specified installation method.
- What carries the load? Ask which part takes the weight of the stored tray, what supports the divider, and what the selected product specifies for the cabinet material and fixings. Have concealed services and any structural implications checked before drilling.
- How do I change or clean it? Ask whether partitions lift out, how a side panel can be reached after installation, and how to clean the base. Rehearse access with an empty cabinet and a light template before loading the organizer.
These questions can also be used with a cabinetmaker. Bring the awkward tray's outline and the different heights or widths marked on the door frame. Ask the maker to show the overlap of the hinge and front edge on the proposed location. Confirm whether the intended route is through the current front or a changed door or frame. Have the actual system and fixing checked, especially if the proposal depends on a narrow edge or a thin panel. Cabinet dimensions and arithmetic by themselves cannot establish support.
Decide what can change the day a new pan arrives
Put a future tray on the drawing as a blank space rather than a fictitious measurement. Ask what you are willing to move if it turns out to be deeper or have larger handles. In a fixed layout, the answer might be the wide end bay, where a different group could move to another cabinet. In an adjustable system, look at which positions are compatible with the frame and whether a partition can still be raised or tilted out after the counter is in place. If the whole organizer needs to come out to be adjusted, check how you would clear its route and where it could rest during the work.
If your current pans are mostly flat but you are choosing a larger roasting pan soon, get an outline of its rim and handles before setting the permanent pattern. Reserve a documented position instead of counting on a few millimetres left on paper. At an existing cabinet you can postpone fixing a divider until the delivered pan has been checked, provided that the temporary arrangement remains supported and the maker's intended use is preserved. For a made-to-order cabinet, agree with the workshop which dimensions are required before parts are made and which positions are adjustable afterward. Keep the inside width and the door opening available to compare replacement parts later.
One trap in a reevaluation is moving a partition while leaving its track or sockets behind. The next tray may fit between the uprights and still rest on a protruding old fitting. Add each fitting to the floor and side views, and ask how the manufacturer expects it to be treated when a bay changes. If the rack sits by a wall that cannot be drilled or in a cabinet where a line might run behind the panel, have the proposed installation assessed. Align new parts with the specified cabinet surfaces, rather than reusing an old fixing position on the assumption that all holes and locations are equivalent.
Use a rejected layout to finish your order
Imagine a first proposal with five narrow bays. The width allocation works on paper before hardware, but a side handle disappears behind a divider and the main pan cannot be withdrawn without touching the neighboring sheet. Write the reason down. Plan a wider bay at the clear end and place the fitting dimensions on the drawing. Mark an ordinary door angle and a place to set the tray down. Recheck all the stored pieces, including the pan, with a template and within the operating space that is actually available. If the plan fails at the extraction point, making the slot wider may have no effect. Look instead for a different position, a compatible door arrangement or another cabinet.
The worksheet asks for the internal clear width and open-door width, the largest tray's upright height and depth and rim thickness, the bay widths and divider or end-fitting sizes, and what happened during the template and grip check. Use several copies for different options. Note the finished reference and the orientation under each reading. Leave a blank when the cabinet has yet to be installed or the equipment has not arrived. Bring that blank to the supplier as a request for a dimension or a chance to check the sample. Keep the specific first contact and the adjusted version visible. A pass mark without the position of the door or the orientation of the tray is hard to use when the parts are cut.
After fitting, test the mock-up path again in the finished cabinet with ordinary neighboring doors and drawers in position. Use an empty tray and watch its complete movement, from a secure grip while in the bay to a stable landing surface and back. Verify the proper fixing and supported use as directed by the selected organizer or maker. Update the drawing if you swap positions after installation. The best layout for this particular set of pans is the one that keeps your awkward tray reachable while the shelves and cabinet still do the work you expect every day.
TRY THE EXAMPLE
Compare the number of tray bays
Enter the internal width in millimetres, a chosen bay width, number of bays and intermediate divider thickness. End panels and fittings need separate allowance.
Allowed range: 1–3000 · Step: 1
Allowed range: 1–1000 · Step: 1
Allowed range: 1–20 · Step: 1
Allowed range: 0–100 · Step: 1
Positive remainder under these assumptions. Check the actual use and product requirements before choosing a layout.
- Bays and intermediate dividers
- 436 mm
- Width remaining before end fittings
- 64 mm
Reference boundary — Usable internal width: 500 mm
Blue dashed line: comparison boundary. Red dimension: shortage.
100 × 4 + 12 × (4 − 1) = 436 mm
Check the door opening, the largest rim and hand path with a lightweight template. Width allocation is not a fixing, load or installation approval.
Teaching assumptions, not a surveyed home or a construction check. Results describe this simplified geometry or budget only. Changes stay on this page and reset on reload.