Washer Detergent Drawer Access: Plan Before Installing
Check the path for opening, filling and removing a washer detergent drawer before choosing a shelf or closet arrangement, with a worked clearance example.
Washer drawer pouring section
The 900 mm drawer rim and a proposed 190 mm vessel envelope meet a shelf at 1,060 mm in A, a shortfall of 30 mm. A shelf at 1,130 mm in B leaves 40 mm in this section.
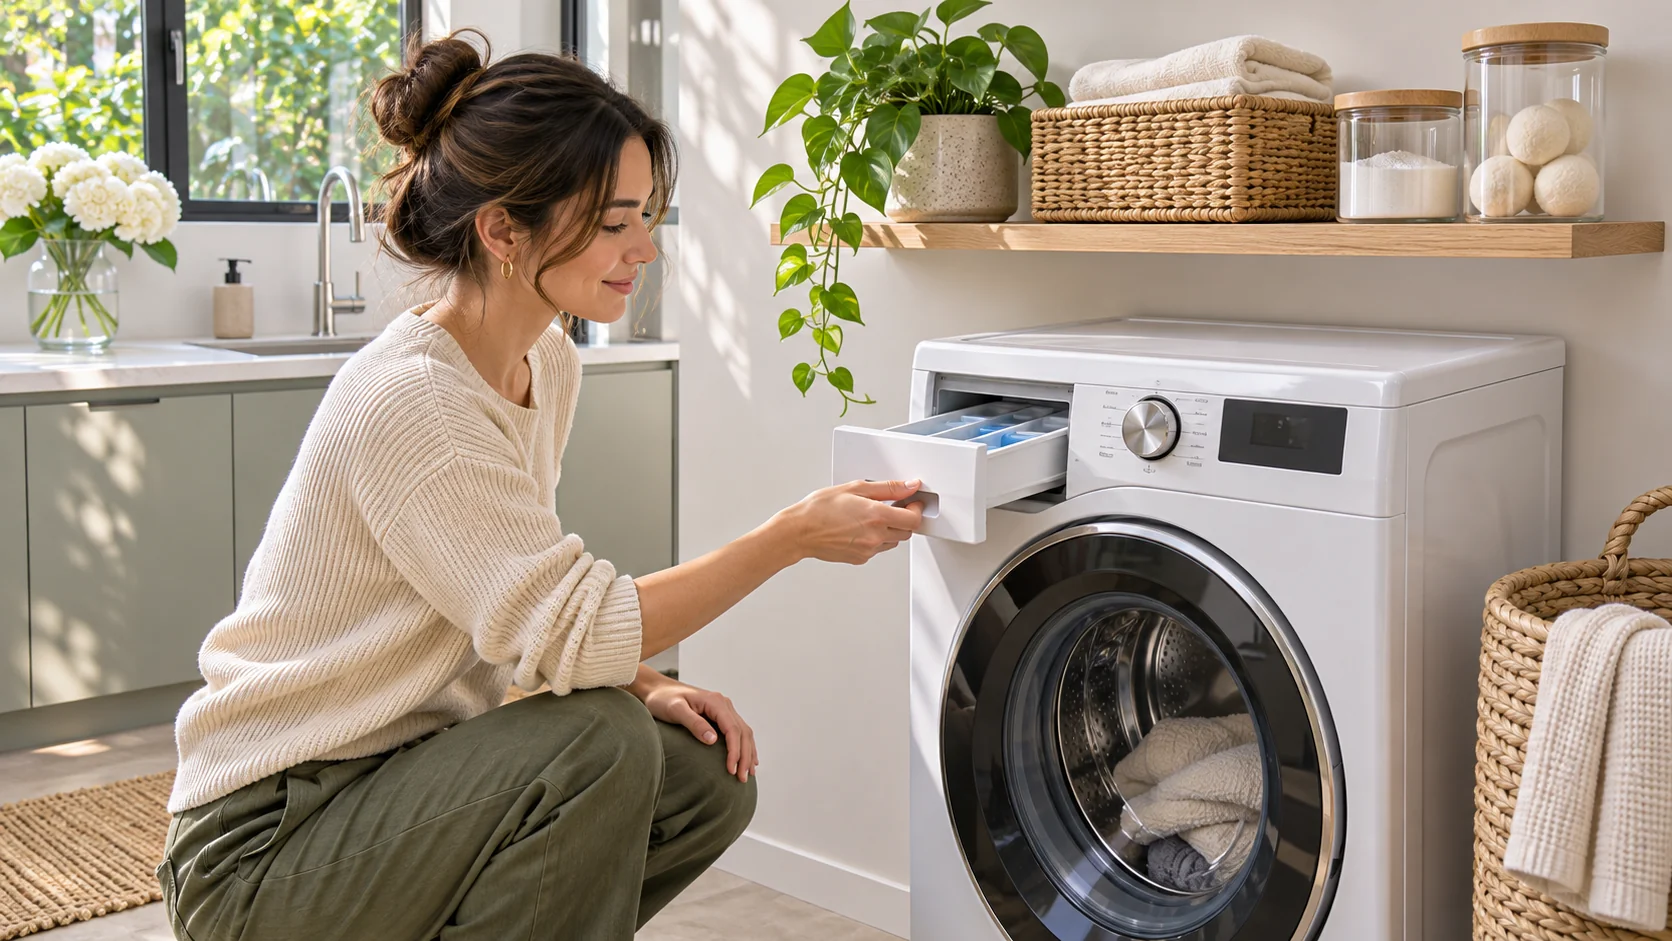
You pull a new washer's detergent drawer forward. The drawer opens, the measuring cup reaches the first compartment, and the top of your hand catches the shelf as you move to the one farther back. A few weeks later you need to remove the drawer and discover that the cupboard door sits across its exit. Both problems can happen while the washer itself fits the alcove. Each one needs a different measurement.
Start with the first thing that fails. Check whether the drawer reaches its normal open position. Then trace the separate movements for adding products and removing the drawer. For a machine you have yet to buy, use the exact model documents or a permitted demonstration to establish what is possible, and keep any action you cannot reproduce unresolved. Use the results to choose the position of the shelf, cabinet door and supplies before a cabinetmaker makes the parts.
If the drawer stops before it should, find what stops it
Begin with the washer's normal filling procedure from its manual. Locate the dispenser and check which part you should hold. Some machines have built-in limits or a distinct removal procedure. For a model you already own, follow its instructions about when you may open the drawer and which machine state is suitable for the check. If the machine is installed where you can use the drawer normally, that is a convenient place to establish the reference. If you are examining a display unit, ask permission and leave any release latch alone unless the person responsible for the display can show you the proper procedure.
Open the closet door the way you would for a load of laundry. If the room has a hinged door, let it rest where it naturally stops. If it has a sliding or folding front, draw it back to its intended operating position. Mark the innermost edge of the open leaf, hinge, handle or stack of panels. The reduced opening can occur at the height of the detergent drawer even where the opening is wide enough at floor level to receive the washer. A cabinetmaker who checks the complete machine passing into the alcove with the doors off will miss that daily restriction.
Pull gently toward the normal stop. If the drawer stops early, observe the first contact while the machine is stationary and the compartment is empty. Watch the side of the drawer face near the closet door, the underside of a shelf where the top of your fingers might rise, and any nearby trim that projects into the path. A shadow cast by an open door makes it hard to distinguish the drawer's edge from the cabinet edge. Have someone look from the side or take a photo while the parts are stationary. Write the contact down in plain language, with the direction of pull and the position of the door. A note that says “left edge of drawer face touches inner fold at ordinary door stop” gives a workshop something to check.
Check the complete return as well. Some users habitually move the cupboard door inward as soon as the cup goes back on a shelf. Rehearse the intended order of actions at low speed. Mark whether the cupboard door can move into the partly open drawer or whether the user would have to maneuver the cup around a panel before pushing the drawer in. If the cabinet is unbuilt, draw the washer face relative to the finished cabinet front and overlay the two moving parts in plan. Allow the trades to determine the actual installation position and hardware behavior from the product information and finished space.
Home in on the first obstruction
- The drawer face hits a panel. Sketch the door and drawer at the moment of contact. Ask the cabinetmaker about the clear opening at that height and where the door naturally stands during use.
- Your fingers meet the underside. Check the intended grip and the depth of the shelf. A height taken to the floor will tell you very little if the shelf edge projects into the exact place your hand needs.
- Nothing visible meets the drawer. Compare against the model's illustrated procedure. If the stop or release is uncertain, pause and verify it from the manual or with the manufacturer or service provider. An unknown mechanical restriction remains a question for the model.
- The drawer opens until you bring the basket in. Lay out where the basket, standing user and door each belong. Try setting the basket down away from the line of pull and check the whole sequence again.
If the machine has to come forward for the reference check, arrange that with the appropriate installer for the water, drain and electrical connections. A front that sits slightly farther forward in a test of an unconnected appliance can look clear of a folding door and still collide in the installed position. Establish the location of the machine first, including the position allowed by its connections and clearances. Trace any alternative placement as a separate option for professional review.
If the drawer opens but pouring is awkward, follow the cup to every compartment
Take the same empty cup, scoop or bottle you actually intend to use, and follow the manufacturer's instructions for the type of product and compartment. Stand where the closet opening lets you stand, with the door in its usual open position. Bring the empty container to the first compartment and simulate the motion all the way through, including turning your hand back upright and withdrawing it. Repeat at each compartment the household uses. The front cell may be open to the room while the next cell is tucked partway under the shelf. The lip of a wide bottle can clear the cabinet until the neck rotates toward a deep compartment. The bottle base and your knuckles then move in a different direction from its mouth.
Observe the motion twice with the same hand and approach. First find where it gets tight. On the second attempt, watch which surface controls the movement: a flat underside, a dipped front edge, a bracket, a divider inside the drawer, an adjacent door, or a combination. If someone else does laundry, give them the same container after you have marked the position. How far a person can reach past the door, and which hand they use while holding the bottle, affect the path. With a step stool or stretching reach in an early mock-up, you may have changed the task you are trying to accommodate. Use the floor and approach that will exist on an ordinary laundry day.
Suppose a shallow cup reaches every part of the drawer but the bottle your household uses is hard to raise into place. A suitable dosing vessel may solve the pouring part of the problem if it is compatible with the product directions and lets you dose appropriately. Record which container was tested and add its storage position so it is available when needed. If you decant the normal amount for immediate use, check where the bottle lands and whether the more frequent wipe-up or handling is acceptable to the household. Keep product handling and storage consistent with its label, including where children or pets can reach. If the shelf also blocks the hand that is pressing a release latch, a change of container will leave the cleaning issue open.
Take a side section where the cap approaches the shelf
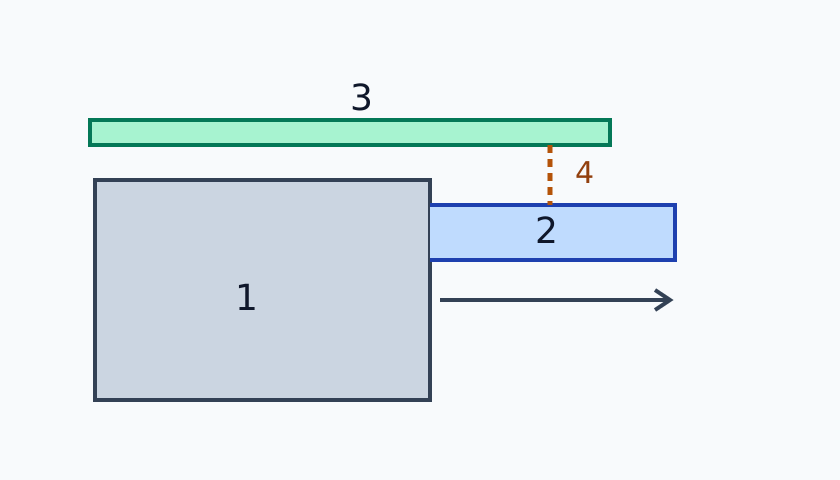
In the drawing, 1 is the washer, 2 the open dispenser drawer, 3 the shelf, and 4 the vertical gap at the illustrated point. The arrow shows the drawer's outward direction. Use the drawing to find the two faces you would measure in a real room. The figure is schematic and leaves out the compartments, tap and hand. In a cabinet with a dropped trim piece, a rail or a bracket beneath the shelf, take a reading to the part your hand or container comes closest to touching. Work from the same finished floor reference, so the two elevations can be compared. Mark where they line up in plan.
Consider a purely illustrative section at the place where a vessel would be raised vertically. The underside of the shelf is 1060 mm above the finished floor. The rim of the open drawer at the same horizontal position is 900 mm above the floor. At that point the gap is 1060 − 900 = 160 mm. Suppose the empty measuring vessel needs 190 mm above the rim in that position. Subtracting its assumed envelope gives 160 − 190 = −30 mm. The shortfall belongs to that point and the imagined position of the vessel. The number has a useful sign, but no information about the gap farther out where the shelf stops, or about how the tilted vessel and hand come through the opening.
Now raise the shelf underside in the same hypothetical section to 1130 mm. The local gap becomes 1130 − 900 = 230 mm, which leaves 230 − 190 = 40 mm above the assumed vertical envelope. Read the second result as a reason to mock up that height, then test the actual hand and container. A shelf moved up also moves the stored detergent, measuring vessels and towels. Put representative items on an existing shelf at the proposed height, or on a stable mock-up. See what each person can reach and return with one hand. A shelf that fixes pouring by sending a heavy bottle too high can create a daily handling problem elsewhere in the same task.
If instead you shorten the shelf, trace the front edge in the side section at the original height. A vessel that needed more height under that edge might clear it once the upper front of the drawer is exposed. Carry the measurement to the point where its other compartments sit and check what storage is left behind the new edge. A thin board marked across the cabinet drawing can help visualize the boundary. Simulate it with a securely supported proxy and an empty container. The trade responsible for the shelf should confirm fixing, load and support, including any change in brackets or overhang. Refer to the appliance instructions for clearances, ventilation and access required for installation or service. All numbers in the example describe the hypothetical section.
Compare the vessel path with a change in drawer position
The same shelf height can behave differently if the whole machine sits farther back or its drawer has a different projection. For reuse with another model, sketch the closed drawer face and its normal open position using the actual drawer data. Preserve the shelf edge line so you can see how much of the fill opening lies behind it. Width and height in the appliance listing are useful for arranging the room, but the dispenser will often need a separate drawing or a demonstration to establish where its compartments lie when opened. Keep an unknown position unresolved until you can inspect it.
There is also a difference between raising the shelf and lowering the rim. A pedestal, for example, may raise both the machine and the open drawer. Include the manufactured base and any part of the installation that changes the rim's position, using the model's compatibility and setup information. If you measure the floor before a finish is added, record the present plane and the future finished plane. Take both heights on the same reference after installation. A mismatch in references can look like a change in pouring space when the distance between shelf and rim in the room has stayed the same.
If you can fill it but cannot clean it, work from the release procedure
Most pouring actions take place at the normal stop. The cleaning action may begin at a different position and require an extra hand at a specific point. Read the model instructions for which parts can be removed, the required power precautions, which latch to press and in which direction the drawer should travel. Use the drawings or manufacturer instructions to establish the actual orientation. If you do not know how to release it, keep the removal step unverified and ask the appropriate person. Do not force the stop. Leave any servicing beyond the user instructions to a qualified person.
Look from the direction your hand will approach the release. Put the other hand where it can support the drawer as instructed. Watch for a cupboard side panel that intersects the withdrawal, or a shelf that permits the initial pull but covers the position at which the latch must be reached. An adult standing squarely in front with both hands free may need a different stance from someone who is dosing with one hand at the side. Mark the approximate end position when the drawer is free. Note where you would put the withdrawn assembly without resting it on the closed washer door or balancing it on the edge of a sink.
If you are permitted by the manual to remove the actual drawer, follow the procedure to the point at which the part can be held securely and carried to the chosen cleaning place. Check the path with the laundry door and a basket in their ordinary positions. Use the cleaning method the manufacturer specifies. A crowded route can lead to spills or a dropped component even when the release itself is easy. If storage is movable, put the basket down before withdrawing the drawer and arrange a clear surface for the assembly. If the way from the washer to the sink turns tightly, orient the assembly with both hands while it is supported and see where your elbows and the part will pass.
Reinstall the part as instructed. A test of removal alone can leave the housing hard to see and make reinsertion awkward, especially if the shelf projects ahead of the release area. Record whether you can align the assembly without leaning on the door, and whether it closes normally when back in place. Use the user manual to decide whether a removed divider or insert needs to be put in a specific position. Document only what was observed in the tested arrangement. If the release procedure cannot be checked in a showroom, arrange a later check after delivery before committing to nearby trim or a final shelf position where your schedule allows.
Read the workflow at the point where your routine breaks
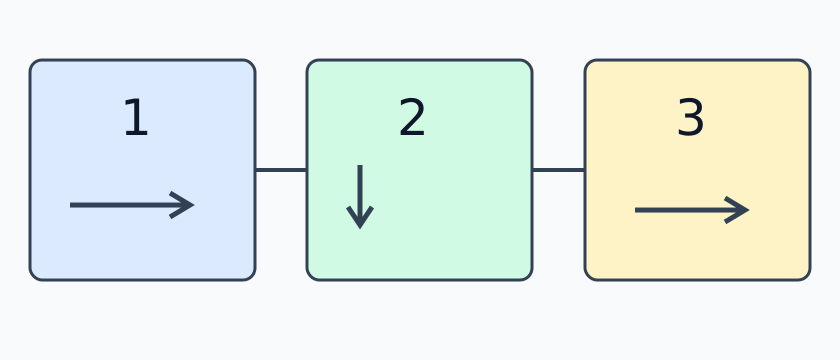
The figure gives each action its own panel. In the first, the drawer reaches its normal stop with the cabinet door in the usual open position. In the second, check the hand and empty container at every compartment. In the third, use the manual's separate release and removal procedure. Compare the two open positions in your record. One describes normal filling and the other belongs to cleaning. A designer who puts both under a single note reading “allow front clearance” may never locate the overhead and side constraints that make them different.
If an existing washer suddenly gets hard to operate even in its former position with nothing visibly in the way, review the appliance's normal cleaning and care instructions. The clearance measurements still describe the surroundings, while a jam, damaged part or uncertain latch calls for the model's support procedures. Give the support provider the model and the observed symptom. A cabinet alteration made to fix a problem inside the dispenser can consume usable space while the mechanical problem persists.
Choose a layout based on the obstruction you found
The smallest sound cabinet change depends on which movement fails and where. Evaluate alternatives against the existing or proposed setup for the same washer position and intended container. A cabinet opening that gets better because the machine moved forward and the door opened farther on the second rehearsal has several variables changing. If you are able to hold other conditions still, change one thing first to see what helped. Once you have a viable candidate, add the other real conditions back and check them together.
Raise the shelf when the trouble is overhead. An upward move usually changes the gap where the shelf overhangs the drawer. It also changes access to the things you keep on top. Mark a high shelf position on the wall and establish how often you need its heaviest item. If that item needs both hands or is hard to set back down, move it to a different approved storage location and leave the higher shelf for items you can safely handle. Draw shelves and supports in section. A bracket or downstand can remain in the movement path even if the underside of the board has moved up. Ask the installer to verify the structure for the intended loads and the applicable appliance conditions before work is fixed.
Shorten the shelf when the front edge crosses the motion. Setting that edge farther back helps if it exposes the actual fill or release path. Confirm that the back of the drawer and the compartment farthest away still have room to work. A shorter shelf can shrink the area for supplies and change where a spill would drip. Decide where the bottle and the dosing vessel live before finalizing the depth. A simple top view can show which stored things still fit and whether they obscure a connection or clearance the washer needs. Include any lip or edge detail in the proposed drawing.
Alter the cupboard door when the front or side exit is pinched. Review the open door, hardware and service access with the cabinetmaker. With a bi-fold door, the stacked panels can project into the left or right side; with sliders, the open area may be biased to one half of the cabinet. Check against the actual location of the drawer. A hinge change can affect the handle or panel farther down its swing. Check how the door works when someone is at the washer and when nearby drawers or another room door are open. A different door can allow the dispenser to open yet deprive the user of a clear place to stand. Review the arrangement as a use sequence.
Change the allocation of the upper storage when the shelf solves the wrong problem. If a laundry basket or a tower of supplies is taking the place your arm needs, try a usable landing point elsewhere before specifying custom changes. If open shelving suits the room, decide where the needed equipment will be stored and whether it remains accessible with the washer in its working position. If you are considering a top above adjacent machines, mark the boundary of the portion that can remain deep and the portion that would intrude on the dispenser. Check the new support arrangement with the relevant trades. A dimension borrowed from an adjacent appliance should be checked against this washer's exact instructions.
Change the appliance only after identifying the geometry that matters. Before buying, ask to see normal drawer projection, the farthest fill compartment and the service or cleaning procedure for the model being considered. Compare from the same finished reference. An alternative machine with a different exterior size can have similar drawer travel. A catalog illustration can identify where the dispenser is, and the actual movement still needs model-specific evidence. Also account for the main door, required connections, ventilation and service access. Those can limit where the alternative washer sits, affecting the dispenser test again.
Decide what the drawing should tell the installer
Show where the opening is measured and which action it serves. A practical detail records the machine model and level position, finished floor reference, drawer rim position at the normal stop, underside height and finished shelf front. Show the door at the position used for the operating check and the intrusion of its hardware if relevant. If a deeper shelf is changed to a shorter one, dimension its new finished edge from a known cabinet or wall face. If a rail remains below it, show that separately. Add the removable drawer's exit direction from the model instructions and a note marking any check that must be repeated with the actual part.
This is also a place to distinguish access for the user's cleaning from access for qualified servicing. The tube, settings and electrical connections are handled in accordance with the model instructions and applicable requirements. Give installation and service information to the appropriate trades for the exact washer and location. On drawings for a closet renovation, label existing water and drain locations and point out where a removable service panel would be reached, if one is part of the approved design. The dispenser test gives evidence for the operations you performed, while other parts of the installation have their own checks.
Rehearse the whole laundry trip with the surrounding furniture
Walk in with the basket you use, stop where you usually place it and open the cabinet. Take the empty cup or bottle from storage, pull the dispenser to its normal stop and simulate reaching the compartments. Put the container back where it lives and close the drawer. Follow the model's method for loading and closing the washer door, using empty hands or a light practice load as appropriate for the dry rehearsal. Then leave the room with the same basket. If the layout works only when the basket is left outside, decide whether that is how the room is meant to be used and ensure it can be carried or stored without obstructing the normal route.
Think about the less common setup too. For example, if the normal filling can be done only while a folding cupboard door is held unusually far open, a second person may have to hold the leaf while the user reaches the far chamber. Bring the leaf back to its ordinary position and document the resulting stop. On the other hand, if cleaning is reasonably possible only after making a clear counter and moving a light basket, that may suit the frequency of that particular action. Mark which movable item shifts and whether the person who does the cleaning can complete the steps. Keep the machine and installed materials in the positions agreed with the installer during both trials.
In a narrow closet, filling and loading can draw the user's feet to different places. Watch where the laundry basket lands when the main washer door is open. A shelf plan intended to solve detergent access should preserve the route for carrying the basket and reaching the main door. If a nearby sink is also used for soaking or cleaning, draw the direction of approach to it and the place for the removed drawer. The cabinet plan might be sound for one user with an empty room while a typical wash starts with a full basket and a helper moving through the aisle. Read the larger door and basket considerations alongside the dispenser check. Laundry closet layout guide
For a unit stacked with another appliance, rely on the approved equipment and installation details when deciding where the washer sits and which parts surround the dispenser. A test made with an isolated washer speaks only to that arrangement. If a construction mock-up is possible, represent the trim, neighboring appliance or shelf in the position expected after the approved assembly is installed. Check fingers and container through the same movement without modifying the unit. If the stacked setup changes the everyday door sequence or leaves the user working from one side, confirm that starting position and note it on your record.
Try a paper comparison before changing the furniture
Suppose the first attempt in a proposed closet finds three different conditions. The drawer reaches its normal stop with the closet door open. The empty cup can reach the forward compartment, but its base touches the projecting shelf when the spout is over the rear compartment. And the manual shows a release near the back, where the tester has yet to establish a path for both hands. Mark the opening row as observed for the setup, the filling row as blocked for the rear compartment, and the removal row as unresolved. This illustrative record points toward the shelf while keeping the separate cleaning question in view.
Imagine two shelf options drawn from the same washer and finished floor. On tracing paper, shorten the shelf by moving its front line back far enough to expose the identified point. Then put a second tracing above the current shelf and mark the proposed underside and bracket position. Place the same drawn outline of the cup over the far compartment in both sketches. The sketch helps decide which options deserve a mock-up. Use the real empty cup for the transition in and out, because the fingers or heel of the bottle may still cross the shelf line as you withdraw. In an existing rental, discuss any permanent work with the person authorized to approve it. The test also works with safely supported, movable mock-up pieces while the alternatives are being reviewed.
Add one ordinary storage task to each option. In the shallow version, put the usual supply container against a stable proxy of the back wall and check whether its base is supported. In the high version, try reaching it from the approach you use when you carry the basket. Do this with an empty representative container if weight or spill risks make the demonstration awkward. A viable option might keep a reading for pouring and leave the supply placement to change. Another option may preserve the shelf capacity but require a different approved storage arrangement to keep heavier items reachable. Record which outcome the household can actually use, next to the specific change on the drawing.
Choose the right checkpoint for a machine on order
When dimensions come from a specification instead of the installed machine, write down precisely what each document establishes. A product outline can show the front edge, a prescribed recess dimension and the position of a service zone. A drawing of the dispenser or a demonstration might establish how the normal stop exposes the compartments. The installation drawing may say how the washer is leveled and located relative to the back wall. Only the finished room and installed unit can establish whether the actual door stop and shelf align with the hypothesized position. Reserve time for that check after installation, and arrange with the cabinetmaker which surrounding pieces can remain adjustable until it happens.
In an appliance replacement, put tape or a removable marker on the present shelf or cabinet front to show the location of the old dispenser. Record where its drawer stops, which parts are removed for cleaning and what everyday problem, if any, you are trying to solve. Overlay the candidate model's projections from its actual planned front. If it puts the far compartment farther behind the shelf, mark a fresh test location and compare it with the shelf detail. If all you have is the exterior footprint, keep the drawer locations as pending. A decision about buying a machine can then include a clear question to ask the supplier instead of a promise based on the old appliance.
For the cabinetmaker's visit, put the model sheet and the furniture section on one surface. Point to the area where the cup approaches the underside and the separate one where the user needs to reach the release. Explain when the cupboard door is open, where the basket sits, and how the normal laundry trip starts. If the installer identifies an appliance requirement that changes the front or side position, apply it before relying on the clearances you recorded. A revised drawing should show the change where it affects the dispenser instead of relying on a note hidden in a separate conversation.
Leave the next person enough evidence to repeat your check
Use the step-by-step check to select opening, filling and removal. It records which checks you have evidence for while you work through the stages. The marks are temporary and self-reported. Reset before comparing another layout, and leave anything unknown unchecked. Keep a separate written record when a supplier or installer needs to review the conclusion. With the finished cabinet in place, repeat the observations that depend on its installed dimensions, and write down the revision and equipment model you checked.
The printable worksheet is useful on a site visit when you need one record for the cabinetmaker and another to compare against later measurements. For opening, write what the drawer reached with the cupboard door set as used. For filling, record the empty vessel, compartments checked, hand used, and the limiting surface. For removal, identify the manual's procedure, exit direction and cleaning destination. Record a reading together with the horizontal point on the section and the condition of the surrounding furniture. Put a question mark next to conditions you have yet to observe. A small sketch of the first obstruction can be more legible than a photo taken into a dark cupboard.
A sample evidence note might read “Normal stop reached at the labeled door position. Empty measure reaches the front cell; hand contacts front shelf edge on approach to rear cell. Release procedure located in appliance manual, physical withdrawal to be tried after delivery. Compare shorter shelf at same finished height; compare a higher shelf too if the shorter version leaves the far cell blocked or sacrifices the space assigned to our supplies.” This is an illustration of what to write. In a real order, attach the relevant drawing and a picture or sketch with the positions labeled. Assign a person to recheck the unresolved action.
After an adjustment, test all the actions in the same order instead of recording only the one that started the job. A new shelf can change where a person retrieves the measure, and a different door stop can affect removal while fixing the opening. Keep the working shelf option only once opening, actual dosing and the instructed cleaning motion each have evidence, and the cabinet and appliance work have been reviewed for the relevant installation conditions. Use the final floor and finished parts for measurements, and note any difference from the rehearsal surface.
Fill the record with three statements a person can imagine doing next week. The drawer reaches its stop with the cupboard door where you ordinarily leave it. Your chosen dosing vessel and hand reach each compartment from the normal standing position. The drawer comes out and goes back in by the manual's procedure and has a route to the sink. Each statement can identify a different remaining action. If one remains unknown, it tells you what to investigate before a shelf or cabinet front is made permanent.
TRY THE EXAMPLE
Check all three drawer movements
Select a stage and record the evidence you collected. An unchecked step remains unknown; this does not validate an installation.
With the closet door in its ordinary open position, pull the drawer gently to its normal stop. Record shelf and door interference; if the stop is not reached, this stage fails.
Use the actual model and empty container, follow its manual and never force the drawer. Check connections and service separately.
Teaching assumptions, not a surveyed home or a construction check. Results describe this simplified geometry or budget only. Changes stay on this page and reset on reload.