Kettle Lid Hits the Upper Cabinet? What to Measure
Find out whether the cabinet blocks the kettle lid or leaves too little room to fill it, and check whether filling at the sink is an option.
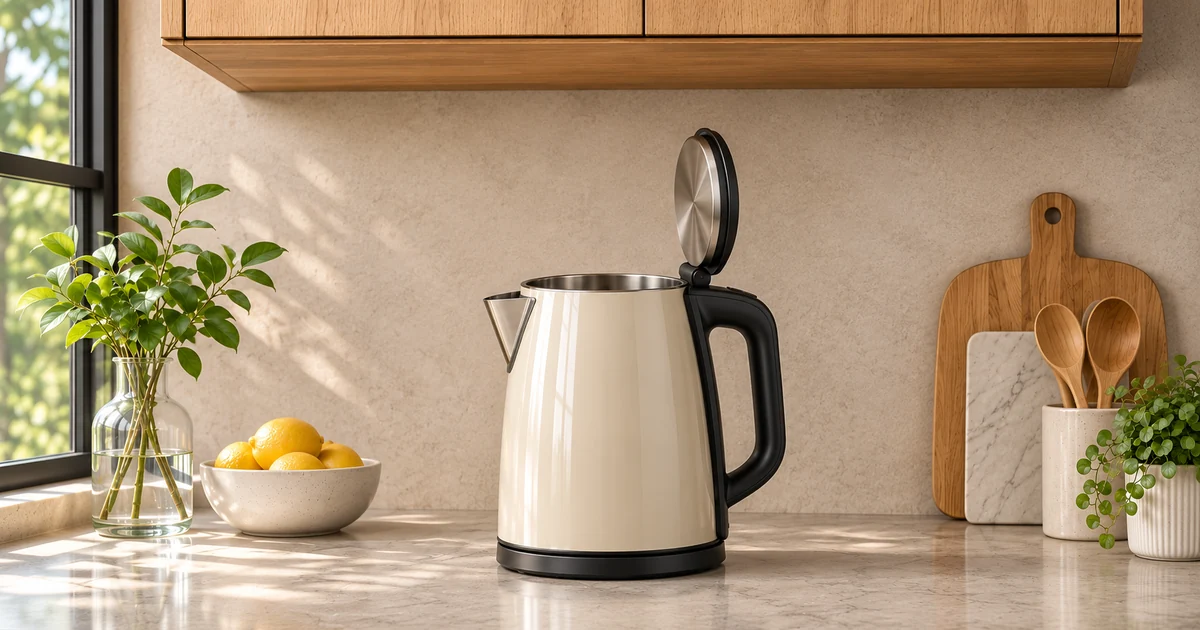
Electric kettle lid clearance
In this 1:1 example, a 230 mm closed kettle reaches 370 mm with its lid open. At A the 330 mm cabinet underside overlaps the open lid by 40 mm. At B the 450 mm underside leaves 80 mm.
You push the lid release and hear a tap against the underside of the cupboard. Or the lid opens all the way, but the jug has nowhere to tilt and your wrist ends up wedged between the handle and the shelf. These are different problems. The first is about the path of the lid. The second is about the space you need to put water through the opening. Moving the kettle can solve either problem, provided the new position works for the jobs you actually do there.
Start with the symptom you can see. For all movement checks below, unplug the kettle, let it cool completely and empty it. Keep the base and connector dry and follow the exact model’s instructions about opening, filling and lifting the body. The checks can be spread out over more than one session. Stop when you know what is blocking the movement and have one permitted next step to try.
- The lid touches something · Find the lowest obstruction along the lid’s path.
- The lid opens, but pouring is awkward · Find out which hand or object runs out of room first.
- I want to fill it by the sink · Follow the route to the tap and back to the dry base.
- The location works for filling, but can I boil there? · Check the placement separately against the manual.
In the 3D comparison above, turn the view to the side and follow the open lid upward from the same worktop in both cases. The lid reaches 370 mm. At A the cabinet underside is 330 mm high, so the edge enters the lid envelope by 40 mm. At B the underside is 450 mm high and the model leaves 80 mm. Transfer the heights at the two points where you would actually place the kettle to the side-view sketch below. When the nearest light fitting or cabinet lip is lower than the rest of the underside, measure the fitting at the proposed lid position before comparing the two places.
The lid hits the cabinet, a light or the wall
First observation: where does it stop?
Look at the place where the lid stops moving. A mark on the top edge can help you find the area to examine, but it may date from a different kettle position. With the body cool, empty and disconnected, bring the lid toward the suspected obstruction using the method specified in the manual. Stop short of contact. Look from the front to see whether it is underneath the cabinet, then from the side to see what it is actually lined up with. A small lip on the cabinet can sit directly in front of the cover and catch the lid halfway through its swing. A light can be lower than the lip and still be irrelevant if the lid travels behind it.
Try to identify the first obstruction in words. “Top of lid approaches the underside of the rail as it turns back” gives you a specific place to measure. “Kettle too tall” could mean the lid, its release button, the handle or the body as you lift it off its base. If the lid also refuses to move on a clear, level counter, or the release feels damaged or stuck, stop the clearance test. Consult the manual or the maker about the mechanism before you try to force it or buy a replacement based on the cabinet height.
If the kettle has a lid you lift away, use the removal motion given in the manual. The clearance includes any upward lift needed to release it, the hand holding it, and a sideways path to a stable spot for the detached lid. Setting the lid down counts as part of that job. The full motion can use more space than the lid appears to need when you look at it closed. A hinged lid can also rise, sweep back and then sit lower at the end of its movement. In both cases a single picture of the final position leaves part of the path unexamined.
A lid can seem to hit only after the kettle has been returned to its base a few times. Trace two positions of the footprint in a sketch. At one it may sit behind the light, and at the other the lid swings underneath the fixture. This gives you two conditions to check with the unplugged, cold kettle. Measure each from the surface supporting the base. If you can only avoid the fixture by lining up the kettle to a mark each time, ask whether that parked position is practical when you have to lift the body and put it back. A position you can reproduce comfortably is easier to keep than one that depends on a perfect return.
Take three measurements from the same surface
- Counter to obstruction. Measure vertically from the surface that supports the kettle or its base to the underside of the lowest object that sits in the lid’s path. Include a light diffuser, trim, cabinet fittings and any shelf above it. If you are still locating the path, record the heights of two or three plausible obstacles and where each one sits. Write down which one actually limits the motion.
- Closed height. Set the cool kettle down on a stable, level counter with clear space above. Include the usual base if you are evaluating height while it sits on that base, keeping it unplugged and dry. Measure vertically from its supporting surface to the highest point when closed. Repeat on the surface where the body will actually be opened if it is filled off the base. Each configuration gets its own entry.
- Maximum open height. Observe the full motion on that clear counter. Follow the lid edge through intermediate positions and measure its highest elevation above the same supporting surface. If someone can help, have them read the ruler from the side while you handle the cold kettle. Keep fingers and the ruler out of the hinge and the opening path. Include the highest point of the rest of the kettle when recording the height occupied in use.
A scrap sheet behind the kettle can serve as a backdrop for notes if it stands securely away from the motion. Mark the height of the part you are observing with the lid closed, partway open and fully open. Use a vertical ruler or tape from the counter. A tape sloping toward the wall reports a longer distance than the vertical gap. A ruler read at an angle can also make a close fit look better or worse. If the result is close to the resolution of your measuring method, keep the result provisional and check again from a position where you can see both ends of the tape.
The supporting surface matters whenever the kettle sits on a different level. A drainboard and a raised sink rim may look level with the counter in a photograph. For the parked kettle, use the actual flat surface under the whole base. For a permitted filling position where the kettle body is set down without its base, use the surface under the body and take the closed and moving heights there. A counter measurement from the first position and a kettle measurement from the second can be individually correct and still produce an unusable comparison.
If the focus is a side collision, sketch the hinge or lid opening on a top view too. Trace where the back of the lid and your fingers go relative to the wall and cabinet side. Rotate the kettle on the clear counter if the manufacturer allows the orientation you are considering, then watch how the rear sweep changes. Rotation can also move the spout, handle, switch and grip into the space used by another person or appliance. Take a second look at the whole action with the orientation you intend to keep. Treat a vertical clearance result as one piece of this check.
What a negative result tells you
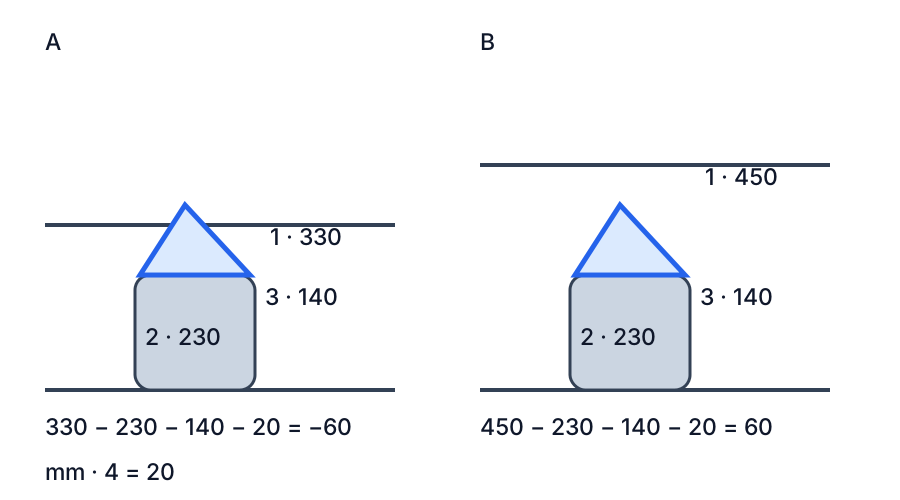
Enlarge the lid-height diagram
Both sides of the sketch use the same teaching example. The number 1 on the drawing marks the overhead boundary, 2 marks the closed height, 3 marks the additional rise and 4 is a separate allowance used for comparison. Read the printed values in millimetres. The example supplies dimensions for a calculation. Use the movement of your own kettle to judge where the obstacle and measuring line belong.
The kettle is 230 mm high closed with its example base. The highest point during opening is 140 mm higher. That puts the maximum open height at 370 mm. At position A, the relevant underside is 330 mm above the counter, so 330 − 370 = −40 mm. The example’s vertical path overlaps the boundary by 40 mm. An optional 20 mm trial allowance compares how much spare space would remain after setting aside that amount. With it, the result at A is −60 mm.
At position B, the boundary is 450 mm above the counter. The same kettle and lid movement leave 80 mm before the trial allowance, and 60 mm after it. Moving the kettle to this second spot is therefore worth testing for lid movement. The trial allowance serves to compare positions under the same assumption. Use the model manual for any required clearances, including where the chosen position can be used for heating. Your hand and jug still need their own check even where the vertical result is positive.
Try positions A and B on the height calculator. It asks for the additional rise, which in the example is 370 − 230 = 140 mm. If you enter 370 in that field, it adds the full open height on top of the closed height, counting the closed height twice. When comparing two locations for the same kettle in the same configuration, keep the closed height, rise and allowance fixed while you change the obstruction height. You will then see how much the location alone changes the result. A change from on the base to off the base is a different comparison and calls for new measurements.
“It says zero. Does the lid touch?” First ask which number is zero. If the remainder before allowance is zero and the two paths line up, the measured lid height meets the obstruction in that model. If the balance after allowance is zero, the measured gap equals your selected allowance. In the example, a 390 mm boundary leaves 20 mm of measured gap and uses the whole 20 mm trial allowance, so the second number is zero. In either case, check the physical sweep with the unplugged kettle before choosing the position. Measurements near a boundary cannot tell you what happens when the base is a little farther back after the next use.
“There’s a gap on paper, but I can see the lid coming towards the light.” Revisit the obstruction you entered and the position where the kettle sat. Compare the low point of the fixture with the lid where their paths cross. When a side wall or front rail intersects the sweep, a positive result on a vertical comparison is only evidence about that particular measuring line. Write down the side obstruction and test another footprint or allowed orientation.
“Could I keep the kettle tucked back and pull it forward every morning?” Test the two states separately with the cold, empty body and the unplugged base. Check whether the whole base stays on a stable surface, whether the front location takes away the space you need to work, and whether the move changes cord routing. If the manufacturer permits a portable body, try moving only that part to a permitted fill position as a separate option. Any movement involving a hot or filled kettle belongs to the manufacturer’s use instructions. If the proposed layout depends on tugging the cord, balancing the base at the lip of the counter or forcing the hinge, stop and choose a different location.
Where to stop. If the lid is clear through the full sweep at a repeatable location, record that position and move to the filling check. If you identified the rail, wall or light that blocks it and there is no workable position on that stretch of counter, end the repeated opening attempts. The next thing to investigate is a separate filling site, an alternative counter position, or a measured comparison with another model.
The lid opens, but the jug or my hand will not fit
Rehearse with the jug empty
A lid check ends at the opening. Filling continues until the jug has tilted toward the opening and returned upright, or until you have finished the product’s other permitted filling procedure. A tall straight jug can fit when upright and hit the cupboard with its rim as it tips. A compact jug can clear the woodwork yet require your wrist to duck below the cabinet edge. Take the filling container you normally use and rehearse the motion dry, with the kettle unplugged, cold and empty. Stand where you ordinarily stand and use the hand you would normally use. Keep both vessels empty for the rehearsal.
Start with the kettle opening the way the manual directs. Bring the jug toward it, turn the spout into position and slowly imitate the tilt and return. At the first awkward point, pause. Ask which object needed more room and in which direction. If the jug’s back clips the cabinet as the spout arrives over the opening, you may need more room at the top or front. If your knuckles approach the cabinet side while you turn the handle, you may need side space or a different orientation. If the kettle opening disappears from view underneath the jug before the pour even begins, the layout may make it difficult to watch where the water goes or check the fill level. Use the fill method and level indicators the manufacturer specifies when you eventually fill the kettle.
Next, check how you close the lid and withdraw the empty jug. In a tight corner it is easy to find one way to get the spout in and then discover that withdrawing it requires you to turn the jug on its side. Take the jug out and set it down in its regular place. A useful trial follows an entire motion with a stable resting spot for each item and accounts for the hand that carries it there. Stop a rehearsal the moment you would have to touch the hinge, hold the lid out of the way by force or brace yourself against an unstable surface to finish the move.
Choose the branch that matches the awkward move
- The jug hits first. If your model allows being filled from a vessel, try a container that is easier to grip and clears the approach and tilt. Rehearse what it takes to set it down and read the fill indication. Keep the proposed pairing specific. A different jug may behave differently, and a jug so small that it makes the process impractical has simply exchanged one problem for another.
- Your hand hits first. Test the grip and the position of the opening once at a different, stable footprint or a manufacturer-permitted orientation. Check again for lid sweep, cable routing and visibility. If more than one person routinely uses the kettle, let them each do the same cold, dry movement in their normal stance. A route that suits one person’s grip can still pinch another’s fingers against the side of the cupboard.
- The closing move fails. If the lid only closes from an angle where you cannot reach or see it, check where you stand and how much room the raised lid leaves for your hand. An open position that exposes the filling hole still has to allow the closure described in the instructions. The same applies when a detached lid needs to be set down and picked back up.
- Liquid or splashes are the concern. Check the manual for how to fill the kettle and where it should be set. Where the dry rehearsal shows a narrow entry, poor visibility or a route passing over the connector, choose a permitted fill method and location that keeps the base, connector, plug and cord dry. If a part is already wet, leave it disconnected and follow the manufacturer’s instructions for that situation.
“Could I add water through the spout and leave the lid shut?” Check the directions for the exact kettle. Some designs and fill arrangements have their own requirements, and a spout that admits water does not settle what the maker permits or whether you can monitor the level. Use the designated fill opening and procedure. If the specified method needs more room, try a different location before abandoning the way the unit is meant to be handled.
“I can reach the opening if I stretch in from the side. Is that enough?” Compare the dry rehearsal with what you can do from your usual stance, including taking the jug away, closing the lid and looking at the fill indicator. If the stretch is the only way around a protruding light or wall, record that point as the obstruction and look for a position that removes it. A stable position with a straightforward grip is useful even when you only prepare a small amount of water. The rehearsal shows where the motion binds. An empty jug cannot establish how a filled one feels to handle.
A quick trial can end here. If the lid opens correctly, the empty vessel moves freely and the manual permits the proposed filling method, note where you set down the vessel and where the base stays dry. Proceed to the independent placement check before using that footprint for boiling. If pouring remains awkward after one change that directly addresses the obstruction, test whether a permitted sink-side filling position works better.
I can open the lid by the sink, but is it practical to fill there?
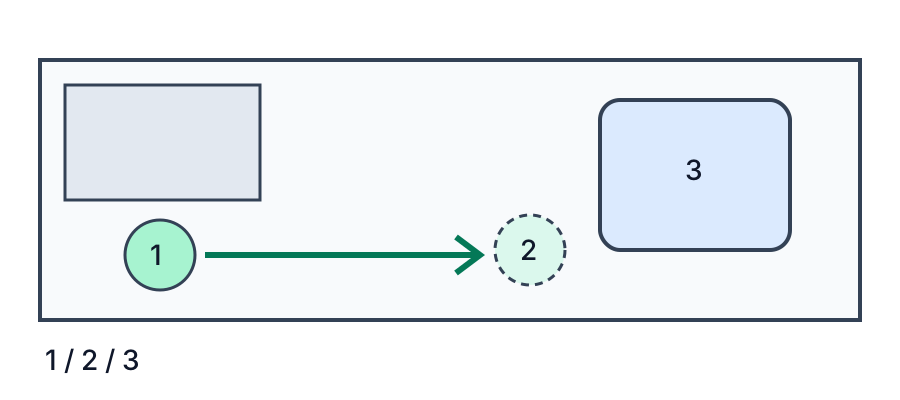
In the top view, 1 is where the kettle normally sits, 2 is a temporary resting spot and 3 is the sink. The arrow follows an empty body, cool and disconnected, in an arrangement where the manufacturer allows filling it off the base. The base and cord stay in the dry location. The drawing is schematic. Its symbol next to the sink represents a spot to assess. It does not supply an approved placement distance or require setting the kettle in the basin.
Run the trip in both directions
Read the filling and handling instructions before lifting the body. If the manual permits removing the body from the base for filling, unplug the kettle and wait for it to cool fully, then empty it as directed. Rehearse with the empty body. Start with the usual handle grip and lift it just as far as it needs to clear the base. Transfer it toward the temporary position without passing it over the cable or reaching across other appliances. Check that the underside of the body and the connector stay dry.
Use the diagram’s second point to decide exactly where the kettle will rest. Is that a level patch of counter large enough for the whole body? Can you stand beside it without opening a cabinet door into your legs or reaching around a drying rack? If the candidate surface is sloped, wet or partly occupied by the sink rim, find a different surface for the trial. A temporary set-down location is useful when you can actually free your hands there and control the tap or a vessel from a stable stance.
Rehearse approaching the tap dry, if the product permits direct filling. Compare the skirt of the tap and its outlet with both the body and the moving lid. Check whether you can bring the opening under the outlet, see any indicator required for fill level, and move the body away without trapping the handle under the tap. Check how the tap is operated and whether that action interferes with your control of the kettle. Let the maker’s instructions decide whether you can fill directly under the tap or must use another method. If the move leaves the connector in the splash area or makes the kettle touch the basin or sit unsteadily, stop there and consider a permitted alternative.
Walk back with the dry, empty kettle. The outbound trip can be clear and the return awkward. A handle that points toward the sink on arrival may require a different grip to set the kettle back on its base. A drawer may be easy to step around going out and in the way when you face the opposite direction. Pick a route on which you can see where the kettle body is going and put it back on its dry base using the manufacturer’s procedure. Identify where a filled kettle would travel. The empty rehearsal maps the path, and the maker’s fill and handling directions govern actual use.
The time of day can change the route without changing the measured heights. A sink-side patch that works before breakfast may be covered by a drainer or a chopping board during dinner preparation. Put those typical objects where they would normally be and repeat the empty trip. The test does not need a staged cluttered kitchen. It only needs the obstruction you actually encounter. If the trip depends on moving half the work area first, find a place that stays available when you use the kettle or identify one item you can realistically relocate.
Read the cause of a failed trip
The sink is close, but lifting off the base already feels cramped. Watch the first part of the lift. The body may have to rise before it can move sideways, and the top of a closed kettle or your fingers may enter the area under the same rail that blocked the lid. Check the lift in the location where the base ordinarily stays. If the movement is constrained there, an open filling spot at the other end of the route cannot solve the first step. Try a different dry base position that also has enough room to lift and reseat the body.
The tap is low, but there is open counter beside it. Separate setting the kettle down from bringing the water to it. A model that permits filling with a vessel may work well on that nearby patch even if its lid cannot move comfortably under the tap. Take the empty jug and kettle through the permitted filling actions side by side. Watch where the tap water would go when collecting it and whether the kettle’s connector would be exposed to splashes. Revisit the original awkward move so the change addresses it. A spot under another cabinet next to the sink can reproduce the same jug problem you began with.
The path is open only when the dishwasher is closed. Rehearse the actual context in which you normally make a drink. If the permitted route requires stepping around an open door or carrying water across an active cooking area, choose another time or location where the route is clear. Keep the dry base and the filling position distinct on your sketch so you can see which part needs to move. A shorter trip has little value if it passes through a working position that is occupied while you use the kettle.
My kettle has a fixed cord or filling instructions I cannot confirm. Keep the base and connector dry and follow the product’s specified filling arrangement. Do not copy the separated body in the drawing if the model doesn’t allow it. A model number on the body or an instruction booklet for that exact unit can help resolve the question. If the permitted filling procedure is unclear, pause that trial and get the instruction from the manufacturer before considering any move toward water.
Where to stop. Record a route only after you have a stable temporary spot, a permitted filling method and a clear path back to the dry base. If only one link in the trip fails, change that link and repeat the dry run. If the manual does not allow the proposed move, cross the route off and return to realistic dry-counter choices. Once the route works for the cold rehearsal, check the conditions for any real filling and operation in the manual.
The arrangement works for filling. Where can I boil the kettle?
The space used to lift the lid, the space used to fill the kettle and the place where the appliance runs serve different purposes. A higher section of counter can make the lid effortless and still leave the steam outlet aimed toward a surface the maker says must be clear. A sink-side position that works with the unplugged body may be unsuitable for the powered base. Decide where each task takes place and apply the model instructions to every task.
Look for the maker’s placement, filling, operation and steam guidance for the exact model and power base. If an instruction calls for a clear area above or around the appliance or rules out certain locations, compare it with the actual position of the kettle, surrounding panels, walls, lights and nearby objects. Check what is above and behind the spout or steam outlet in your chosen orientation. A cabinet door or shelf is a surface in that path even if the lid’s hinge is safely underneath and the opening motion is clear.
For access, observe the outlet and cord route while everything is unplugged. Can you put the body down where intended without a cord entering the sink-side work area, crossing a walking path, catching on items or hanging where it may be pulled? Can you reach the designated controls and plug as the manufacturer directs? If the proposed alternative would require changes to wiring, an adapter or a power arrangement that is not described in the instructions, leave the location unresolved and obtain the appropriate guidance. Clear space over a lid supplies no answer about the condition or suitability of an electrical connection.
If you notice condensation, moisture near the electronics, evidence of damage or a recurring fault, stop the use of that setup and follow the maker’s instructions for what you observed. Avoid a trial boil as a way of diagnosing an unverified location under a cupboard. Where materials and their finishes could be affected, consult the relevant care instructions or installer as well. A visible dry surface at the time of a cold check says little about what happens with heat or steam. The fastest way to sort the questions is to read the model-specific placement guidance before picking between the locations that passed the dry checks.
“Can I apply the diagram’s 20 mm as a steam gap?” Use the clearance and placement conditions for the model. The 20 mm belongs to the geometry example and is subtracted from the room above the moving lid. The lab knows those dimensions and cannot observe the location of the steam outlet, the type of cabinet finish or the manufacturer’s operating requirements. Keep the geometry in the worksheet beside the manual guidance so you can see where each decision came from.
“The manual gives a placement condition, but I am unsure where the measurement begins.” Record the wording, the model and the surface or part you think it refers to. Ask the manufacturer to clarify before relying on that location. Measurements from the counter to a cabinet and from an appliance surface to an obstruction answer different questions. Until you know which dimension the maker meant, a large gap in the lid exercise cannot resolve the placement question.
It works on the clear counter. What should I change first?
Start with the smallest change that removes the observed obstruction while respecting the manual. If the hinge or light causes the collision, first test a repeatable position with a clear sweep. If the swing is clear and a jug hits, first change the jug’s approach or the permitted filling location. If lifting the body is the problem, watch the entire lift and return before trying to shorten the route to the sink. Test one change at a time. With several changes made together, it is difficult to see which one helped and which introduced a new constraint.
Three counter layouts to compare without remodeling
A tall opening on the same run of counter. Suppose the side beneath the cabinet is the 330 mm example and the spot by the end of the run is the 450 mm example. Keep 230 mm closed and 140 mm added rise when comparing the same base and orientation. The arithmetic supports testing the end of the run for the open lid. At that new spot, watch the side of the wall, the working stance, where the jug rests and the available power arrangement. If the spot clears the lid but puts the cord into a wet area, record it as a candidate for the manufacturer-permitted cold filling steps only, or drop it if those steps also fail.
A corner that blocks a hand rather than the lid. Imagine the same kettle under a shelf with sufficient vertical gap, placed next to a side wall. The open lid clears, but the grip forces the jug hand against the wall during the approach. Move the body away from the side wall on a dry, stable worktop, or test a permitted orientation so the grip has a clear line. Keep the gap behind the hinge in view because moving the kettle laterally can bring the lid below another light or fitting. Repeat the whole movement and write down the first object that would touch. If the grip works at the new spot but must point over the counter edge, assess a wider section instead.
A kitchen with several short work surfaces. Imagine an uncluttered stretch where the base can sit and a separate flat patch by the sink where there is enough room to fill. The two spots each solve part of the job, provided the manual permits the arrangement and you can return the body without crossing the cooking area or moving the base into the wet zone. Dry run the lift, transfer and return with the normal furniture and appliances in place. If the route becomes impractical while those other appliances are used, reconsider the positions together. For a project that groups multiple countertop appliances, the appliance garage sizing guide covers access as a layout problem. Where a knife block shares the same stretch, its upper-cabinet clearance guide gives the separate removal check.
These are hypothetical layouts for diagnosing different causes. The useful observation is the point where the motion fails and whether the one proposed change fixes it. In a shared kitchen, note whether the changed position stays clear when other people use the counter. In a narrow passage, pay attention to where you have to stand for the return trip. And if you have a separate prep task that always occupies the proposed resting spot, treat that position as unavailable during normal use.
When a different kettle becomes the sensible comparison
Compare models after you have identified what the space requires. If the overhead obstruction is the deciding condition, get measurements for the closed height including its usual base and the highest point during the actual opening or lid removal procedure. If the filling hand or vessel is the deciding condition, check the grip orientation, opening position and manufacturer’s filling procedure. If the route is the issue, ask whether the body is designed to be removed for filling and how it is returned to the base. Descriptions such as compact, wide opening or removable lid leave out the motion you need to understand.
If you can inspect a model in person with permission, ask to see the dry opening and closing motion and how it sits on its own base, without plugging it in. When you have only product drawings, look for where their dimensions start and end. Ask for the maximum opening height measured above the same worktop as the base, and mention a rail or side wall if that is what actually stops the lid. If the answer supplies only the closed height again, leave the open height unknown. Your current kettle’s rise is an input for your current kettle.
If the candidate uses a lid that can come fully away, check that the release action, the space for your hand and a place to set the detached lid all work. You might gain useful clearance at the cabinet and lose the place on the counter where you normally put the jug. A smaller body can leave more counter area available yet have its opening or handle positioned in a way that changes the movement. Use the same dry-run checklist for both options and keep instructions for the proposed model alongside their dimensions.
Write down what would change your decision
Use the kettle position worksheet to record the exact model, location and date. Include the cabinet feature you measured, the supporting surface and whether the base was in the setup. Note the closed and maximum open height, then calculate the additional rise from those two measurements. Name the reason for any chosen trial allowance. It might help you compare the effect of slightly different parking positions, but the worksheet keeps it separate from the measured gap and any clearance stated by the manufacturer.
Then add one sentence about the whole route for the lid and one about what happened with the filling vessel. State where the hand or jug ran out of room. If you are trying a separate filling station, add the temporary resting spot, the usual base position, and what changes on busy days. Identify the manual wording or section you are using for filling, steam and electrical placement. If you cannot find an answer, leave the relevant measurement blank or mark that permission as unresolved and record who can clarify it. When you later compare notes, that open item will be easier to spot than a guessed dimension folded into the total.
Here is a useful way to close out the teaching example. At A, the −40 mm physical comparison resolves why the lid would hit if the example paths align. At B, the 80 mm gap supports a dry check at the new spot. With the 20 mm trial allowance, −60 mm and 60 mm distinguish the two assumed positions without changing the kettle. The decision still depends on the real sweep, grip and jug, the permitted route if filling elsewhere, and the instructions for the actual operating position. Save the first confirmed result and name the next unresolved action. If the lid already clears and the jug is the only problem, leave the cabinet measurements alone and spend that effort on the filling motion.
TRY THE EXAMPLE
Compare the open kettle lid envelope
Measure from the same counter to the obstruction and to the highest point of the closed and open kettle. Enter the additional rise, not the full open height, and a separate trial allowance.
Allowed range: 1–2000 · Step: 1
Allowed range: 1–1000 · Step: 1
Allowed range: 0–1000 · Step: 1
Allowed range: 0–500 · Step: 1
A negative remainder means the selected allocations overlap. Change the inputs or the proposal.
- Remainder before allowance
- -40 mm
- Balance after allowance
- -60 mm
330 − 230 − 140 − 20 = -60 mm
Check the full lid sweep, hand and filling vessel, product instructions, steam and electrical placement separately; this vertical example does not approve operation.
Teaching assumptions, not a surveyed home or a construction check. Results describe this simplified geometry or budget only. Changes stay on this page and reset on reload.