Home Art Studio Layout: Lighting, Storage, and Flow
Plan a home art studio with accurate daylight, task lighting, easel and table clearances, wet and dry zones, storage, ventilation, cleanup, and safe power.
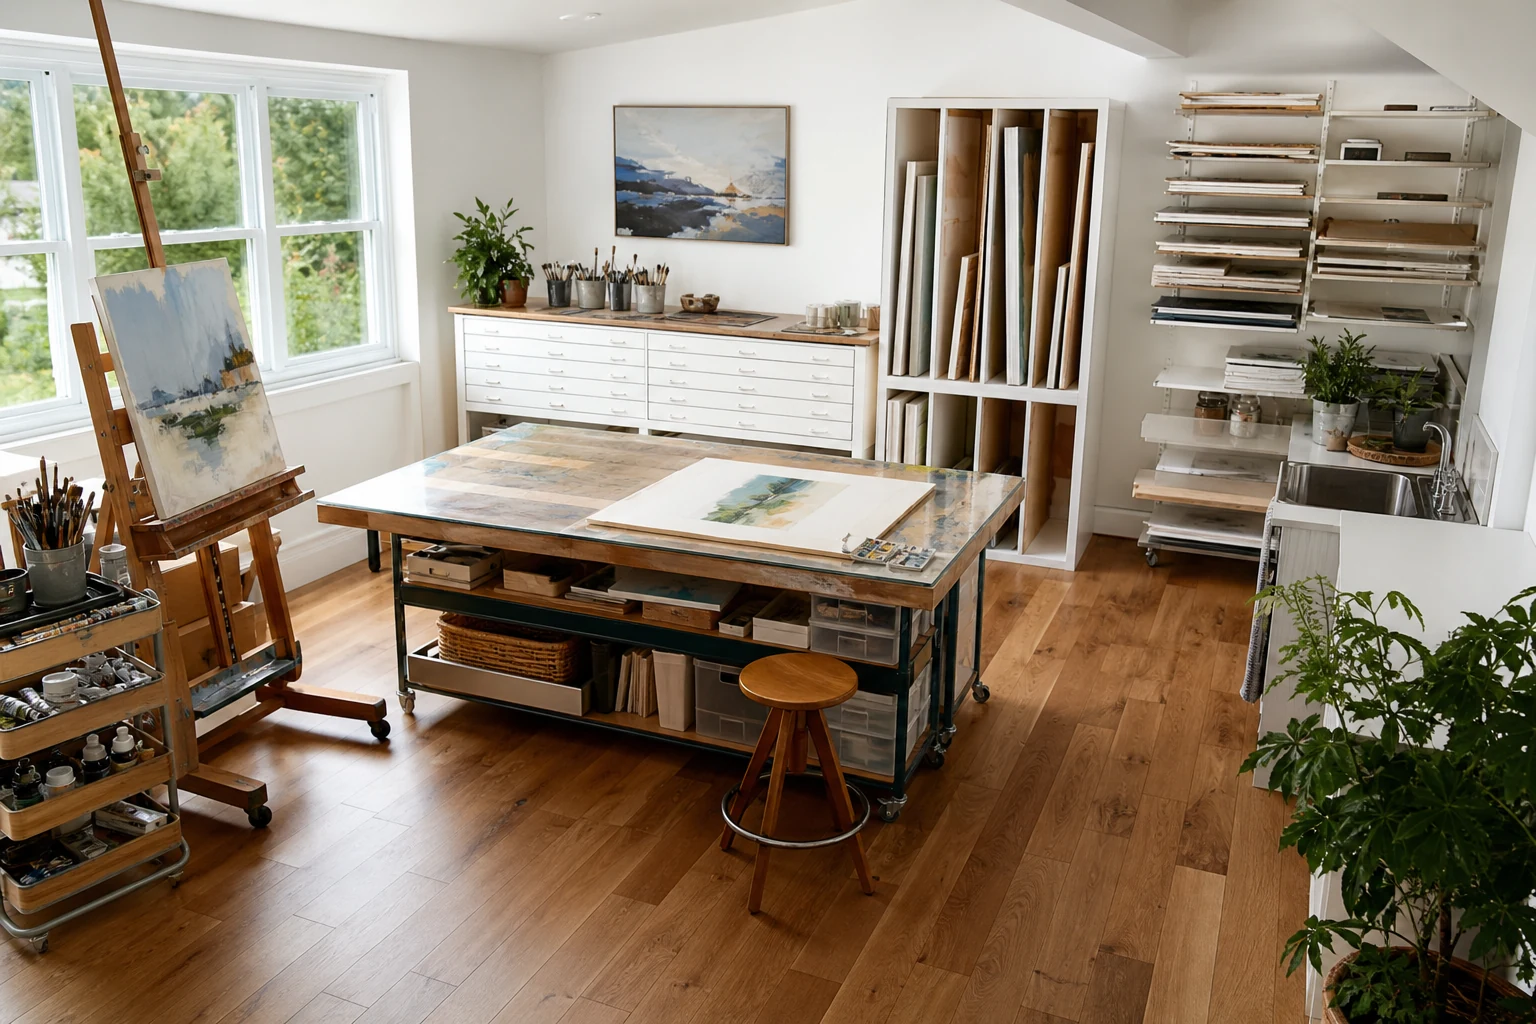
A home art studio needs to support making, drying, storing, cleaning, and reviewing work. A room can look inspiring while forcing the artist to carry wet paper across a laptop, stack canvases against a radiator, or paint with changing color from mixed lamps. Design the sequence from materials entering the room to finished work leaving it.
Define the Medium and the Mess
Oil painting, watercolor, drawing, printmaking, ceramics, textiles, and digital work need different surfaces, ventilation, water, power, and storage. List the largest normal work, the heaviest tool, every liquid, and how long work remains wet. Separate occasional ambitions from weekly practice; a permanent kiln zone is not justified for someone who only sketches at home.
Record hazards as well as furniture. Solvents, dust, heat, sharp tools, pigments, and children or pets change the room requirements. Follow product safety data, local fire and electrical rules, and professional advice for hazardous materials. A spare bedroom is not automatically suitable for every process.
Map a One-Way Workflow
Create zones for material storage, setup, making, drying, review, photography, and cleanup. Arrange them so wet or fragile work travels the shortest distance. A painter might move from vertical canvas storage to easel, then to drying rack, then to review wall. A watercolor artist may need paper storage, a large flat table, clean water, drying boards, and a protected archive.
Keep shipping materials and finished work near the exit rather than behind the active easel. Put cleaning tools at the sink or cleanup cart. The workflow does not need rigid walls; a rolling cart or floor marking can define each zone while allowing the room to change.
Use Daylight as a Reference, Not the Only Light
North-facing daylight in the northern hemisphere is often valued for its relatively consistent character, but orientation, climate, neighboring buildings, glazing, and season matter. Direct sun can create glare and rapidly changing contrast. Use adjustable blinds or diffusing curtains and keep valuable work away from prolonged ultraviolet exposure.
Add high color-rendering task light with a consistent color temperature. Mount or position lights so hands and the artist’s body do not cast a strong shadow over the work. For an easel, two balanced sources can reduce glare and reveal surface. For a table, broad light from the side and above is usually more useful than one point fixture.
Do not mix several unrelated lamp colors when judging paint. A separate warm ambient mode can make the room pleasant after work, but the review mode should be repeatable. The lighting guide for small rooms offers a method for layering ambient and task light.
Give the Easel a Movement Envelope
An easel footprint is only the start. Add the canvas width, rear support, artist standing distance, a step-back review position, palette cart, and route around wet edges. For large work, the artist may stand 1.5–3 m back to judge composition. That view corridor should not end in a door or storage pile.
Place the easel where changing daylight does not shine directly into the artist’s eyes. Keep it away from radiators and strong vents that dry paint unevenly. If the easel rolls, lock the casters and preserve a flat floor.
Size a Table for the Largest Repeatable Task
Measure the largest paper, cutting mat, textile, or print plate used regularly, then add hand and tool space. A worktable 75–90 cm deep can support many seated and standing tasks, but posture and medium determine height. Use an adjustable chair or table where different activities alternate.
Keep at least one clear edge for clamping. Rounded corners reduce injury in a tight room. Draw stools and chairs pulled out, cabinet drawers open, and long rulers in use. A central island can be efficient in a square room but becomes an obstacle in a narrow one; a wall table with a mobile cart may be better.
Store Flat, Vertical, and Small Materials Separately
Paper and finished flat work need supported, dry storage. Canvases and boards can use vertical slots with dividers so one piece can be removed without moving the stack. Small tools need shallow drawers or visible containers close to their task. Deep mixed bins are where brushes, blades, and clips disappear.
Heavy materials belong below waist height. Frequently used colors and tools belong within a comfortable reach arc. Keep an empty “project in progress” tray so the main table can reset without mixing active work into permanent storage. Photograph or label closed drawers using a system that remains easy to update.
Separate Wet and Dry Zones
Keep water, ink, paint, clay, and cleanup away from computers, paper archives, and charging equipment. A sink should have a splashback, reachable towel, durable worktop, and storage for approved cleanup supplies. Never pour materials into drains unless product and local disposal guidance permit it.
Drying racks need airflow and enough spacing to avoid contact. Place them outside the main path, but not in an unventilated cupboard. Provide a temporary quarantine surface for wet brushes, solvent containers, or glazed pieces so cleanup does not compete with making.
Plan Ventilation for the Actual Process
Opening a window is not a complete ventilation strategy for solvents, spray, dust, or kiln emissions. Identify the contaminant and use source capture, rated equipment, storage, and personal protection appropriate to the medium. Some processes should be moved to a dedicated workshop rather than a living-space studio.
Keep exhaust and fresh-air paths free. Do not place paper, fabric, or solvents near heaters. Store flammables only as regulations and product guidance allow. Install smoke, heat, or carbon-monoxide detection appropriate to the space and process.
Make Cleanup the Easiest Final Step
Put waste sorting, brush cleaning, cloth storage, and floor tools where the work ends. Choose a floor that can be cleaned without creating a slipping hazard. Use a protective mat under messy zones, but tape or bevel edges so carts and feet do not catch.
Set a five-minute reset target: return tools, move work to drying, wipe the surface, close hazardous materials, and clear the exit. If the layout makes this impossible, storage is too far away or the permanent equipment count is too high.
Simulate Three Projects
Build the room in Aedifex with real work sizes, easel movement, open drawers, table, carts, drying racks, lights, outlets, and sink. Simulate a small daily study, the largest monthly project, and cleanup after an interrupted session. Use the room planner to compare a central table with a perimeter layout.
Home Art Studio Checklist
- Define the weekly medium, maximum work size, liquids, heat, dust, and drying time.
- Map storage, setup, making, drying, review, photography, and cleanup in order.
- Control daylight and use repeatable high-color-rendering task light.
- Add the artist’s step-back view and palette cart to the easel footprint.
- Size the worktable for the largest regular task and preserve a clamping edge.
- Separate flat, vertical, small, heavy, and in-progress storage.
- Keep wet work, cleanup, computers, archives, and power in safe zones.
- Design ventilation and disposal for the actual material, not a generic studio.
- Make a five-minute safe reset possible.
The best studio keeps attention on the work instead of the room. Once the workflow is safe, use the interior planner to compare durable finishes and register to save the chosen studio configuration.
Home Art Studio Layout: Lighting, Storage, and Flow
Independent teaching assumptions: Measure 3200 mm from the wall behind the easel to the opposite fixed boundary, including the easel and its rear support. Allocate 600 mm to that complete easel, 1400 mm to stepping back and an independently assumed 1000 mm to carrying wet work; the calculation implies no ventilation or material-safety performance.
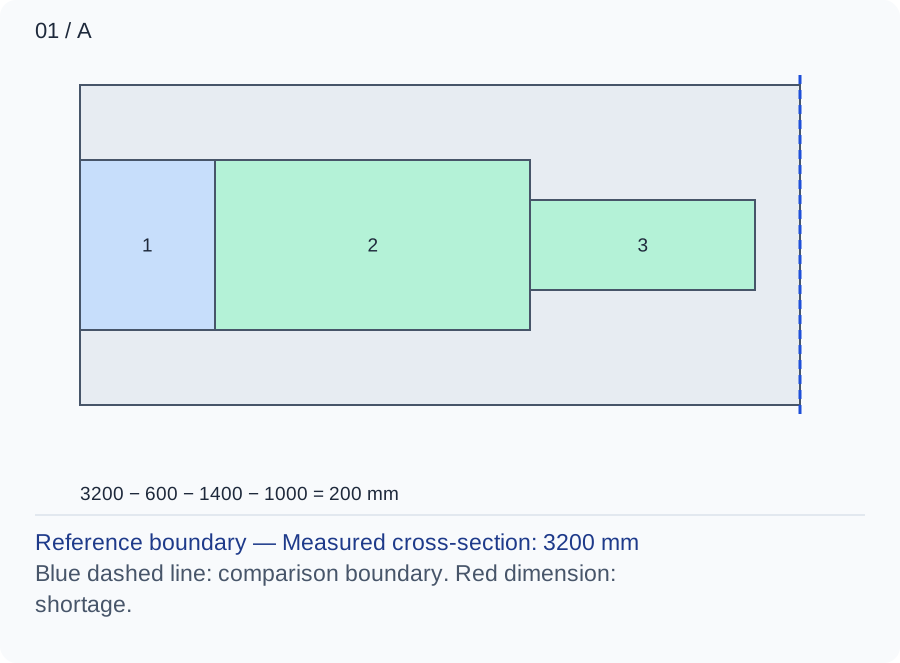
The review distance and wet-work route are simultaneous demands when someone carries a drying board behind the artist. 3200 − 600 − 1400 = 1200 mm remains; after the 1000 mm trial envelope, 200 mm remains.
Numbers and marks identify the items described here; use the stated dimensions rather than measuring the screen.
1: fixed occupation; 2: operating extension; 3: chosen user or route allocation. These are sequential allocations, not exact furniture positions.
| Input | A | B |
|---|---|---|
| Measured cross-section (mm) | 3200 | 3200 |
| Fixed occupied depth (mm) | 600 | 600 |
| Extension during use (mm) | 1400 | 1800 |
| Tested user envelope (mm) | 1000 | 1000 |
Changed conditions and evidence
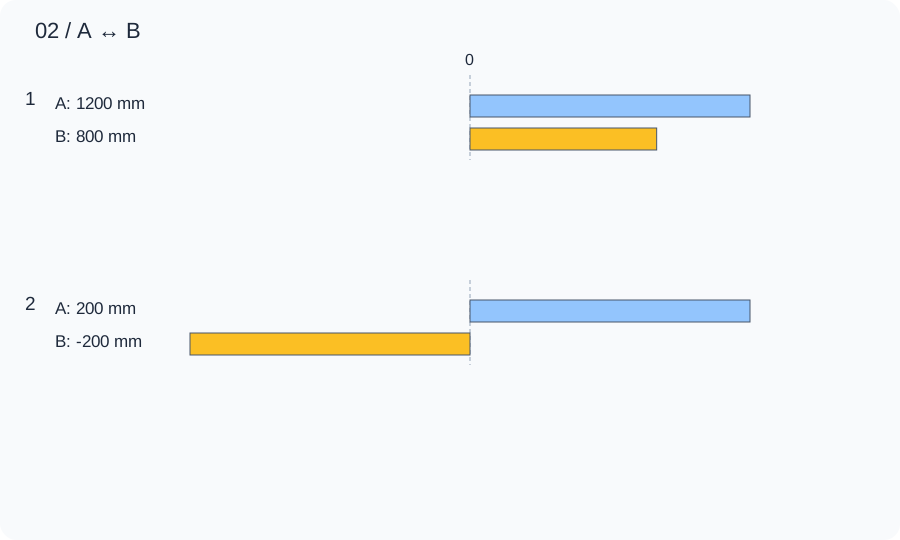
Stepping back 1800 mm overlaps the carrying reservation; relocate the drying rack to the same side as the easel or schedule tasks separately, trading storage location or workflow flexibility for clear movement. 3200 − 600 − 1800 = 800 mm remains; after the 1000 mm trial envelope, -200 mm remains.
| Calculated relationship | A | B |
|---|---|---|
| 1. Unoccupied cross-section | 1200 mm | 800 mm |
| 2. Remainder after the stated allowance | 200 mm | -200 mm |
Carry a dry dummy board of the largest regular size from easel to drying rack while another adult marks the review position. Assess real media, ventilation, spill control and disposal with appropriate guidance; never use hazardous wet materials for the layout trial.
TRY THE EXAMPLE
Home Art Studio Layout: Lighting, Storage, and Flow
Independent teaching assumptions: Measure 3200 mm from the wall behind the easel to the opposite fixed boundary, including the easel and its rear support. Allocate 600 mm to that complete easel, 1400 mm to stepping back and an independently assumed 1000 mm to carrying wet work; the calculation implies no ventilation or material-safety performance.
Allowed range: 1–10000 · Step: 1
Allowed range: 0–10000 · Step: 1
Allowed range: 0–10000 · Step: 1
Allowed range: 0–10000 · Step: 1
Positive remainder under these assumptions. Check the actual use and product requirements before choosing a layout.
- Unoccupied cross-section
- 1,200 mm
- Remainder after the stated allowance
- 200 mm
Reference boundary — Measured cross-section: 3200 mm
Blue dashed line: comparison boundary. Red dimension: shortage.
3200 − 600 − 1400 − 1000 = 200 mm
Carry a dry dummy board of the largest regular size from easel to drying rack while another adult marks the review position. Assess real media, ventilation, spill control and disposal with appropriate guidance; never use hazardous wet materials for the layout trial.
Teaching assumptions, not a surveyed home or a construction check. Results describe this simplified geometry or budget only. Changes stay on this page and reset on reload.