Home Coffee Bar Layout: Dimensions, Storage, Workflow
Design a home coffee bar with correct counter depth, appliance headroom, water and waste flow, mug storage, landing space, lighting, power, and cleanup.
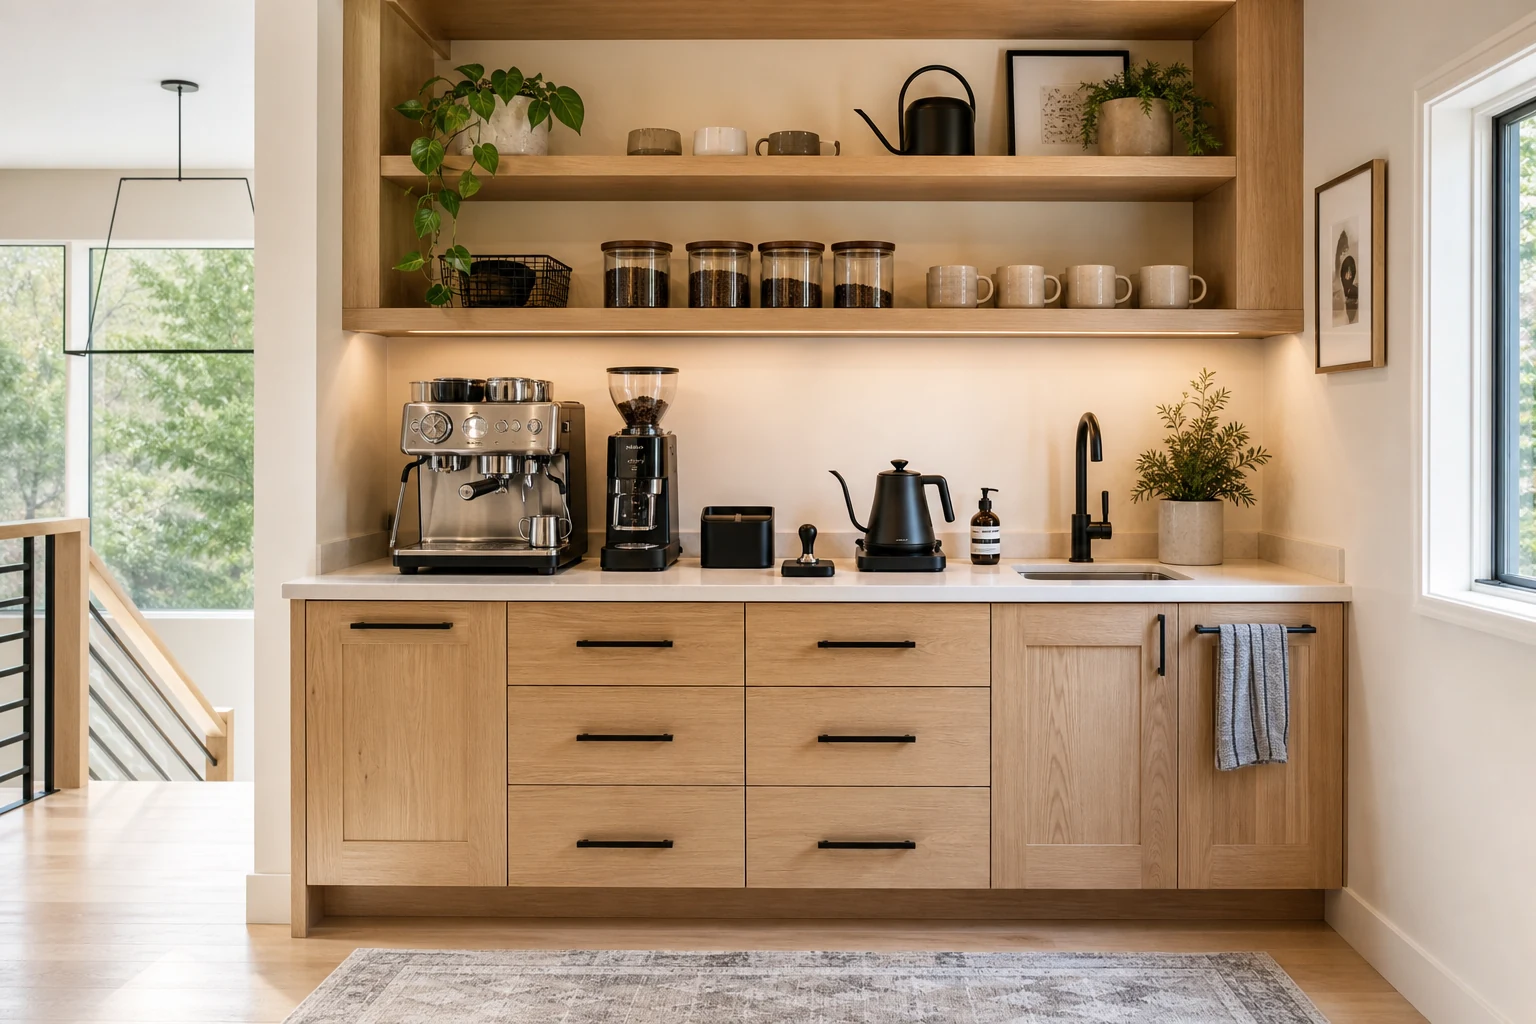
A home coffee bar is a short production line: collect water, grind, dose, brew, steam, serve, knock out, rinse, and reset. A stylish alcove fails when the espresso machine cannot refill under a shelf, the grinder sprays grounds onto the floor, or two mugs consume the only landing area. Measure each appliance in use, not only its retail footprint.
Choose the Workflow Before the Cabinet
Write the sequence for the household’s normal drink. Espresso may require beans, grinder, scale, dosing tools, machine, milk, pitcher, knock box, rinse, and cup. Filter coffee may need kettle, dripper, papers, server, and waste. Tea adds tins and a safe hot-water landing. Build the station around the repeated sequence rather than every possible gadget.
Arrange clean-to-dirty from one side to the other. For example: bean storage and grinder, preparation space, brewer, serving area, knock box and sink. Right- or left-handed use may reverse the direction. Keep the refrigerator or milk drawer within a short route that does not cross the main kitchen cooking zone.
Measure Appliances in Operation
Record width, depth, full height, cord and plug projection, door or lever movement, water-tank removal, bean-hopper refill, drip-tray removal, steam-wand swing, and required ventilation. An espresso machine 40 cm deep may need 50–60 cm of usable counter depth once hoses, plug, cup rail, and hand access are included.
Check whether the water tank lifts upward or slides out. A machine can fit under a shelf while being impossible to refill. Tilt-head grinders and lever machines need vertical movement. Follow manufacturer clearances and do not enclose equipment that releases heat or steam without suitable ventilation.
Set Counter Depth and Height From the User
A standard kitchen counter around 60 cm deep suits many stations, but shallow sideboards around 35–45 cm may only fit compact brewers and can leave handles or cords projecting. Measure the exact equipment. Keep the front edge stable and free enough for tamping, pouring, and setting down a hot cup.
Standard counter height is comfortable for many tasks, but espresso tamping can benefit from a slightly lower surface for some users. Test wrist and shoulder position. Accessibility or seated use requires individualized knee space, reach, and appliance controls; follow local guidance and the actual person.
Preserve Landing and Preparation Space
Do not fill the full counter with equipment. Keep a continuous clear area roughly 40–60 cm wide as a starting point for weighing beans, placing two cups, pouring, and assembling a drink. Larger households or pour-over setups may need more. Put the clear zone between grinder and brewer so it serves both.
Hot kettles and portafilters need heat-resistant landing. Avoid carrying boiling water across the room or over a person’s lap. If the coffee bar is inside a cabinet, confirm doors can stay fully open without narrowing the working aisle or trapping heat.
Put Water, Milk, and Waste Close Together
A sink is convenient but not mandatory if a safe nearby route exists. Measure the trip with a full water tank and a dripping tray. A small bar sink needs splash control, a reachable towel, and enough room to empty the knock box without hitting the faucet.
Plumbed machines require filtration, shutoff, leak protection, drainage, service access, and installation according to the manufacturer and local plumbing rules. A leak sensor beneath the station can limit damage. Never hide a shutoff behind a fixed appliance.
Place a sealed grounds bin or knock box beside the machine, not across the kitchen. Compost only where local systems accept the material. Store milk close enough for the workflow while returning it promptly to refrigeration.
Store Cups and Tools by Reach
Daily cups belong within comfortable reach and should not require leaning over a hot machine. Shallow drawers are useful for scales, filters, spoons, cleaning brushes, and spare seals. Beans should be stored according to roaster guidance in a cool, dry place away from heat and direct sun.
Upper shelves should be shallow enough to see and retrieve items safely. Heavy stacks of mugs need load-rated support. Keep specialty tools and backup supplies away from the daily zone so the counter resets quickly.
Plan Outlets and Cables Safely
Count the simultaneous loads: machine, grinder, kettle, refrigerator, and lighting can exceed what one casual power strip should serve. Have a qualified electrician size circuits, outlets, residual-current protection, and placement for local rules and equipment. Keep plugs accessible and away from splashes and steam.
Route cords without crossing the preparation surface or touching hot equipment. Avoid tightly coiling high-load cords. Built-in cable grommets need edges, ventilation, and service access suited to the appliance.
Light the Work, Not the Shelf Edge
Place task light toward the front of the upper shelf so hands do not shadow the scale and cup. Use a neutral, glare-controlled light that makes spills and grounds visible. Warm ambient shelf light can remain separate. Keep fixtures rated and clear of steam as required.
If the station is near a window, direct sun can heat beans and machines and create glare on displays. Use an adjustable window treatment without blocking ventilation.
Control Steam, Heat, and Noise
Espresso machines, kettles, and some brewers release heat and moisture. Preserve top and side clearances, use moisture-resistant surfaces, and ventilate an enclosed cabinet. Wipe condensation beneath shelves. Do not place heat-sensitive art, plants, or electronics directly above steam.
Grinders and pumps can disturb a sleeping household. Use stable feet or a manufacturer-approved mat, secure rattling cups, and avoid sharing a lightweight wall with a headboard if early use is common. Soft-close drawers reduce the rest of the noise.
Rehearse Cleanup Without a Time Guarantee
Record the time for your own routine only after following the appliance’s cleaning, cooling, and maintenance instructions. A short route is useful, but neither this layout nor a 90-second target establishes that every machine can be cleaned safely in that time.
Place cloths, brush, approved cleaner, spare water, waste, and drip-tray route within one or two steps. Choose a counter and backsplash that resist coffee acids and stains according to material guidance. Keep a washable floor area in front and avoid a thick rug that catches grounds and water.
Run the reset after every typical drink: knock out, purge, wipe wand, rinse, empty grounds where needed, return milk, wipe counter, and restock cups. If cleanup crosses the room repeatedly, move water, waste, or storage closer.
Simulate the Morning Queue
Build the coffee bar in Aedifex with appliances, open water tanks, steam-wand swing, doors, drawers, two users, mugs, milk route, and waste. Test one quick coffee, two different drinks, refilling beans, and deep cleaning. The kitchen pantry guide can help connect bulk storage without crowding the daily station.
Use the room planner to compare an open alcove, appliance cabinet, and mobile cart. Choose the version that keeps landing, water, and cleanup continuous.
Home Coffee Bar Checklist
- Write the actual drink sequence and choose its left-to-right direction.
- Measure each appliance with tank, hopper, lever, tray, wand, plug, and door moving.
- Match counter depth and height to the equipment and user.
- Preserve roughly 40–60 cm of clear preparation and landing space as a starting point.
- Keep water, refrigeration, grounds, rinse, towel, and waste within a short route.
- Provide filtration, shutoff, drainage, leak access, and a sensor for plumbed equipment.
- Store daily cups and tools within reach, away from heat and steam.
- Use qualified electrical design for the simultaneous appliance load.
- Add front-positioned task light, ventilation, moisture-resistant surfaces, and noise control.
- Make the daily cleanup loop fast enough to repeat every time.
A good coffee bar makes the second drink easier than the first. Once the sequence works, use the interior planner to compare cabinetry and finishes, then register to save the measured equipment layout.
Home Coffee Bar Layout: Dimensions, Storage, Workflow
Assume a coffee bar has 600 mm usable counter depth and a 400 mm machine. Add a hypothetical 100 mm plug-and-hose envelope and 80 mm front handling allowance; these are not manufacturer ventilation values.
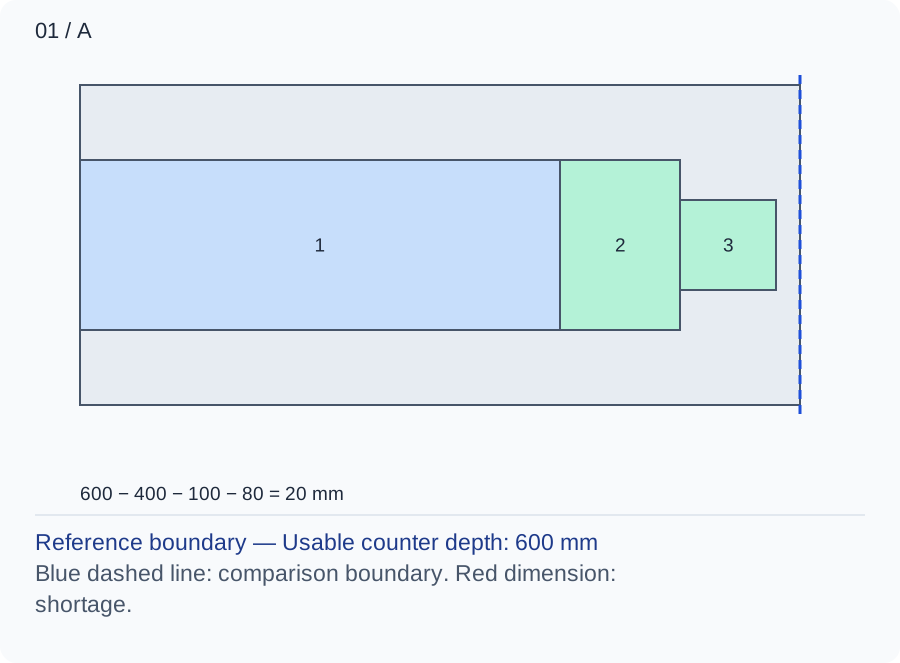
The drawing distinguishes connected depth from the bare case. 600 − 400 − 100 = 100 mm before handling, or 20 mm beyond the assumed front task envelope.
Numbers and marks identify the items described here; use the stated dimensions rather than measuring the screen.
1: fixed occupation; 2: operating extension; 3: chosen user or route allocation. These are sequential allocations, not exact furniture positions.
| Input | A | B |
|---|---|---|
| Usable counter depth (mm) | 600 | 450 |
| Machine body depth (mm) | 400 | 400 |
| Connected plug and hose depth (mm) | 100 | 100 |
| Front handling allowance (mm) | 80 | 80 |
Changed conditions and evidence
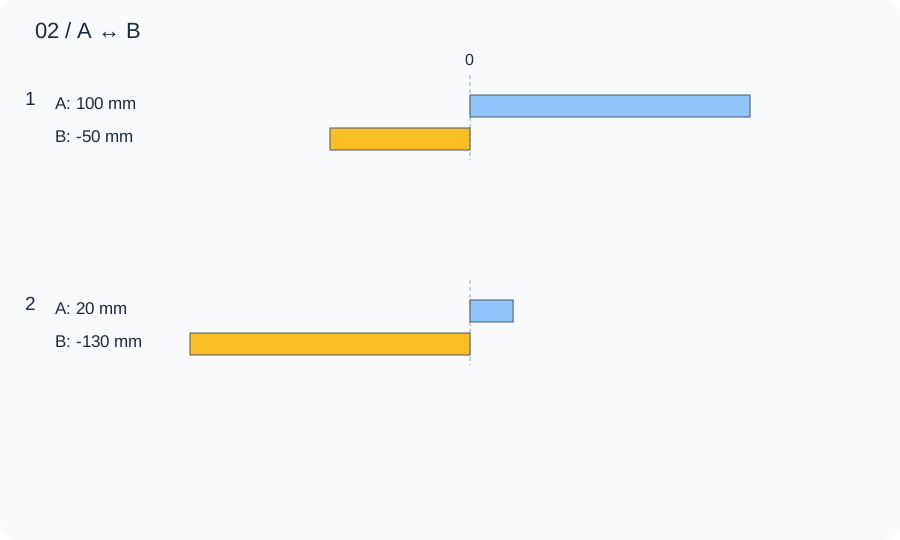
A 450 mm sideboard gives −130 mm under the same assumptions. Choose a compact brewer or a properly suitable deeper counter, accepting equipment or floor-space tradeoffs instead of allowing a hot appliance to overhang.
| Calculated relationship | A | B |
|---|---|---|
| 1. Unoccupied cross-section | 100 mm | -50 mm |
| 2. Remainder after the stated allowance | 20 mm | -130 mm |
Remove the real water tank and drip tray with the machine safely off and cool. Test two-cup preparation and cleaning separately, following the equipment instructions rather than assuming the numeric allowance guarantees service access.
TRY THE EXAMPLE
Home Coffee Bar Layout: Dimensions, Storage, Workflow
Assume a coffee bar has 600 mm usable counter depth and a 400 mm machine. Add a hypothetical 100 mm plug-and-hose envelope and 80 mm front handling allowance; these are not manufacturer ventilation values.
Allowed range: 1–10000 · Step: 1
Allowed range: 0–10000 · Step: 1
Allowed range: 0–10000 · Step: 1
Allowed range: 0–10000 · Step: 1
Positive remainder under these assumptions. Check the actual use and product requirements before choosing a layout.
- Unoccupied cross-section
- 100 mm
- Remainder after the stated allowance
- 20 mm
Reference boundary — Usable counter depth: 600 mm
Blue dashed line: comparison boundary. Red dimension: shortage.
600 − 400 − 100 − 80 = 20 mm
Remove the real water tank and drip tray with the machine safely off and cool. Test two-cup preparation and cleaning separately, following the equipment instructions rather than assuming the numeric allowance guarantees service access.
Teaching assumptions, not a surveyed home or a construction check. Results describe this simplified geometry or budget only. Changes stay on this page and reset on reload.