U-Shaped Kitchen Layout: Clearances and Work Zones
Plan a U-shaped kitchen with practical aisle widths, corner storage, appliance clearances, landing zones, lighting, and an efficient cooking workflow.
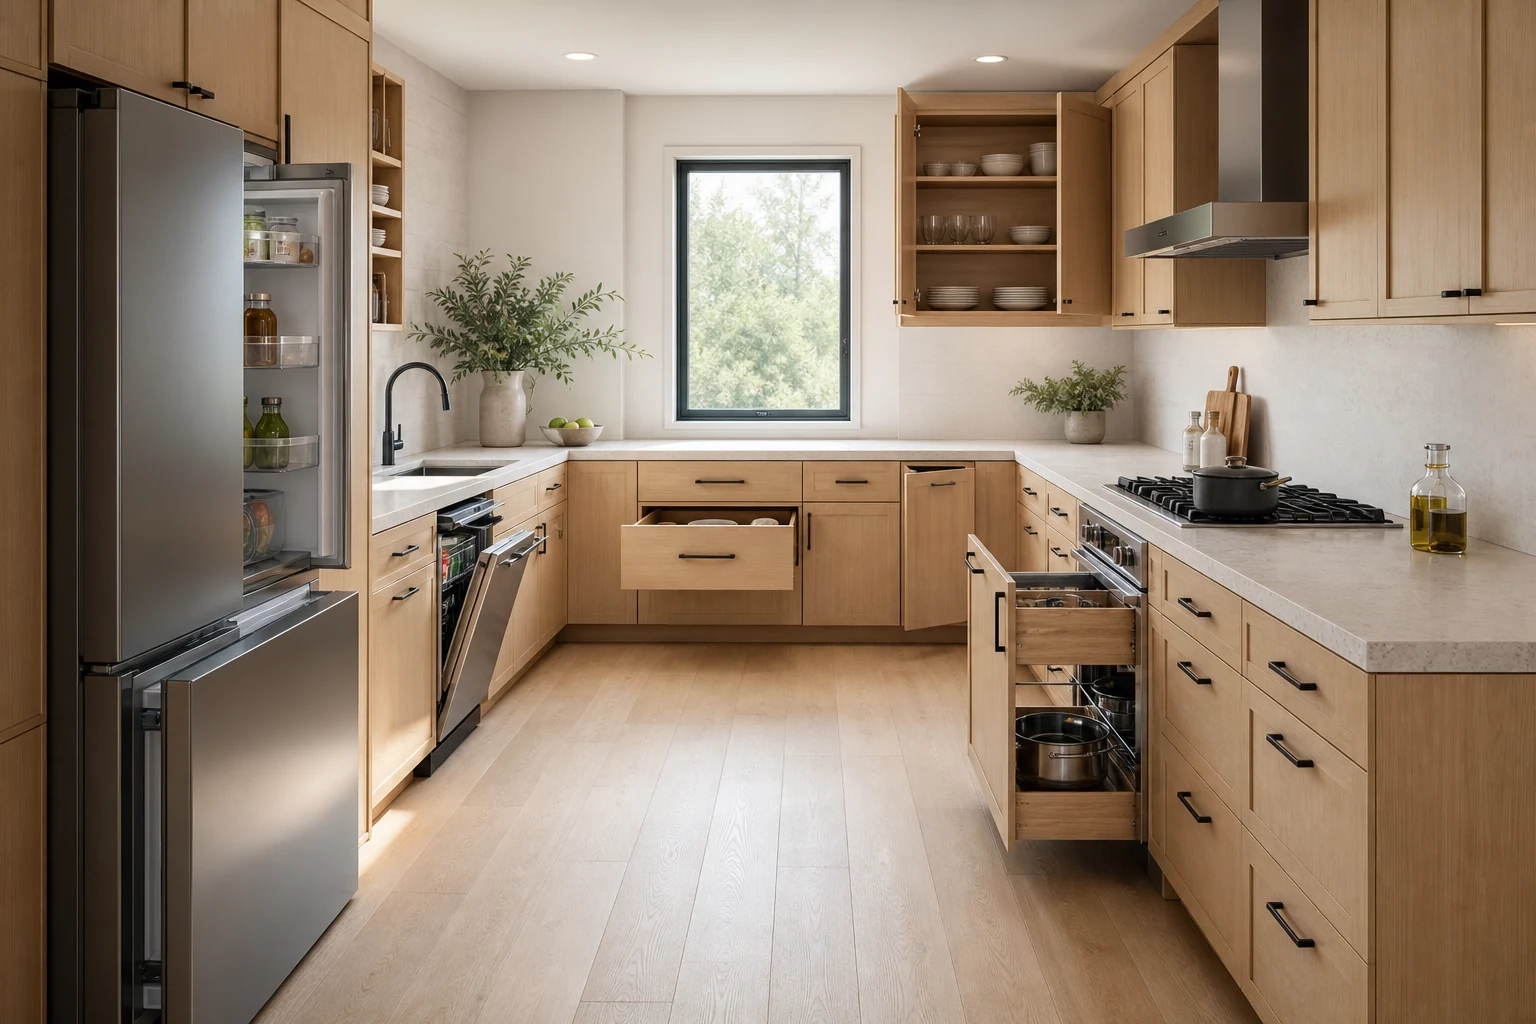
A U-shaped kitchen can put storage and work surface on three sides without adding an island, but the same enclosure that makes it efficient can also make it feel trapped. The layout succeeds when the aisle supports real bodies, open doors, hot pans, and a second person—not only cabinet outlines on an empty plan. Measure the room, choose the work sequence, and draw every moving part before ordering cabinetry.
Confirm That the Room Fits the Shape
Standard base cabinets are commonly about 60 cm deep, so opposing runs already consume roughly 120 cm before the aisle begins. A room 330 cm wide leaves about 210 cm between cabinet fronts; a room 240 cm wide leaves only about 120 cm. Wall irregularities, fillers, handles, freestanding appliances, and projecting worktops reduce the usable number. Measure at floor, counter, and wall-cabinet height because old rooms are rarely square.
The open end of the U also needs a job. It may connect to dining, form the main entry, or become a short peninsula. Do not narrow that opening simply to gain one more cabinet. If people regularly cross the kitchen to reach a garden door or utility room, a U may place through-traffic inside the cooking zone; a galley or L-shaped plan could work better.
Set the Aisle for the Number of Cooks
For one cook, roughly 105–120 cm between opposing cabinet or appliance fronts is a useful planning range. Around 120–150 cm is more comfortable for two cooks, passing behind an open dishwasher, or turning with a tray. These are design starting points, not substitutes for local code or accessibility requirements. Measure from the most projecting fixed surfaces, not from cabinet boxes hidden behind worktops and handles.
More space is not automatically better. An aisle much wider than 150 cm can turn a compact work sequence into repeated steps. Test the actual household: one person cooking alone, two people preparing dinner, a child opening the refrigerator, and someone unloading the dishwasher. Mark the tightest moment rather than averaging the whole room.
Build a Short Work Sequence
Place food storage, landing, washing, preparation, cooking, and serving in a clear order. The refrigerator needs a nearby surface for grocery bags. The sink needs drainage and preparation space. The cooktop needs heat-resistant landing on at least one side, ideally both. Keep the largest uninterrupted counter between sink and cooktop because that is where most preparation happens.
Avoid forcing the refrigerator door, dishwasher, and oven to compete at one end. In a right-handed household, a clockwise sequence may feel natural; in another room, plumbing and the dining connection may reverse it. The useful test is a complete meal, not a perfect triangle. Model the sequence in Aedifex, then count turns and crossings while making breakfast and a more complex dinner.
Treat Corners as Access Problems
Two internal corners create much of a U-shaped kitchen’s storage volume and much of its frustration. Blind corners can swallow small appliances, while rotating or pull-out mechanisms consume cabinet width and need clear door travel. Decide what the corner will store before choosing hardware. Large lightweight items used weekly may suit a carousel; heavy pans may be better in wide drawers beside the corner.
Keep handles from colliding where runs meet. A filler strip may look wasteful on plan but can be essential for opening adjacent drawers past 90 degrees. Check wall-cabinet doors too: a corner door, extractor canopy, and tall refrigerator panel can collide above the counter even when the base plan looks clean.
Draw Every Appliance Open
Show the dishwasher door flat, oven door open, refrigerator drawers extended, and pull-out pantry at full travel. Then add a person standing in front of each. An aisle that feels generous with everything closed can disappear during cleanup. Do not place an oven opposite a dishwasher if their open doors overlap, and avoid locating the main turn directly behind a hot oven door.
Confirm appliance ventilation and manufacturer clearances before finalizing panels. Integrated refrigerators may need specific hinge space and airflow. A range at the end of a run needs protection from side traffic and enough counter beside it. Put sockets where appliances are actually used without running cords across a sink or cooktop.
Decide Whether the Open End Needs Seating
A breakfast ledge can make the U sociable, but stools require knee space and pull-back room outside the working aisle. Keep seated people out of the refrigerator-to-sink route. If the room is small, a shallow overhang for one or two seats may work better than extending the run into a bulky peninsula. Compare it with a nearby table using the dining table size guide before duplicating functions.
Layer Light Across Three Runs
Three-sided cabinetry creates shadows. Use continuous under-cabinet task light where possible, plus dedicated light at the sink and cooktop. Ceiling lights alone often put the cook’s body between the fixture and the counter. Keep reflected glare off polished stone and position pendants only where they will not obstruct tall doors or sightlines.
Ventilation must match the cooktop and room, especially when the U opens into living space. Plan the duct route before upper cabinets. A recirculating hood may be the only option in some apartments, but filter access and replacement still need space.
Test the Active Layout Before Ordering
Create the room at real dimensions in the room planner. Add cabinets, worktop projections, handles, appliances, people, and open-door zones. Run five scenarios: unloading groceries, preparing a meal, draining pasta, loading the dishwasher, and letting a second person make a drink. If one door blocks the only exit or every task crosses the hot zone, revise the plan.
Use painter’s tape or cardboard boxes to mock up the narrowest section at home. This catches shoulder clearance and door conflicts that are difficult to feel on a screen. Record the final aisle at several points rather than relying on one nominal dimension.
U-Shaped Kitchen Checklist
- Measure wall width at several heights and locate plumbing, gas, ventilation, windows, and doors.
- Allow roughly 105–120 cm for one cook and 120–150 cm for two, then verify local requirements.
- Preserve uninterrupted preparation space between sink and cooktop.
- Give refrigerator, oven, and cooktop safe landing surfaces.
- Resolve both corners, including fillers, handles, and upper-door collisions.
- Draw every appliance, drawer, stool, and pantry pull-out fully open.
- Keep through-traffic and seated guests outside the hot work route.
- Test groceries, cooking, serving, and cleanup before ordering cabinets.
A good U-shaped kitchen feels compact without feeling enclosed. Start with movements and open doors, then fit storage around them. Once the active layout works, use the interior planner to compare finishes and lighting, and create an account to keep the tested version with the rest of your project.
U-Shaped Kitchen Layout: Clearances and Work Zones
The U-kitchen comparison uses the article’s 2400 mm room and two 600 mm cabinet runs. Add an independent 600 mm appliance projection and 600 mm user allocation for a cleanup state.
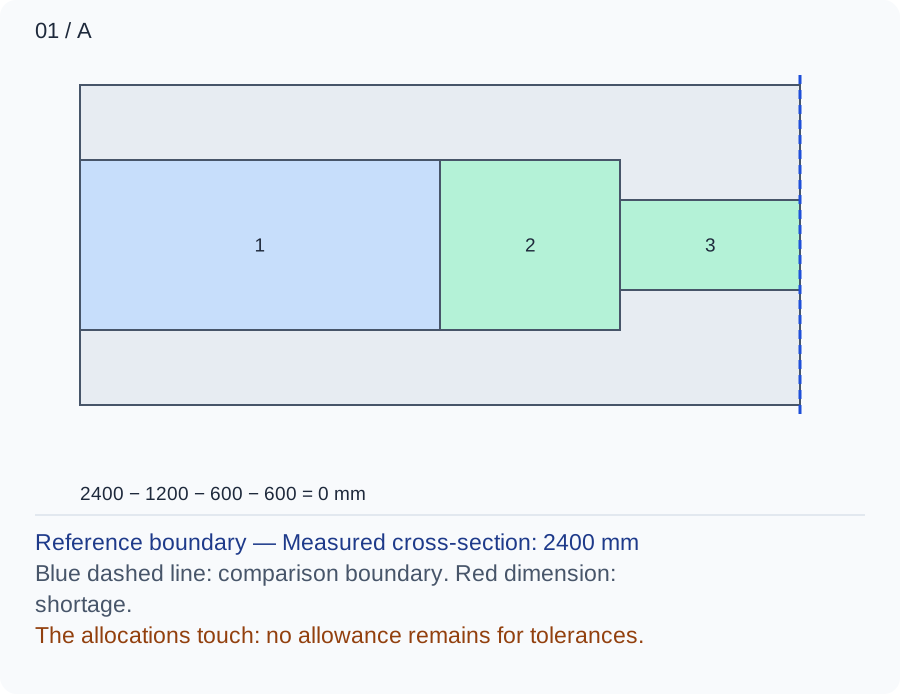
The closed aisle is 1200 mm but opening the appliance leaves 600 mm. The user consumes that remainder, so the U’s enclosure cannot be assessed from the closed shape alone.
Numbers and marks identify the items described here; use the stated dimensions rather than measuring the screen.
1: fixed occupation; 2: operating extension; 3: chosen user or route allocation. These are sequential allocations, not exact furniture positions.
| Input | A | B |
|---|---|---|
| Measured cross-section (mm) | 2400 | 3300 |
| Combined fixed occupation (mm) | 1200 | 1200 |
| Operating projection (mm) | 600 | 600 |
| Chosen user or route allowance (mm) | 600 | 600 |
Changed conditions and evidence
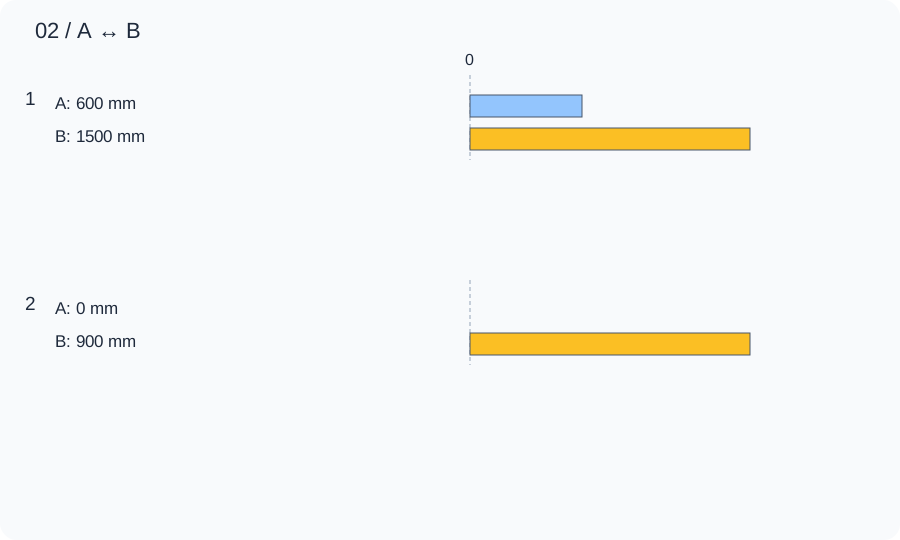
The article’s wider 3300 mm shell adds 900 mm to the balance with identical cabinets. This improves this section but spreads opposing work areas farther apart, and the open end still needs its own check.
| Calculated relationship | A | B |
|---|---|---|
| 1. Unoccupied cross-section | 600 mm | 1500 mm |
| 2. Remainder after the stated allowance | 0 mm | 900 mm |
Mark both corner fillers, handles and full appliance openings before rehearsing groceries and cleanup. Use the actual narrowest finished section; the larger shell does not resolve corner hardware or service constraints.
TRY THE EXAMPLE
U-Shaped Kitchen Layout: Clearances and Work Zones
The U-kitchen comparison uses the article’s 2400 mm room and two 600 mm cabinet runs. Add an independent 600 mm appliance projection and 600 mm user allocation for a cleanup state.
Allowed range: 1–12000 · Step: 1
Allowed range: 0–12000 · Step: 1
Allowed range: 0–12000 · Step: 1
Allowed range: 0–12000 · Step: 1
A remainder is zero: the selected allocations touch. This does not include tolerances or confirm usability.
- Unoccupied cross-section
- 600 mm
- Remainder after the stated allowance
- 0 mm
Reference boundary — Measured cross-section: 2400 mm
Blue dashed line: comparison boundary. Red dimension: shortage.
The allocations touch: no allowance remains for tolerances.
2400 − 1200 − 600 − 600 = 0 mm
Mark both corner fillers, handles and full appliance openings before rehearsing groceries and cleanup. Use the actual narrowest finished section; the larger shell does not resolve corner hardware or service constraints.
Teaching assumptions, not a surveyed home or a construction check. Results describe this simplified geometry or budget only. Changes stay on this page and reset on reload.